Love this? Save it for later!
Share the inspiration with your friends
My husband had claimed to hate green bean casserole for seventeen years. Seventeen years of holiday dinners where I’d watch him load up his plate with turkey and mashed potatoes, carefully steering clear of the baking dish everyone else was reaching for. Then last Christmas, I made this version ‘just for the kids’ and found him standing over the stove at 11 PM, eating straight from the serving spoon he’d grabbed from the sink. He didn’t even bother with a bowl, you know? Just stood there in his pajama pants, caught red-handed, with a guilty look that said everything.
Honestly, I wasn’t trying to convert him. The whole thing started because my youngest, Leo, kept asking for “the crunchy green beans” he’d had at a friend’s house. I figured I’d make a batch, keep it simple, and not make a big deal about it. The original recipe my mother-in-law made was fine—canned soup, canned beans, those fried onions from a can—but it always felt a little… sad. The green beans turned mushy, the sauce was gluey, and let’s face it, kids usually pushed it around their plates. I wanted something they’d actually eat. Something that would make them ask for seconds before the turkey even made it to the table.
So I started experimenting. I swapped the canned soup for a homemade cream sauce that felt rich but not heavy. I used fresh green beans instead of canned, blanched just long enough to stay bright and snappy. And I made my own crispy onion topping because, let me tell you, the smell alone is worth the extra ten minutes. The first time I served it, Leo ate three helpings. His sister Clara, who usually eats like a bird, asked for the recipe. And my husband? Well, he’s already texted me to make sure I’m bringing it to his parents’ house for Christmas this year. Funny how that works.
Why You’ll Love This Recipe
This isn’t your grandma’s green bean casserole—though I promise she’ll still approve. This is the version that disappears first from the holiday table, the one that gets asked for by name at family gatherings, the dish that turns vegetable skeptics into believers. Here is why this recipe works so well for families:
- Quick & Easy: From start to finish, this comes together in about 45 minutes. The hands-on time is even less—maybe 20 minutes of actual work, then the oven does the rest. Perfect for Christmas morning when you’re already juggling presents, wrapping paper, and a million other things.
- Simple Ingredients: No canned soup, no mystery ingredients, nothing that requires a special trip to a fancy grocery store. You probably already have most of this in your pantry. Fresh green beans, butter, mushrooms, cream, and onions—that’s the heart of it.
- Perfect for Christmas: This dish looks gorgeous on a holiday table. The bright green beans against the creamy sauce, topped with golden, crispy onions—it’s festive without trying too hard. Plus, it travels well if you’re bringing it to someone else’s house.
- Crowd-Pleaser: Kids love the crunchy topping. Adults love the creamy, savory sauce. Even the picky eaters in your family will go back for seconds. I’ve tested this on my own kids, their friends, and a room full of skeptical in-laws. It passed every test.
- Unbelievably Delicious: The texture is what gets people. The green beans stay crisp-tender, the sauce is silky and rich, and the topping has that perfect crunch that makes you close your eyes after the first bite. It is comfort food at its finest.
What makes this recipe different from the rest is the technique. Blanching the green beans keeps them from turning into mush. Making the sauce from scratch lets you control the thickness and flavor. And the homemade onion topping? It stays crunchy even the next day—something the canned version never manages. This isn’t just another green bean casserole. It is the one you will make every year from now on.
What Ingredients You Will Need
This recipe uses simple, wholesome ingredients that come together to create something truly special. Most of these are pantry staples, especially around the holidays, so you likely already have everything you need.
- Fresh green beans (1 ½ pounds, trimmed and cut into 2-inch pieces) — Fresh is non-negotiable here. Canned green beans turn mushy and lose that satisfying snap. Look for beans that are bright green and firm, with no brown spots. I buy mine a day or two before Christmas and store them in the crisper drawer.
- Unsalted butter (4 tablespoons, divided) — Using unsalted butter lets you control the salt level in the dish. I use Kerrygold when I want a richer flavor, but any good quality butter works fine.
- Cremini mushrooms (8 ounces, sliced) — These have more flavor than white button mushrooms. They add an earthy, savory depth to the sauce that kids somehow never complain about. Just slice them thin so they cook evenly.
- Yellow onion (1 medium, finely chopped) — The base of the sauce. Don’t skip this—it adds sweetness and complexity.
- All-purpose flour (3 tablespoons) — This thickens the sauce. No need for anything fancy here.
- Whole milk (1 cup) — Whole milk gives the creamiest results, but 2% works in a pinch. I wouldn’t go lower than that or the sauce might be too thin.
- Heavy cream (½ cup) — This is what makes the sauce luxuriously rich. You can substitute half-and-half if you want something lighter, but the texture won’t be quite as silky.
- Chicken or vegetable broth (½ cup) — Low-sodium is best so you can control the salt. I use chicken broth for more flavor, but vegetable broth works beautifully for a vegetarian version.
- Garlic (3 cloves, minced) — Fresh garlic only. The jarred stuff has a different flavor that doesn’t work as well here.
- Salt and black pepper (to taste) — Simple seasonings that let the other flavors shine.
- Fresh thyme (1 teaspoon, chopped) — Optional, but it adds a lovely earthy note that complements the mushrooms. I use it when I have it; dried thyme works too (use ½ teaspoon).
- For the topping:
- Yellow onions (2 medium, thinly sliced into rings) — You want them thin so they crisp up evenly. A mandoline makes this easy, but a sharp knife works fine.
- Buttermilk (½ cup) — This helps the flour coating stick and adds a slight tang that balances the richness of the casserole.
- All-purpose flour (½ cup) — For coating the onions before frying.
- Salt and paprika (½ teaspoon each) — Paprika adds color and a subtle smoky flavor.
- Vegetable or canola oil (for frying) — Enough to fill a small pot with about 2 inches of oil.
One note on the onions: I’ve tried using pre-made fried onions from the store, and honestly, they just don’t compare. The homemade version stays crunchy longer and has a much better flavor. If you are short on time, you can use the canned ones, but I promise the extra 15 minutes for homemade is worth it.
Equipment Needed
You don’t need any fancy equipment for this recipe, which is part of what makes it so approachable. Here is what you will need:
- Large pot (for blanching the green beans) — Any pot that can hold a few quarts of water works. I use my 6-quart stockpot.
- Large skillet or sauté pan (for making the sauce) — A 12-inch skillet gives you plenty of room to cook the mushrooms and build the sauce. A non-stick or stainless steel pan both work well.
- Small pot or deep saucepan (for frying the onions) — You want something deep enough to hold 2 inches of oil safely. A 2-quart saucepan is perfect.
- Baking dish (9×13-inch or similar) — A 2-quart casserole dish works too. Glass or ceramic both work; just adjust the baking time slightly if using glass (it heats faster).
- Slotted spoon or spider strainer — For removing the fried onions from the oil. A slotted spoon works fine; a spider strainer is even better because it lets the oil drain quickly.
- Paper towels — For draining the fried onions. Trust me, you’ll need a whole stack.
- Cutting board and sharp knife — For trimming the green beans and slicing the onions. A sharp knife makes this job so much easier.
- Measuring cups and spoons — Standard set. Nothing special here.
- Wooden spoon or spatula — For stirring the sauce. Wooden spoons are my favorite because they don’t scratch the pan.
If you don’t have a deep saucepan for frying, a regular pot works—just be careful not to fill it more than halfway with oil. And if you don’t have a 9×13 dish, you can use two smaller dishes or even a cast-iron skillet. I’ve made this in a 10-inch cast iron before and it turned out beautifully.
Preparation Method
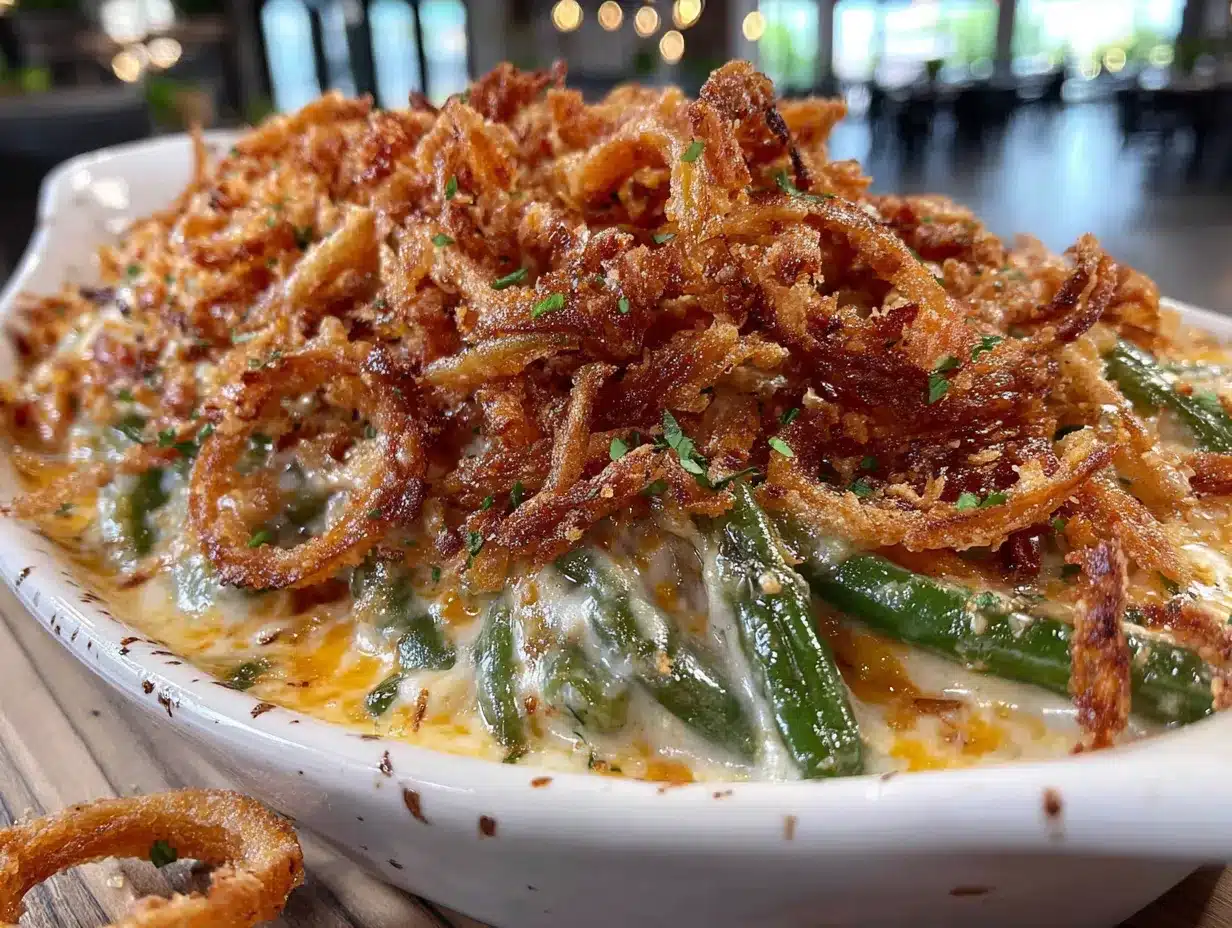
Let me walk you through this step by step. I’ve made this recipe more times than I can count, and I’ve learned a few tricks along the way that make it foolproof.
- Preheat your oven to 375°F (190°C). Get this going first so it’s ready when you need it. While the oven heats, bring a large pot of salted water to a boil. You want it rolling—not just simmering.
- Blanch the green beans. Drop the trimmed green beans into the boiling water and cook for exactly 3 minutes. Set a timer—don’t guess. You want them bright green and just tender, not soft. While they cook, fill a large bowl with ice water. After 3 minutes, use a slotted spoon or tongs to transfer the beans to the ice water. This stops the cooking immediately and locks in that beautiful color. Let them sit in the ice water for 2-3 minutes, then drain well and set aside.
- Make the crispy onion topping. While the beans are blanching, start the onions. In a shallow bowl, whisk together the buttermilk and a pinch of salt. In another bowl, combine the flour, salt, and paprika. Dip the onion slices in the buttermilk, letting the excess drip off, then coat them in the flour mixture. Shake off any excess flour. Heat about 2 inches of oil in a small pot to 350°F (175°C). If you don’t have a thermometer, drop a pinch of flour in—if it sizzles immediately, you’re ready. Fry the onions in batches, being careful not to crowd the pot. Cook for 2-3 minutes, stirring occasionally, until golden brown and crispy. Transfer to a paper towel-lined plate and sprinkle with a little salt while they’re still hot. Set aside.
- Sauté the mushrooms. In a large skillet, melt 2 tablespoons of butter over medium-high heat. Add the sliced mushrooms and cook without stirring for 2-3 minutes—this lets them get a nice golden sear. Then stir and continue cooking until they release their liquid and it evaporates, about 5 minutes total. Add the minced garlic and cook for 30 seconds until fragrant. Transfer the mushrooms to a plate and set aside.
- Build the cream sauce. In the same skillet, melt the remaining 2 tablespoons of butter over medium heat. Add the chopped onion and cook, stirring occasionally, until softened and translucent, about 4-5 minutes. Sprinkle the flour over the onions and stir constantly for 1 minute—this cooks out the raw flour taste. Slowly pour in the milk, heavy cream, and broth, whisking continuously to prevent lumps. Bring to a simmer and cook for 3-4 minutes, stirring often, until the sauce thickens enough to coat the back of a spoon. Season with salt, pepper, and thyme if using.
- Combine everything. Add the blanched green beans and cooked mushrooms to the sauce. Stir gently until everything is well coated. Taste and adjust seasoning—this is your last chance to get it right. Transfer the mixture to your greased 9×13 baking dish and spread it into an even layer.
- Bake. Place the dish in the preheated oven and bake for 20 minutes, until the sauce is bubbly around the edges and the casserole is heated through. Remove from the oven and let it rest for 5 minutes.
- Top and serve. Just before serving, scatter the crispy fried onions over the top. Don’t put them on before baking or they’ll get soggy—this is the trick that keeps them crunchy. Serve immediately while everything is hot and the topping is still crisp.
One thing I learned the hard way: don’t skip the resting step. The casserole needs those 5 minutes to set up so the sauce doesn’t run all over the plate. I made that mistake the first time and ended up with a puddle of creamy sauce instead of a cohesive dish. Still tasted good, but it wasn’t pretty.
Cooking Tips & Techniques
Over the years, I’ve made every mistake in the book with this recipe. Here are the lessons I’ve learned so you don’t have to make them yourself.
Don’t overcook the green beans. Three minutes in boiling water is plenty. I know it feels like they’re still crunchy, but they’ll continue cooking in the oven. If you blanch them until they’re fully tender, they’ll turn to mush after baking. Trust the process. The first time I made this, I blanched them for 6 minutes because I was distracted by the kids. The result was a sad, limp casserole that nobody wanted to eat.
Use a thermometer for the oil. If you’re frying the onions, a thermometer is your best friend. Oil that’s too hot will burn the outside while leaving the inside raw. Oil that’s not hot enough will make the onions greasy and sad. 350°F is the sweet spot. If you don’t have a thermometer, test with a small piece of onion first. It should sizzle immediately and float to the top.
Make the sauce smooth. The key to a lump-free sauce is adding the liquid slowly while whisking constantly. Pour it in a thin stream, not all at once. If you do get lumps, don’t panic—just whisk vigorously and they’ll usually break up. If they don’t, you can strain the sauce through a fine-mesh sieve before adding the beans.
Multitask wisely. While the green beans are blanching, start the onions. While the onions are frying, make the sauce. This recipe is designed so you can do multiple things at once without feeling overwhelmed. Just make sure you have everything prepped and measured before you start cooking. I learned this the hard way when I was scrambling to mince garlic while the mushrooms were burning.
Keep the topping separate. This is the most important tip in this entire post. Do not put the fried onions on the casserole before baking. They will get soft and lose that wonderful crunch. Add them right before serving, and if you have leftovers, store the topping separately and add it when you reheat. This one change transformed my green bean casserole from good to unforgettable.
Variations & Adaptations
One of the best things about this recipe is how adaptable it is. Here are some ways to make it your own:
Dairy-Free Version: Swap the butter for a plant-based butter (I like Miyoko’s), use unsweetened oat milk or cashew milk instead of whole milk, and replace the heavy cream with full-fat coconut cream. The flavor changes slightly, but it’s still creamy and delicious. I made this for a friend with a dairy allergy and she said it was the best green bean casserole she’d ever had.
Gluten-Free Version: Use a gluten-free all-purpose flour blend for the sauce and the onion coating. I’ve had good luck with Bob’s Red Mill 1-to-1 Baking Flour. Just make sure the blend contains xanthan gum for proper thickening. The texture is slightly different, but still very good.
Add Bacon: Because everything is better with bacon. Cook 4-5 slices of bacon until crispy, crumble them, and sprinkle over the finished casserole along with the fried onions. The smoky, salty flavor pairs beautifully with the creamy sauce. My husband insists this is the only way to make it now.
Make It Ahead: Assemble the casserole (without the topping) up to 2 days in advance. Cover and refrigerate. When you’re ready to bake, add 10 minutes to the baking time since you’re starting from cold. Make the fried onions fresh on the day you serve them—they don’t hold up well if made ahead.
Add Cheese: Stir in ½ cup of shredded Gruyère or sharp cheddar cheese to the sauce just before adding the green beans. It adds a lovely richness and a subtle tang. I tried this one Christmas when I had extra cheese in the fridge, and it was a huge hit.
Use Frozen Green Beans: In a pinch, you can use frozen green beans instead of fresh. Thaw them first, pat them dry, and skip the blanching step. Just toss them directly into the sauce. The texture won’t be quite as crisp, but it’s still a solid option for busy weeknights.
Serving & Storage Suggestions
This casserole is best served hot, straight from the oven, with the crispy onions still crunchy. I like to bring the whole baking dish to the table and let everyone serve themselves. It looks so festive with the golden topping peeking out from under the onions.
What to serve with it: This is a classic holiday side dish, so it pairs beautifully with roasted turkey, mashed potatoes, and cranberry sauce. But honestly, it goes with just about anything. I’ve served it alongside roast chicken, pork chops, and even a simple weeknight steak. The creamy, savory flavor complements most main dishes.
Storage: Leftovers keep well in the refrigerator for 3-4 days. Store them in an airtight container, but keep the fried onions separate if possible. The casserole itself will get softer over time, but the flavor actually improves as it sits.
Reheating: The best way to reheat is in the oven at 350°F for 15-20 minutes, covered with foil to prevent drying out. If you stored the onions separately, sprinkle them on top for the last 5 minutes. In a hurry? The microwave works too—just know the onions will be soft. I’ve been known to eat the leftovers cold, straight from the fridge, and I’m not ashamed to admit it.
Freezing: You can freeze the assembled casserole (without the topping) for up to 3 months. Thaw overnight in the refrigerator, then bake as directed. Make the fried onions fresh when you’re ready to serve. I’ve done this for Christmas prep and it works beautifully.
One thing I love about this recipe is how the flavors develop over time. The second day, the sauce has soaked into the green beans just a little more, and everything tastes even more cohesive. If you can resist eating it all the first night, the leftovers are a real treat.
Nutritional Information & Benefits
Let’s be real—this is a holiday dish, not a health food. But it does have some redeeming qualities. Green beans are packed with vitamins A, C, and K, plus fiber and folate. Mushrooms are a good source of B vitamins and selenium. And the homemade sauce means you’re controlling the ingredients, not relying on processed soup with its preservatives and excess sodium.
Here are the approximate nutritional values per serving (based on 8 servings):
- Calories: 280
- Total Fat: 18g
- Saturated Fat: 9g
- Cholesterol: 45mg
- Sodium: 420mg
- Total Carbohydrates: 24g
- Dietary Fiber: 4g
- Sugars: 8g
- Protein: 7g
If you’re watching your sodium, use low-sodium broth and go easy on the salt. You can also swap the heavy cream for half-and-half to cut some fat and calories. But honestly? Christmas is one day a year. I say make it the way you love it and enjoy every bite.
This recipe contains dairy and gluten. For allergen-friendly versions, see the variations section above.
Conclusion
This green bean casserole has become a non-negotiable part of our Christmas dinner. It’s the dish that my kids ask for weeks in advance, the one that makes my husband sneak bites before dinner is served, the recipe that turned a holiday skeptic into a true believer. And honestly? That’s what cooking is all about—finding those recipes that bring people together, that make them smile, that create memories around the table.
I hope you’ll give this version a try. Don’t be intimidated by the homemade sauce or the fried onions—they’re easier than you think, and the payoff is huge. And if your family is anything like mine, you might just convert a few green bean casserole skeptics of your own.
I’d love to hear how it turns out for you. Did your kids love it? Did your husband get caught eating it straight from the dish? Drop a comment below and let me know. And if you have your own twist on this recipe, share that too—I’m always looking for new ideas to try.
Happy cooking, and Merry Christmas from my family to yours.
Frequently Asked Questions
Can I use canned green beans instead of fresh?
You can, but I really don’t recommend it. Canned green beans are already cooked, so they’ll turn mushy in the oven. The texture just isn’t the same. If you’re in a pinch, frozen green beans are a much better option—just thaw and pat them dry before using.
Can I make the fried onions ahead of time?
You can make them a few hours ahead, but they’re best fresh. If you need to prep in advance, store them in an airtight container at room temperature for up to 4 hours. Don’t refrigerate them—they’ll get soft. I’ve tried making them the day before, and they were never as good.
How do I keep the topping crunchy?
The secret is adding the fried onions right before serving. Don’t bake them on top of the casserole. If you have leftovers, store the topping separately and add it when you reheat. This one trick makes all the difference.
Can I double this recipe for a crowd?
Absolutely. Just double all the ingredients and use a larger baking dish or two 9×13 dishes. You might need to add a few minutes to the baking time. I’ve made a triple batch for our extended family Christmas and it worked perfectly.
What if my sauce is too thin?
If your sauce hasn’t thickened after simmering for 4-5 minutes, mix 1 tablespoon of cornstarch with 2 tablespoons of cold water to make a slurry. Stir it into the sauce and cook for another minute—it should thicken right up. This happened to me once when I used 2% milk instead of whole milk, and the slurry saved the day.
Pin This Recipe!

Best Kid-Approved Christmas Green Bean Casserole Recipe
This homemade green bean casserole features fresh green beans, a creamy from-scratch sauce, and crispy fried onions. It’s the holiday side dish that converts even the biggest skeptics into believers.
- Prep Time: 20 minutes
- Cook Time: 25 minutes
- Total Time: 45 minutes
- Yield: 8 servings 1x
- Category: Side Dish
- Cuisine: American
Ingredients
- 1 ½ pounds fresh green beans, trimmed and cut into 2-inch pieces
- 4 tablespoons unsalted butter, divided
- 8 ounces cremini mushrooms, sliced
- 1 medium yellow onion, finely chopped
- 3 tablespoons all-purpose flour
- 1 cup whole milk
- ½ cup heavy cream
- ½ cup low-sodium chicken or vegetable broth
- 3 cloves garlic, minced
- Salt and black pepper to taste
- 1 teaspoon fresh thyme, chopped (or ½ teaspoon dried)
- For the topping:
- 2 medium yellow onions, thinly sliced into rings
- ½ cup buttermilk
- ½ cup all-purpose flour
- ½ teaspoon salt
- ½ teaspoon paprika
- Vegetable or canola oil for frying
Instructions
- Preheat oven to 375°F (190°C). Bring a large pot of salted water to a boil.
- Blanch the green beans: Drop trimmed beans into boiling water and cook for exactly 3 minutes. Transfer to a bowl of ice water to stop cooking. Drain and set aside.
- Make the crispy onion topping: In a shallow bowl, whisk buttermilk with a pinch of salt. In another bowl, combine flour, salt, and paprika. Dip onion slices in buttermilk, then coat in flour mixture. Heat 2 inches of oil in a small pot to 350°F (175°C). Fry onions in batches for 2-3 minutes until golden and crispy. Drain on paper towels and season with salt.
- Sauté mushrooms: In a large skillet, melt 2 tablespoons butter over medium-high heat. Add mushrooms and cook without stirring for 2-3 minutes, then stir and cook until liquid evaporates, about 5 minutes total. Add garlic and cook 30 seconds. Transfer to a plate.
- Build the cream sauce: In the same skillet, melt remaining 2 tablespoons butter over medium heat. Add chopped onion and cook until softened, 4-5 minutes. Sprinkle flour over onions and stir constantly for 1 minute. Slowly pour in milk, heavy cream, and broth, whisking continuously. Bring to a simmer and cook 3-4 minutes until thickened. Season with salt, pepper, and thyme.
- Combine: Add blanched green beans and cooked mushrooms to the sauce. Stir gently to coat. Transfer to a greased 9×13-inch baking dish.
- Bake for 20 minutes until bubbly around edges. Let rest for 5 minutes.
- Top with crispy fried onions just before serving. Serve immediately.
Notes
Don’t put the fried onions on before baking or they’ll get soggy. Add them right before serving. For make-ahead, assemble casserole without topping up to 2 days in advance and refrigerate; add 10 minutes to baking time. Store leftover topping separately to maintain crunch.
Nutrition
- Serving Size: 1 serving
- Calories: 280
- Sugar: 8
- Sodium: 420
- Fat: 18
- Saturated Fat: 9
- Carbohydrates: 24
- Fiber: 4
- Protein: 7
Keywords: green bean casserole, Christmas side dish, holiday recipe, homemade green bean casserole, crispy onion topping, kid-friendly, Thanksgiving side dish



