Love this? Save it for later!
Share the inspiration with your friends
Last Tuesday, I got the text that sends a chill down every unprepared host’s spine: “Hey, party’s in three hours. Can you bring an appetizer?” Three hours. I had a block of cream cheese, a packet of ranch seasoning, some bacon I’d been saving for a lazy breakfast, and a half-bag of shredded cheddar. Everyone else would be bringing those fancy, multi-layered dips with the homemade caramelized onions and the artisanal crackers they’d probably made from scratch. I was staring at my sad little collection of ingredients, feeling that familiar wave of panic.
Honestly, I almost just grabbed a bag of chips and called it a day. But then I remembered this old trick my neighbor, a woman who can whip up a feast from thin air, once told me. “Just roll with it,” she’d said, handing me a cheese ball at a block party years ago. So, I took a deep breath, threw everything into a bowl, and started mixing. I didn’t have time to overthink it. I just needed something that tasted good and looked like I’d tried, even if I hadn’t.
The thing is, I was so focused on the clock that I forgot to chill the mixture properly. I ended up shaping it into a slightly lopsided, warm-ish ball, then frantically rolling it in bacon bits and hoping for the best. It was a mess. But you know that feeling when you just have to go with it? That was this cheese ball. I brought it to the party, set it down next to a gorgeous, towering spinach dip, and waited for the inevitable comparison. But then, the first person tried it. Then another. And another. That clumsy, last-minute cheese ball was the first thing to disappear. It wasn’t meant to be a showstopper, but honestly, it just was.
Why You’ll Love This Recipe
This isn’t just another appetizer recipe—it’s the one you’ll turn to again and again. I’ve tested this combination more times than I can count, tweaking the ratios until it was just right. It’s the kind of recipe that feels like a secret weapon in your back pocket, ready for any occasion that demands something delicious without the stress.
- Quick & Easy: Comes together in under 15 minutes of active prep time. Perfect for those “I need something now” moments.
- Simple Ingredients: You probably have most of these in your fridge and pantry right now. No fancy grocery store trips required.
- Perfect for Parties: This is the ultimate crowd-pleaser for game days, holiday gatherings, or casual get-togethers.
- Crowd-Pleaser: I’ve yet to meet someone who doesn’t go back for seconds. It’s that addictive combination of creamy, salty, and savory.
- Unbelievably Delicious: The texture is perfectly smooth and spreadable, and the flavor is next-level comfort food. It’s the kind of appetizer that makes you close your eyes after the first bite.
What makes this cheese ball different from the rest? It’s the perfect balance of tangy ranch, smoky bacon, and rich cream cheese. I’ve seen versions that are too salty or too heavy, but this one hits that sweet spot. Plus, the addition of green onions adds a fresh pop that cuts through the richness. This isn’t just another version—it’s my best version, and it’s the one that always gets asked for by name.
This recipe is more than just food. It’s the kind that makes you feel like you’ve got it all together, even when you’re running on fumes. It’s comfort food, pure and simple—creamy, savory, and so satisfying. Perfect for impressing guests without breaking a sweat, or turning a simple snack into something memorable. You deserve a recipe that delivers every single time, and this one does.
What Ingredients You Will Need
This recipe uses simple, wholesome ingredients to deliver that bold, savory flavor and satisfying creamy texture without any fuss. You’ll find that most of these are pantry or fridge staples, making this a go-to recipe for any last-minute entertaining.
- For the Cheese Ball Base:
- 16 ounces (450g) cream cheese, softened (I recommend Philadelphia for the smoothest texture)
- 1 packet (1 ounce or 28g) dry ranch seasoning mix (Hidden Valley is my go-to)
- 1 cup (120g) sharp cheddar cheese, shredded (shred your own from a block for the best melt and flavor)
- 1/2 cup (50g) cooked bacon, crumbled (about 8 slices)
- 1/4 cup (25g) green onions, thinly sliced (both white and green parts)
- For the Coating:
- 1/2 cup (50g) cooked bacon, crumbled (about 8 slices, for rolling)
- 1/4 cup (25g) fresh parsley, finely chopped (optional, for color)
- 1/4 cup (30g) pecans or walnuts, finely chopped (optional, for crunch)
Ingredient Selection Tips: For the best texture, make sure your cream cheese is truly at room temperature. If it’s too cold, your mixture will be lumpy. I like to let mine sit out for at least 30 minutes. For the bacon, I prefer thick-cut, as it gives a more substantial crunch. You can use pre-cooked bacon bits in a pinch, but freshly cooked and crumbled bacon really does make a difference in flavor. Look for a sharp cheddar for a more pronounced cheese taste. A mild cheddar will work, but it won’t have the same punch.
Substitution Guidance: For a lighter version, you can use reduced-fat cream cheese, though the texture will be slightly less rich. If you’re not a fan of ranch, you can substitute with a dry Italian dressing mix for a different flavor profile. For a nut-free coating, simply omit the pecans or walnuts and use extra bacon and parsley. You can also use cooked and crumbled turkey bacon for a lower-fat option, though it will be less crispy.
Equipment Needed
You don’t need any fancy gadgets for this recipe. It’s all about keeping things simple and stress-free. Here’s what you’ll need to get the job done.
- Large Mixing Bowl: A standard-sized bowl is perfect for combining all the ingredients. I use a glass or ceramic bowl.
- Electric Hand Mixer or Stand Mixer: While you can mix by hand with a sturdy spatula, a mixer makes the process much faster and ensures a perfectly smooth and creamy base. I’ve done both, and the mixer is a lifesaver when the cream cheese is still a bit cold.
- Rubber Spatula: Essential for scraping down the sides of the bowl and getting every last bit of the delicious mixture.
- Plastic Wrap: This is key for shaping the cheese ball and keeping it tidy while it chills. A good, strong wrap is your best friend here.
- Baking Sheet or Small Plate: For holding the coating ingredients and for rolling the cheese ball. A rimmed baking sheet is ideal to catch any stray crumbs.
- Sharp Knife and Cutting Board: For chopping the green onions and parsley, and for crumbling the bacon.
If you don’t have a hand mixer, don’t worry. You can absolutely mix everything by hand. Just make sure your cream cheese is very soft. It will take a bit more elbow grease, but it works perfectly fine. For the coating, a shallow dish or pie plate works great for holding the bacon bits and nuts.
Preparation Method
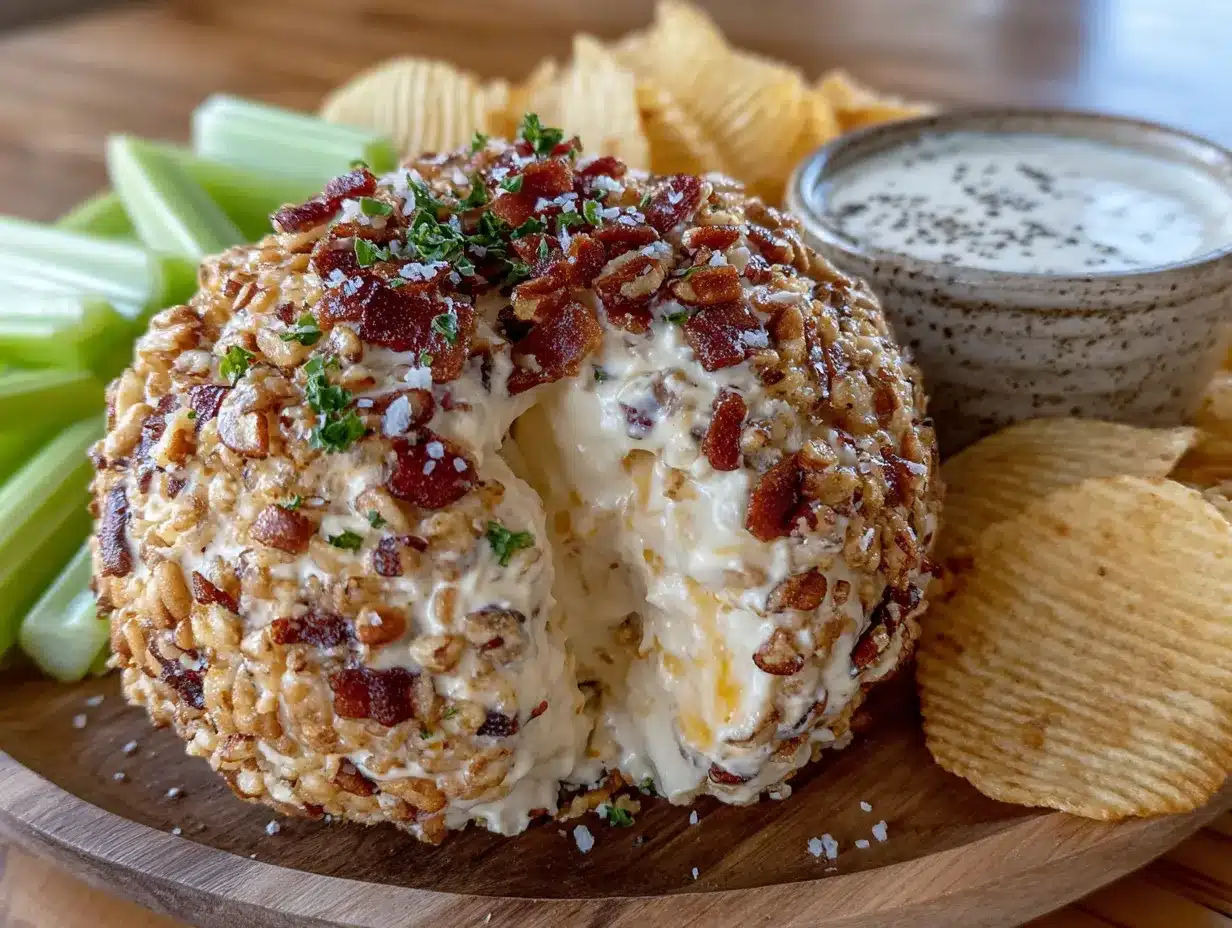
Let’s get to the fun part! This recipe is so simple, you’ll be amazed at the results. Follow these steps, and you’ll have a beautiful, delicious cheese ball ready for any occasion.
- Prepare Your Ingredients: First, make sure your cream cheese is softened. Take it out of the fridge at least 30 minutes before you start. While you wait, cook your bacon until it’s nice and crispy. I like to bake mine in the oven at 400°F (200°C) for about 15-18 minutes. Let it cool, then crumble it into small pieces. You’ll need about 1 cup total for the recipe (1/2 cup for the base, 1/2 cup for the coating). Finely chop your green onions and parsley.
- Mix the Base: In your large mixing bowl, add the softened cream cheese and the dry ranch seasoning mix. Using your hand mixer on medium speed, beat them together until the mixture is smooth and completely combined. This should take about 2 minutes. You want a light, airy texture, so don’t overmix.
- Add the Cheese and Mix-ins: Add the shredded cheddar cheese, 1/2 cup of the crumbled bacon, and the sliced green onions to the cream cheese mixture. Switch to a rubber spatula and fold everything together until it’s evenly distributed. Make sure there are no streaks of cream cheese left. The mixture will be thick and a little sticky—that’s perfect.
- Shape the Cheese Ball: Lay out a large piece of plastic wrap on your counter. Using your spatula, scrape the cheese mixture onto the center of the plastic wrap. Gather the edges of the plastic wrap and twist them together, using the wrap to help you shape the mixture into a tight ball. You can also use your hands to gently press and shape it through the plastic wrap. Don’t worry if it’s not perfectly round at this point.
- Chill the Ball: Wrap the plastic wrap tightly around the cheese ball and place it in the refrigerator. Let it chill for at least 2 hours, or up to overnight. This step is crucial. It allows the flavors to meld together and firms up the mixture so it’s easy to handle and coat. If you skip this, your cheese ball will be too soft to roll in the coating.
- Prepare the Coating: About 15 minutes before you’re ready to serve, take the chilled cheese ball out of the fridge. On a small plate or baking sheet, combine the remaining 1/2 cup of crumbled bacon, the chopped parsley (if using), and the finely chopped pecans or walnuts (if using). Mix them together with your fingers.
- Coat the Cheese Ball: Unwrap the chilled cheese ball and place it in the center of the coating mixture. Gently press the coating all over the ball, making sure it’s evenly covered. You can use your hands to gently pat the coating onto any bare spots. Don’t be afraid to get in there—it’s the best part!
- Serve and Enjoy: Transfer the coated cheese ball to a serving platter. Let it sit at room temperature for about 15-20 minutes to soften slightly before serving. This makes it easier to spread. Serve with your favorite crackers, crostini, or fresh veggie sticks.
Cooking Tips & Techniques
Over the years, I’ve made this cheese ball more times than I can count, and I’ve learned a few things the hard way. Here are my best tips to make sure yours turns out perfectly every single time.
The Room Temperature Rule is Real: I cannot stress this enough. If your cream cheese is cold, you’ll end up with a lumpy, uneven mixture. It’s the number one mistake people make. Set it out on the counter for at least 30 minutes. If you’re in a hurry, you can cut it into small cubes, which will soften faster. But honestly, patience is the key here.
Don’t Overmix the Cheese: Once you’ve added the cheddar and bacon, switch to a spatula. Overmixing with an electric mixer can break down the cheese and bacon too much, resulting in a pasty texture. You want to see little bits of bacon and cheese throughout. It’s about folding, not beating.
The Patience for Chilling: I know it’s tempting to skip the chill time, but don’t. The cheese ball needs that time to firm up. If you try to coat it while it’s still soft, the coating will just sink in and get lost. A properly chilled cheese ball is a work of art. I once made the mistake of only chilling it for 30 minutes, and it was a sticky, crumbly mess. Learn from my failure!
Toasting the Nuts: If you decide to use pecans or walnuts in your coating, take an extra minute to toast them in a dry skillet over medium heat for 2-3 minutes. It brings out their natural oils and adds a deeper, nuttier flavor that takes the cheese ball to the next level. Just watch them closely so they don’t burn.
Make-Ahead Magic: This is a fantastic make-ahead appetizer. You can prepare the cheese ball through step 5 (shaping and chilling) up to 3 days in advance. Just keep it tightly wrapped in the fridge. Then, when you’re ready to serve, just roll it in the coating and let it sit out for a bit. It’s a total game-changer for party planning.
Variations & Adaptations
One of the best things about this cheese ball is how easy it is to make it your own. I’ve tried a few different twists over the years, and they’ve all been delicious. Here are some ideas to get you started.
- Spicy Southwest Cheese Ball: Add 1/2 cup of drained and rinsed black beans, 1/4 cup of finely chopped pickled jalapeños, and 1 teaspoon of cumin to the base. For the coating, use crushed tortilla chips and a little chili powder instead of the bacon and nuts. It’s a fantastic twist for a fiesta-themed party.
- Everything Bagel Cheese Ball: Omit the bacon and green onions. Instead, add 2 tablespoons of everything bagel seasoning to the base. For the coating, use a mixture of 2 tablespoons of everything bagel seasoning and 1/4 cup of finely chopped dried chives. Serve with bagel chips or cucumber slices. It’s a brunch-time dream.
- Herb & Garlic Lovers’ Cheese Ball: Swap the ranch seasoning for 2 teaspoons of garlic powder, 1 teaspoon of onion powder, and 1 tablespoon of dried mixed herbs (like parsley, oregano, and thyme). For the coating, use a mixture of fresh chopped parsley, chives, and dill. This version is incredibly fresh and aromatic.
- Dietary Adaptations: For a gluten-free version, just make sure your ranch seasoning mix is certified gluten-free (most are). For a lower-fat version, use reduced-fat cream cheese and turkey bacon. For a vegetarian version, simply omit the bacon and add 1/2 cup of finely chopped sun-dried tomatoes or roasted red peppers for a similar savory depth.
My personal favorite variation is the Spicy Southwest one. I made it for a Super Bowl party, and it was gone in minutes. The smoky heat from the jalapeños and cumin paired perfectly with the creamy cheese. It’s a reminder that a simple base recipe can be a canvas for so many delicious flavors.
Serving & Storage Suggestions
This cheese ball is best served at room temperature, so take it out of the fridge about 20 minutes before you plan to dig in. This allows the flavors to fully bloom and makes it perfectly spreadable. I like to place it on a nice wooden board or a slate platter for a rustic, inviting look.
What to Serve With It: The options are endless! Classic buttery crackers, like Ritz or Club crackers, are a perfect match. For something crunchier, try crostini or bagel chips. Fresh veggies are also fantastic—think crisp celery sticks, carrot sticks, bell pepper strips, and cucumber rounds. The cool, crunchy vegetables are a wonderful contrast to the rich, creamy cheese ball.
Storage Instructions: If you have any leftovers (which is rare!), wrap the cheese ball tightly in plastic wrap and store it in the refrigerator. It will keep well for up to 5 days. The coating might get a little soft, but the flavor will still be fantastic. For longer storage, you can freeze the uncoated cheese ball for up to 2 months. Wrap it tightly in plastic wrap and then in a layer of foil. Thaw it in the refrigerator overnight before coating and serving.
Reheating Tips: You don’t really “reheat” a cheese ball, but if you find it’s too firm after being in the fridge, just let it sit at room temperature for 30-45 minutes. The flavors actually deepen and meld together even more after a day or two in the fridge. So, in a way, leftovers are even better!
Nutritional Information & Benefits
While this is definitely a treat-yourself appetizer, it’s good to know what’s in it. The nutritional values are estimates and will vary based on the specific brands and ingredients you use.
Estimated Nutritional Values (per serving, based on 12 servings):
- Calories: 280
- Fat: 24g
- Carbohydrates: 4g
- Protein: 12g
Health Benefits of Key Ingredients: Cream cheese provides a good source of calcium and vitamin A. Bacon, while indulgent, adds protein and a satisfying savory flavor that can help curb cravings. The green onions add a touch of vitamins K and C, plus a bit of fiber. If you add the nuts, you’ll get a dose of healthy fats and vitamin E.
Dietary Considerations: This recipe is naturally low in carbohydrates, making it a great option for those following a keto or low-carb diet. It is also gluten-free as long as you use a certified gluten-free ranch seasoning. Be mindful of the sodium content from the bacon and seasoning. This cheese ball is best enjoyed as part of a balanced diet, and I personally love that it allows me to indulge without any guilt.
Conclusion
So there you have it—my cozy, cheesy, bacon-ranch cheese ball. This isn’t just a recipe; it’s a little piece of comfort that’s saved me from pre-party panic more times than I can count. It’s proof that you don’t need hours in the kitchen or a list of exotic ingredients to create something that people will genuinely love. It’s simple, it’s forgiving, and it’s absolutely delicious.
I encourage you to make this your own. Add a little extra black pepper, swap in a different cheese, or try one of the variations I mentioned. The best recipes are the ones that feel like yours. This one is a fantastic starting point, a blank canvas for your own creativity.
I’d love to hear how it turns out for you! Did you make any changes? Was it a hit at your party? Drop a comment below and let me know. And if you made it through a last-minute scramble like I did, tell me about it! Sharing our kitchen victories (and our happy accidents) is what makes cooking so much fun. Now go on, get mixing—your new favorite appetizer is waiting.
Frequently Asked Questions
Can I make this cheese ball ahead of time?
Absolutely! In fact, I recommend it. You can prepare the cheese ball through the chilling step (step 5) up to 3 days in advance. Just keep it tightly wrapped in plastic wrap in the refrigerator. When you’re ready to serve, simply roll it in the coating and let it sit at room temperature for 20 minutes.
Can I use pre-shredded cheese?
You can, but I really recommend shredding your own from a block of cheese. Pre-shredded cheese is coated with anti-caking agents like cornstarch or potato starch, which can prevent it from melting and blending as smoothly into the cream cheese. Shredding your own gives you a much creamier, more flavorful result.
How do I get my cream cheese to soften quickly?
If you’re in a hurry, cut the cream cheese into small, 1-inch cubes and let them sit on the counter for 15-20 minutes. You can also place the unwrapped block of cream cheese in a microwave-safe bowl and microwave it on 50% power in 10-second intervals until it’s just soft to the touch. Be careful not to melt it!
Can I freeze a cheese ball?
Yes, you can! It’s best to freeze the cheese ball before you add the coating. Wrap it tightly in plastic wrap, then in a layer of aluminum foil, and freeze for up to 2 months. When you’re ready to use it, thaw it overnight in the refrigerator. Then, proceed with coating and serving as directed.
My cheese ball is too soft to shape. What did I do wrong?
This usually happens if the cream cheese was too warm or if you didn’t chill it long enough. Don’t panic! Just pop the mixture back into the refrigerator for another 30-60 minutes. It should firm up nicely. If it’s still too soft after a good chill, you can try adding a little more shredded cheese to help bind it.
Pin This Recipe!

Cozy Cheesy Bacon Ranch Cheese Ball – Best Easy Appetizer

This isn’t just another appetizer recipe—it’s the one you’ll turn to again and again. It’s the perfect balance of tangy ranch, smoky bacon, and rich cream cheese, making it a crowd-pleaser for game days, holiday gatherings, or casual get-togethers.
- Prep Time: 15 minutes
- Cook Time: 18 minutes
- Total Time: 2 hours 33 minutes
- Yield: 12 servings 1x
- Category: Appetizer
- Cuisine: American
Ingredients
- 16 ounces (450g) cream cheese, softened
- 1 packet (1 ounce or 28g) dry ranch seasoning mix
- 1 cup (120g) sharp cheddar cheese, shredded
- 1/2 cup (50g) cooked bacon, crumbled (about 8 slices)
- 1/4 cup (25g) green onions, thinly sliced
- 1/2 cup (50g) cooked bacon, crumbled (for coating, about 8 slices)
- 1/4 cup (25g) fresh parsley, finely chopped (optional)
- 1/4 cup (30g) pecans or walnuts, finely chopped (optional)
Instructions
- Prepare your ingredients: Soften cream cheese at least 30 minutes before starting. Cook bacon until crispy (bake at 400°F/200°C for 15-18 minutes), then crumble. Finely chop green onions and parsley.
- Mix the base: In a large mixing bowl, beat softened cream cheese and dry ranch seasoning mix with an electric hand mixer on medium speed until smooth and combined, about 2 minutes.
- Add the cheese and mix-ins: Fold in shredded cheddar cheese, 1/2 cup crumbled bacon, and sliced green onions with a rubber spatula until evenly distributed.
- Shape the cheese ball: Place mixture onto a large piece of plastic wrap. Gather edges and twist to shape into a tight ball, using hands to gently press through the wrap.
- Chill the ball: Wrap tightly in plastic wrap and refrigerate for at least 2 hours, or up to overnight.
- Prepare the coating: About 15 minutes before serving, combine remaining 1/2 cup crumbled bacon, chopped parsley (if using), and chopped nuts (if using) on a small plate or baking sheet.
- Coat the cheese ball: Unwrap chilled cheese ball and place in coating mixture. Gently press coating all over until evenly covered.
- Serve and enjoy: Transfer to a serving platter. Let sit at room temperature for 15-20 minutes to soften slightly before serving with crackers, crostini, or fresh veggie sticks.
Notes
For best texture, ensure cream cheese is at room temperature. Chill the cheese ball for at least 2 hours before coating. Toasting nuts in a dry skillet for 2-3 minutes enhances flavor. Can be made ahead up to 3 days in advance (through chilling step).
Nutrition
- Serving Size: 1 serving
- Calories: 280
- Sugar: 2
- Sodium: 580
- Fat: 24
- Saturated Fat: 12
- Carbohydrates: 4
- Protein: 12
Keywords: cheese ball, bacon ranch, easy appetizer, party food, game day snack, cream cheese appetizer