Love this? Save it for later!
Share the inspiration with your friends
The power went out halfway through boiling the eggs. I stood there in the dark kitchen, phone flashlight propped against a jar of paprika, wondering why I even bothered trying to be cute with appetizers. This was supposed to be a sophisticated spread for a Halloween party—something elegant, maybe a bit spooky but refined. Instead, I had a pot of cooling water, a dozen eggs I couldn’t see to peel, and a jar of olives I’d grabbed on a whim because they were on sale. Let me tell you, I was this close to ordering pizza and calling it a night.
But here’s the thing about cooking when things go wrong—you stop trying so hard. I peeled those eggs by feel in the dim glow, mashed the yolks with more mustard than I usually use (couldn’t find the measuring spoon), and stared at those black olives sitting on the counter. Maybe you’ve been there—that moment where you just shrug and try something ridiculous because why not? I sliced an olive, placed it on the yolk mixture, and laughed at how much it looked like a tiny cat eye. Then I did another. And another.
Honestly, I couldn’t stop. By the time the power came back, I had a platter of the most ridiculous, adorable, unexpectedly perfect black cat deviled eggs staring back at me. They weren’t sophisticated. They weren’t what I planned. But when I brought them to the party, they disappeared before anything else on the table. Someone actually asked if I’d made them for years. I just smiled and said, “Something like that.” This is the recipe that taught me to stop panicking when the kitchen throws a curveball—and honestly, it’s become my most requested dish every October since.
Why You’ll Love This Recipe
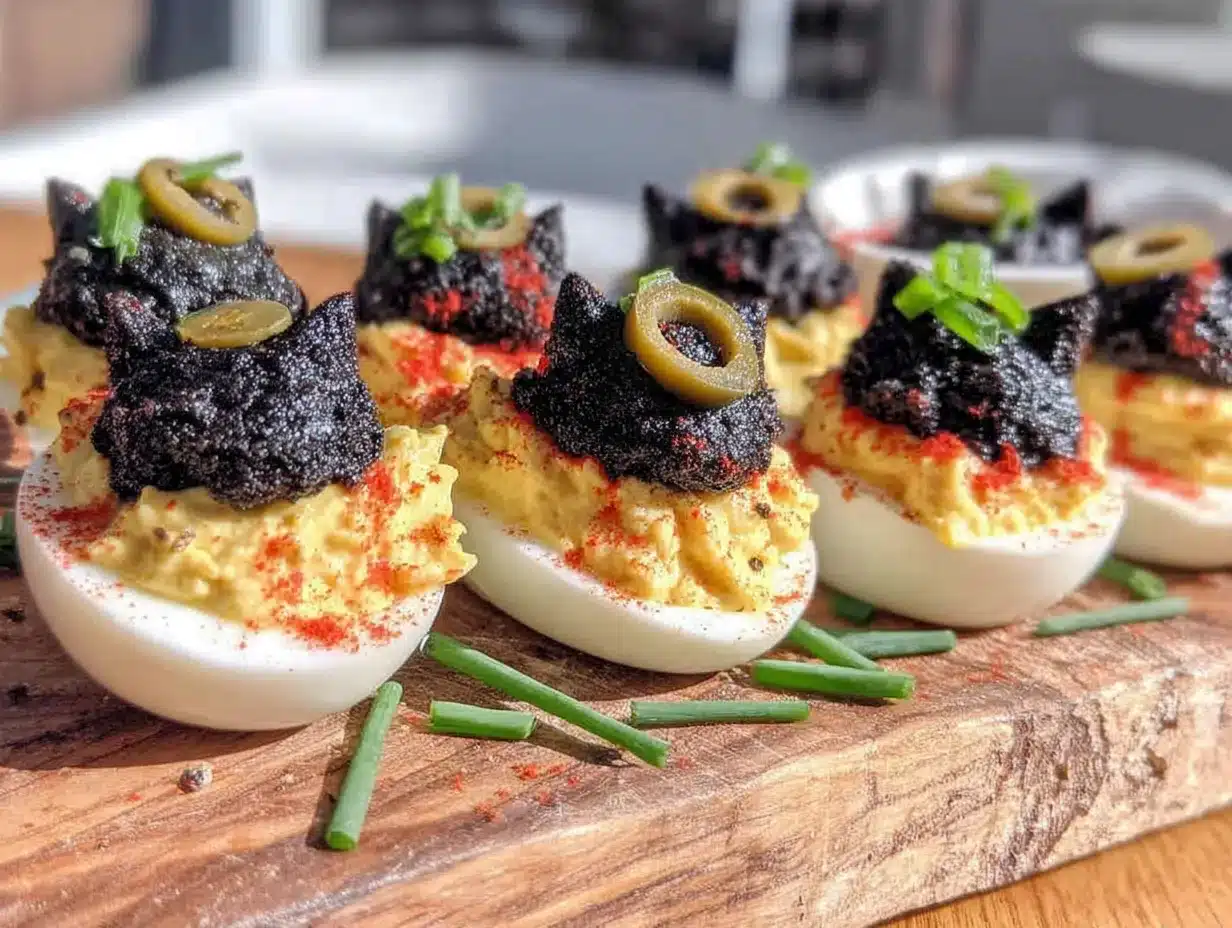
These cozy black cat deviled eggs with olive eyes aren’t just another Halloween appetizer—they’re the kind of recipe that makes people stop and smile before they even take a bite. I’ve tested this over three Halloweens now, tweaking the yolk-to-mustard ratio and figuring out the best olive placement so the cats actually look like cats and not sad blobs. Here’s why this recipe works so well:
- Quick & Easy: From pot to platter in about 30 minutes, with most of that time being hands-off boiling and cooling.
- Simple Ingredients: Eggs, olives, mayo, mustard, paprika—you probably have everything except the black olives already.
- Perfect for Halloween: Whether it’s a costume party, a cozy night in with scary movies, or a classroom treat that won’t get you side-eyed by other parents.
- Crowd-Pleaser: Kids love the cat faces, adults love the classic deviled egg flavor—everyone wins.
- Unbelievably Delicious: The briny olive against the creamy, tangy yolk filling is a combo I didn’t see coming, but now I can’t make deviled eggs any other way.
What makes this different from every other Halloween deviled egg recipe out there? It’s the technique. Most versions use food coloring or paprika dusting to make the eggs look like cats, which either tastes weird or rubs off. Using black olives for the eyes and ears gives you actual cat features that stay put and add flavor. Plus, the olive brine in the yolk mixture? That’s my secret touch—it ties everything together. This isn’t just another version. It’s the one that tastes as good as it looks, and honestly, that’s rare for themed food.
This recipe is comfort food reimagined for a holiday that sometimes gets too focused on scary. It’s cozy. It’s silly. It’s the kind of thing that makes you close your eyes after the first bite and think, “Okay, this is why I love cooking.”
What Ingredients You Will Need
This recipe uses simple, everyday ingredients to create something that looks way more complicated than it actually is. Most of these are probably already in your fridge and pantry, which is exactly how I like my recipes to work.
For the Eggs
- 12 large eggs (room temperature if possible—they peel easier)
- Water (enough to cover the eggs by an inch)
- 1 tablespoon white vinegar (helps the eggs peel cleanly—trust me on this)
- 1 teaspoon salt (added to the boiling water)
For the Yolk Filling
- 1/3 cup mayonnaise (I prefer Duke’s or Hellmann’s for the right tang)
- 1 tablespoon Dijon mustard (yellow mustard works too, but Dijon gives a smoother flavor)
- 1 teaspoon olive brine (from the jar of black olives—adds that subtle briny depth)
- 1/4 teaspoon black pepper (freshly ground if you have it)
- 1/8 teaspoon salt (go light—the brine and olives add salt)
- 1/4 teaspoon paprika (plus more for garnish)
For the Cat Faces
- 1 can (about 24) large black olives (look for the biggest ones you can find—you need room to cut eyes and ears)
- Optional: 1 small carrot (for tiny cat noses or whiskers, if you’re feeling extra)
Let me talk about the olives for a second because this matters. You want the large, pitted black olives—the ones that come in a can, not the fancy oil-cured ones from the olive bar. The canned ones are firmer, easier to slice cleanly, and have that mild briny flavor that won’t overpower your deviled eggs. I’ve tried this with kalamata olives, and while they look pretty, the flavor is too strong and the texture is too soft for clean cuts. Stick with the basic canned black olives. Your cat faces will thank you.
For substitutions, if you need this dairy-free, you’re in luck—traditional deviled eggs don’t use dairy anyway. For a lighter version, swap half the mayo with plain Greek yogurt. It changes the texture slightly (a bit tangier, a bit less creamy), but it works. If you’re avoiding eggs altogether, well, this might not be the recipe for you—but you could try the filling in hollowed-out cucumber rounds for a fun, egg-free alternative.
Equipment Needed
Nothing fancy here—this is a recipe that works with basic kitchen gear. Here’s what you’ll need:
- Large pot (big enough to hold 12 eggs in a single layer without crowding)
- Slotted spoon (for gently lowering eggs into boiling water and fishing them out)
- Medium bowl (for ice water bath)
- Sharp knife (a paring knife works best for slicing olive eyes—seriously, a dull knife will squish them)
- Cutting board (preferably one with a groove to catch olive juice)
- Medium mixing bowl (for the yolk mixture)
- Fork or potato masher (for mashing yolks—I prefer a fork because I can control the texture better)
- Small spoon or piping bag (for filling the egg whites—a zip-top bag with the corner snipped off works perfectly if you don’t have a piping bag)
- Serving platter (something dark or neutral lets the black cat faces pop)
If you don’t have a piping bag, honestly, just use a spoon. I’ve done it both ways, and while the piping bag gives you cleaner lines, a spoon works fine and takes less cleanup. The olive eyes cover any imperfections anyway.
Preparation Method
Let me walk you through this step by step. I’ve made these so many times now that I could do it in my sleep, but I remember how confusing the first batch was—especially getting those olive eyes to look right. Take your time with the olive cutting. It’s the only part that requires a little patience.
Step 1: Boil the Eggs (10 minutes active, 10 minutes resting)
Place your eggs in a large pot in a single layer. Add enough cold water to cover them by about an inch. Add the vinegar and salt—I know it seems like a small thing, but the vinegar helps the shells release from the egg whites, and the salt helps the water boil faster. Bring the water to a rolling boil over high heat. Once it’s boiling hard, cover the pot, turn off the heat, and let it sit for exactly 10 minutes. Set a timer. I’ve forgotten before, and you end up with gray-ringed yolks that look sad.
Step 2: Ice Bath (5 minutes)
While the eggs are resting, fill a medium bowl with ice and cold water. When the timer goes off, use your slotted spoon to transfer the eggs to the ice bath. Let them sit for at least 5 minutes. This stops the cooking immediately and makes peeling so much easier. I’ve skipped this step when I was in a hurry, and I regretted it—the shells stick like glue.
Step 3: Peel the Eggs (5-10 minutes, depending on your patience)
Gently tap each egg on the counter to crack the shell all over, then roll it between your palms to loosen the shell. Start peeling from the wider end—there’s usually an air pocket there that makes it easier to get under the membrane. Rinse each peeled egg under cool water to remove any tiny shell fragments. Pat them dry with a paper towel.
Step 4: Cut and Separate (5 minutes)
Using a sharp knife, slice each egg in half lengthwise. Carefully pop the yolks out into your mixing bowl. Arrange the egg white halves on your serving platter, cut side up. Don’t worry if a few tear—you can hide the damaged ones in the middle of the platter.
Step 5: Make the Filling (5 minutes)
Add the mayonnaise, Dijon mustard, olive brine, black pepper, salt, and paprika to the bowl with the yolks. Mash everything together with a fork until it’s smooth and creamy. Taste it. Does it need more mustard? More brine? Adjust now before you fill the eggs. I usually end up adding an extra splash of brine because I love that tangy, briny kick against the rich yolk.
Step 6: Fill the Egg Whites (5-10 minutes)
Spoon the yolk mixture into a piping bag (or a zip-top bag with a corner snipped off) and pipe it into each egg white half. You want a nice mound that comes slightly above the edge of the white—this gives you a good surface for the olive face. If you’re using a spoon, just dollop it in and smooth the top gently.
Step 7: Create the Cat Faces (10-15 minutes—this is the fun part)
Here’s where the magic happens. Drain your black olives and pat them dry with a paper towel. Using your sharp knife, slice each olive crosswise into thin rounds—these will be the eyes. You want them about 1/8-inch thick. Then, from the remaining olive pieces, cut small triangles for the ears. Each cat needs two eyes and two ears. I usually get about 2-3 cat faces per olive, depending on the size.
Place two olive rounds on each filled egg white for the eyes, positioning them slightly toward the top of the yolk mound. Then gently press two olive triangles above the eyes for the ears. If you want to add whiskers, use tiny slivers of carrot or a thin line of paprika dusted on each side of the face. I’ve also used chive pieces for whiskers, which look adorable and add a mild onion flavor.
Step 8: Garnish and Serve (2 minutes)
Sprinkle a tiny pinch of paprika over each cat face—just a light dusting. This gives them a subtle “furry” look and adds color. Serve immediately or refrigerate until ready to serve.
Cooking Tips & Techniques
After making these more times than I can count, I’ve learned a few things the hard way. Let me save you some trouble.
The biggest mistake people make is using eggs that are too fresh. Fresh eggs are actually harder to peel than eggs that have been in the fridge for a week or two. If you’re planning to make these for a party, buy your eggs at least a week ahead. The slightly older eggs have a higher pH, which means the shells come off in bigger pieces rather than tiny, frustrating fragments.
Don’t overcook the eggs. I know I said 10 minutes, but if you have really large eggs or your stove runs hot, check at 9 minutes. Overcooked eggs develop that greenish-gray ring around the yolk, and while it doesn’t affect the taste much, it makes your filling look less appetizing. The perfect hard-boiled egg has a bright yellow yolk with no gray ring.
When cutting the olive eyes, use a sawing motion rather than pressing straight down. Olives are slippery little things, and pressing hard makes them squirt out from under your knife. I learned this after launching an olive across the kitchen and finding it three days later under the fridge. A gentle sawing motion gives you clean, round slices that stay intact.
Multitasking tip: While the eggs are boiling and then resting in the ice bath, use that time to slice your olives. It’s about 15 minutes of downtime, which is plenty of time to get all your cat features ready. I lay out the olive slices and triangles on a paper towel in groups of four (two eyes, two ears) so I can just grab and place when it’s assembly time.
For consistent results, use a piping bag for the filling. I know it’s an extra step, but it gives you uniform mounds that make the cat faces look professional. If you’re making these for a party where presentation matters, the piping bag is worth the five minutes of extra effort.
Variations & Adaptations
One of the best things about this recipe is how easy it is to tweak. Here are some variations I’ve tried and loved:
Spicy Black Cat Deviled Eggs
Add 1/2 teaspoon of cayenne pepper or a splash of hot sauce to the yolk mixture. The heat pairs beautifully with the briny olives and creates a more adult version. I made these for a Halloween party last year, and they were the first to go—people kept coming back for “one more spicy cat.”
Vegan Black Cat Deviled Eggs
Use firm tofu instead of eggs. Press a block of extra-firm tofu for 30 minutes to remove excess water, then crumble and mix with the same filling ingredients (use vegan mayo). Shape the mixture into oval mounds on a platter and top with olive faces. The texture is different—creamier, less firm—but the flavor is surprisingly close. My vegan friend couldn’t stop eating them.
Gluten-Free Option
This recipe is naturally gluten-free, so no changes needed. Just double-check your mustard and mayonnaise labels to ensure they’re certified gluten-free if that’s a concern for you.
Different Cat Colors
For a fun twist, use different colored olives. Green olives with pimentos give you orange-eyed cats. Kalamata olives create darker, more dramatic faces. I’ve even used sliced radishes for pink-eyed white cats—just use the egg white as the face and skip the yolk filling for that version.
Mini Cat Faces
If you’re making these for a kids’ party, use quail eggs instead of chicken eggs. They’re smaller, cuter, and easier for little hands to hold. The olive slices will need to be cut smaller too, but the overall effect is absolutely adorable.
Serving & Storage Suggestions
These cozy black cat deviled eggs are best served chilled or at room temperature. I prefer them cold—the contrast between the creamy filling and the firm olive slices is more pronounced when they’re straight from the fridge. Arrange them on a dark platter if you have one; the black olive faces pop beautifully against a dark background, and it gives the whole spread a moody Halloween vibe.
For presentation, I like to arrange the cat faces in a circle facing inward, like they’re all looking at each other. It’s a small touch, but it makes people smile. You can also place them on a bed of dark leafy greens (kale or spinach work well) for a spooky “graveyard” look.
Storage: These will keep in the refrigerator for up to 2 days, but they’re best within 24 hours. The olive slices can start to dry out and curl at the edges if left too long. Store them in an airtight container, layered between paper towels to absorb any moisture. Do not freeze—the texture of the eggs and mayonnaise will break down completely.
Reheating: Don’t. These are meant to be served cold. If you’ve refrigerated them, just take them out 15 minutes before serving to take the chill off slightly. The flavors actually improve after a few hours in the fridge—the olive brine melds with the yolk mixture and everything becomes more cohesive.
One thing I love about this recipe is that the flavors get better over time. The first day, the olive taste is distinct and separate from the filling. By day two, they’ve married together into something more complex and satisfying. If you can make these a day ahead, do it. Your future self will thank you.
Nutritional Information & Benefits
Per serving (2 deviled eggs):
- Calories: 180
- Protein: 12g
- Fat: 14g
- Carbohydrates: 2g
- Fiber: 0g
- Sugar: 1g
- Sodium: 350mg
Eggs are a fantastic source of high-quality protein and contain all nine essential amino acids. They’re also rich in choline, which supports brain health, and lutein, which is good for your eyes. The olives add healthy monounsaturated fats and antioxidants, plus a dose of vitamin E. This recipe is naturally low in carbohydrates and can fit into a keto or low-carb diet without any modifications.
For those watching their sodium, you can reduce the salt in the filling and use low-sodium olives. The flavor will still be good—just a little less briny. And if you’re concerned about cholesterol, recent research suggests that dietary cholesterol from eggs has minimal impact on blood cholesterol for most people. As always, check with your healthcare provider for personalized advice.
Conclusion
These cozy black cat deviled eggs with olive eyes are proof that the best recipes often come from happy accidents. What started as a power-outage kitchen disaster turned into my most-requested Halloween dish, and every time I make them, I remember that it’s okay when things don’t go according to plan. Sometimes the detour is better than the destination.
I love this recipe because it brings people together. Kids light up when they see the cat faces. Adults appreciate the cleverness. And everyone loves the taste—creamy, tangy, briny, and just a little bit smoky from the paprika. It’s comfort food dressed up for a party, and honestly, that’s my favorite kind of cooking.
Now I want to hear from you. Have you made these? Did your cat faces turn out adorable or hilariously derpy? (Both are acceptable, by the way.) Drop a comment below and let me know how they turned out. And if you came up with your own variation—maybe you used different olives or added a secret ingredient—share that too. I’m always looking for new ideas to try.
Happy Halloween, and happy cooking. May your eggs peel easily and your olive eyes stay exactly where you put them.
Frequently Asked Questions
Can I make these black cat deviled eggs ahead of time?
Absolutely. You can boil and peel the eggs up to 3 days ahead and store them in the fridge. The filling can be made a day ahead and kept in a piping bag in the refrigerator. Assemble the cat faces no more than 24 hours before serving for the best appearance.
Why did my olive eyes fall off?
This usually happens if the yolk filling is too wet or if the olives are too wet. Pat your olives dry thoroughly before slicing, and make sure your filling is firm enough to hold the olives in place. If your filling seems loose, add a little more mashed yolk or a tiny bit of breadcrumbs to thicken it.
Can I use food coloring instead of olives for the cat features?
You can, but I don’t recommend it. Food coloring can bleed into the yolk filling and create a messy look. Plus, the olives add flavor and texture that food coloring can’t replicate. If you really want to try it, use black food coloring gel and draw the features with a toothpick, but the results won’t be as clean or tasty.
How do I get perfectly round olive slices for the eyes?
Use a sharp knife and slice with a gentle sawing motion. If you have a mandoline slicer, you can use it for perfectly even slices, but be careful—olives are small and can be tricky to hold steady. Alternatively, you can buy pre-sliced olives, though they’re often too thin for this purpose.
Can I use this recipe for other holidays?
Yes! The basic deviled egg recipe works for any occasion. For Easter, use pastel-colored olives or add a tiny carrot slice for a bunny face. For Christmas, use red pimentos for Rudolph noses. For a regular party, just skip the cat faces and enjoy classic deviled eggs with a briny twist from the olive brine.
Pin This Recipe!

Cozy Black Cat Deviled Eggs with Olive Eyes
These adorable black cat deviled eggs with olive eyes are a fun and delicious Halloween appetizer. Creamy, tangy yolk filling meets briny olives for a crowd-pleasing treat that’s as tasty as it is cute.
- Prep Time: 15 minutes
- Cook Time: 10 minutes
- Total Time: 30 minutes
- Yield: 24 deviled eggs (12 servings of 2 eggs each) 1x
- Category: Appetizer
- Cuisine: American
Ingredients
- 12 large eggs (room temperature if possible)
- Water (enough to cover eggs by an inch)
- 1 tablespoon white vinegar
- 1 teaspoon salt
- 1/3 cup mayonnaise (preferably Duke’s or Hellmann’s)
- 1 tablespoon Dijon mustard
- 1 teaspoon olive brine (from the jar of black olives)
- 1/4 teaspoon black pepper (freshly ground)
- 1/8 teaspoon salt
- 1/4 teaspoon paprika (plus more for garnish)
- 1 can (about 24) large black olives (pitted)
- Optional: 1 small carrot (for tiny cat noses or whiskers)
Instructions
- Place eggs in a large pot in a single layer. Add cold water to cover by an inch, plus vinegar and salt. Bring to a rolling boil over high heat. Cover, turn off heat, and let sit for exactly 10 minutes.
- While eggs rest, prepare an ice bath with ice and cold water. Transfer eggs to ice bath with a slotted spoon and let sit for at least 5 minutes.
- Peel eggs: gently tap each on the counter to crack shell, roll between palms, and peel starting from the wider end. Rinse under cool water and pat dry.
- Slice each egg in half lengthwise. Pop yolks into a mixing bowl. Arrange egg white halves on a serving platter, cut side up.
- Make filling: add mayonnaise, Dijon mustard, olive brine, black pepper, salt, and paprika to the yolks. Mash with a fork until smooth and creamy. Adjust seasoning to taste.
- Fill egg whites: spoon filling into a piping bag (or zip-top bag with corner snipped) and pipe into each egg white half, mounding slightly above the edge. Alternatively, use a spoon.
- Create cat faces: drain olives and pat dry. Slice olives crosswise into thin rounds (about 1/8-inch thick) for eyes. Cut small triangles from remaining olive pieces for ears. Place two olive rounds on each filled egg for eyes, and two triangles above for ears. Optionally add carrot slivers for whiskers.
- Garnish: sprinkle a light dusting of paprika over each cat face. Serve immediately or refrigerate until ready to serve.
Notes
Use eggs that are at least a week old for easier peeling. Pat olives dry before slicing to prevent them from falling off. For best results, assemble cat faces no more than 24 hours before serving. The filling can be made a day ahead and stored in a piping bag in the fridge. Do not freeze.
Nutrition
- Serving Size: 2 deviled eggs
- Calories: 180
- Sugar: 1
- Sodium: 350
- Fat: 14
- Saturated Fat: 3
- Carbohydrates: 2
- Protein: 12
Keywords: Halloween deviled eggs, black cat deviled eggs, spooky appetizer, Halloween party food, olive eyes, easy Halloween recipe



