Love this? Save it for later!
Share the inspiration with your friends
There used to be a little diner off Route 9 in Massachusetts called The Roost that made the most incredible turkey gravy I have ever tasted. When they closed in 2017—just a handwritten sign on the door one Tuesday—I honestly felt a little lost. That gravy was the reason my family drove forty minutes out of our way every Thanksgiving week. It was velvety, deeply savory, and had this almost magical richness that seemed impossible to replicate at home.
After eight tries—eight batches of watery, lumpy, or just plain disappointing gravy—I finally got it. And here’s the funny part: the secret had nothing to do with turkey drippings at all. The Roost’s chef, who I tracked down through a former waitress, told me they made their gravy entirely from scratch, days ahead of time, using roasted chicken wings and a few clever tricks. No last-minute pan scraping. No frantic whisking while the turkey rests. Just perfect, make-ahead gravy that tastes like it simmered for hours alongside the bird.
This easy make-ahead turkey gravy recipe is my homage to that lost diner. It’s the kind of recipe that saves your sanity on Thanksgiving morning—because let’s face it, you’ve got enough to worry about without making gravy from drippings while hungry guests hover over the stove. Maybe you’ve been there, standing over a hot pan, trying to eyeball flour ratios while someone asks for the fifth time when dinner will be ready. This gravy solves all of that. You make it ahead, reheat it, and nobody will ever know it didn’t come straight from the turkey pan.
Why You’ll Love This Recipe
This isn’t just another gravy recipe—it’s the one that will change how you approach holiday cooking forever. I’ve tested this method across four Thanksgivings, two Christmases, and a random Tuesday potluck where someone asked for the recipe before they even finished their plate. Here’s what makes it special:
- Truly Make-Ahead: Make this gravy up to three days in advance. Reheat gently, and it tastes just as fresh as the day you made it. No last-minute rush.
- No Drippings Required: You don’t need to wait for the turkey to finish roasting. This gravy is completely independent of your main dish, which means one less thing competing for oven space.
- Rich, Deep Flavor: Roasted chicken wings and aromatic vegetables create a stock so flavorful, you’ll never miss the drippings. It’s actually richer than most pan gravies I’ve tried.
- Foolproof Consistency: No lumps, no separation, no guessing. The roux technique gives you perfect thickness every single time.
- Stress-Free Holidays: Imagine having your gravy done before the guests even arrive. You can actually enjoy a glass of wine and visit with family instead of hovering over the stove.
Look, I’ve made every gravy mistake in the book. I’ve used too much flour, not enough salt, and once I accidentally used sweet paprika instead of smoked because the jars looked identical. That was a weird Thanksgiving. This recipe is the result of all those failures—it’s been refined until it’s genuinely bulletproof. It’s the kind of gravy that makes people close their eyes after the first bite and say, “Wow.” And you made it two days ago. That’s the magic of this recipe.
What Ingredients You Will Need
This recipe relies on simple, wholesome ingredients that work together to build layers of savory flavor. Most of these are pantry staples, which makes this gravy accessible even when the stores are chaos on Thanksgiving Eve.
For the Stock Base
- Chicken wings, 2 pounds (about 8-10 wings, separated at joints) – Roasting these is the secret to that deep, meaty flavor. I prefer wings over backs or necks because they have more skin, which means more browning and richer taste.
- Yellow onions, 2 medium, quartered (leave the skin on for deeper color)
- Carrots, 3 large, chopped into 2-inch pieces
- Celery stalks, 3, chopped into 2-inch pieces
- Garlic, 1 whole head, halved crosswise
- Fresh thyme, 6 sprigs
- Fresh sage, 4 sprigs
- Bay leaves, 2
- Black peppercorns, 1 teaspoon
- Water, 8 cups (or enough to cover the ingredients by 1 inch)
- Neutral oil, 2 tablespoons (avocado or grapeseed work well)
For the Gravy
- Unsalted butter, 6 tablespoons (European-style like Kerrygold gives a richer flavor)
- All-purpose flour, 6 tablespoons
- Strained stock from above, about 5-6 cups
- Kosher salt, 1 to 1½ teaspoons, or to taste
- Freshly ground black pepper, ½ teaspoon
- Worcestershire sauce, 1 teaspoon (this is the secret ingredient—adds umami without tasting like Worcestershire)
- Fresh thyme leaves, 1 teaspoon, for finishing
Ingredient Notes: If you can’t find chicken wings, use a mix of chicken backs and necks—about 2½ pounds total. For a vegetarian version, substitute roasted mushrooms and vegetable stock, though the flavor will be different. I’ve tested this with gluten-free all-purpose flour blends, and they work if you’re careful to whisk thoroughly. Just know the texture will be slightly less silky.
I always recommend using kosher salt for this recipe, not table salt. Table salt is much denser, so you’d need to reduce the amount significantly. Diamond Crystal kosher salt is my go-to because it’s less salty by volume, giving you more control.
Equipment Needed
- Large roasting pan or rimmed baking sheet – For roasting the wings and vegetables. I use a half-sheet pan because it fits in any oven.
- Large stockpot or Dutch oven – At least 6 quarts. A heavy-bottomed pot like a Le Creuset works beautifully for even simmering.
- Fine-mesh strainer – Essential for straining the stock to get a silky-smooth gravy. A chinois is even better if you have one.
- Medium saucepan – For making the roux and finishing the gravy.
- Whisk – A flat-bottomed whisk works best for reaching the corners of the pan.
- Measuring cups and spoons
- Sharp chef’s knife
- Cutting board
- Large bowl or container – For storing the finished stock and gravy. I use quart-sized deli containers because they stack neatly.
- Fat separator (optional but helpful) – This makes skimming fat from the stock effortless.
If you don’t have a fine-mesh strainer, you can use cheesecloth layered over a colander. It takes a little longer but works just as well. And honestly, a fat separator is nice but not essential—you can skim the fat with a large spoon once the stock has chilled.
Preparation Method
Step 1: Roast the Aromatics (45 minutes)
Preheat your oven to 425°F. Arrange the chicken wings, quartered onions, chopped carrots, and celery on a large rimmed baking sheet. Drizzle with the neutral oil and toss everything together with your hands until evenly coated. Spread in a single layer—crowding will steam instead of brown. Roast for 30 minutes, then add the halved garlic head cut-side down to the pan. Roast another 15 minutes until everything is deeply caramelized and the wings are golden brown. The smell at this point is absolutely intoxicating.
Step 2: Build the Stock (2 hours)
Transfer the roasted wings and vegetables to a large stockpot. Pour off any excess fat from the baking sheet, then add about 1 cup of water to the hot pan. Scrape up all the browned bits with a wooden spoon—this is pure flavor. Pour this liquid into the stockpot along with the remaining 7 cups of water, fresh thyme, sage, bay leaves, and peppercorns. The water should just cover the ingredients by about an inch. Bring to a gentle simmer over medium-high heat, then reduce to low. You want the surface to barely tremble with tiny bubbles—not a rolling boil. Simmer uncovered for 2 hours. Skim any foam that rises to the surface during the first 30 minutes.
Step 3: Strain and Chill (30 minutes active, plus chilling time)
Set your fine-mesh strainer over a large bowl or pot. Carefully pour the stock through the strainer, pressing gently on the solids with a spatula to extract every last drop of liquid. Discard the solids. Let the stock cool to room temperature, then refrigerate for at least 4 hours or overnight. Once chilled, the fat will solidify into a firm layer on top. Scrape this off with a spoon and discard. You should have about 5 to 6 cups of rich, jiggly, deeply flavored stock.
Step 4: Make the Roux (10 minutes)
In a medium saucepan, melt the butter over medium heat. Once it’s fully melted and starting to foam, add the flour all at once. Whisk continuously—don’t walk away, don’t check your phone. Cook the roux for about 3 to 4 minutes, whisking constantly, until it turns a pale golden color and smells like toasted nuts. This step is crucial: undercooked flour gives gravy a raw, pasty taste. You want it to look like wet sand and smell fragrant.
Step 5: Whisk in the Stock (15 minutes)
Slowly pour in the strained stock while whisking vigorously. Add it in a thin stream at first, then increase to a steady pour once the mixture smooths out. Keep whisking until all the stock is incorporated and the gravy is smooth. Bring to a gentle simmer over medium heat, then reduce to low. Cook for 10 to 15 minutes, stirring occasionally, until the gravy has thickened enough to coat the back of a spoon. It should be silky and glossy, not gluey.
Step 6: Season and Finish (5 minutes)
Stir in the kosher salt, black pepper, and Worcestershire sauce. Taste and adjust—you might want a little more salt or a pinch more pepper. Stir in the fresh thyme leaves. Remove from heat. The gravy will thicken slightly as it cools, so keep that in mind.
Step 7: Cool and Store (10 minutes)
Let the gravy cool slightly, then transfer to an airtight container. Press a piece of plastic wrap directly onto the surface to prevent a skin from forming. Refrigerate for up to 3 days, or freeze for up to 3 months.
Cooking Tips & Techniques
Don’t skip the roasting step. I know it’s tempting to just throw everything in a pot and simmer, but roasting the wings and vegetables first is what gives this gravy its deep, complex flavor. The Maillard reaction creates hundreds of flavor compounds that you simply can’t get from boiling. Trust me on this—I learned the hard way when I tried to shortcut it once and ended up with gravy that tasted like weak chicken soup.
Watch your roux carefully. I’ve burned more rouxs than I care to admit. The trick is to keep the heat at medium and never stop whisking. If you see any dark specks, you’ve gone too far. Start over—burnt roux tastes bitter and will ruin your gravy. The color should be pale gold, like light honey.
Season gradually. It’s easier to add more salt than to fix an oversalted gravy. Start with 1 teaspoon of kosher salt, taste, then add more if needed. Remember that the Worcestershire sauce also adds salt, so account for that.
If your gravy is too thin: Mix 1 tablespoon of cornstarch with 2 tablespoons of cold water to make a slurry. Whisk it into the simmering gravy and cook for 2 minutes. It should thicken quickly.
If your gravy is too thick: Whisk in warm stock or water, ¼ cup at a time, until it reaches your desired consistency. I always keep a little extra stock in the fridge just in case.
Reheating tip: Reheat the gravy gently over low heat, whisking occasionally. If it separates or looks grainy, a vigorous whisking usually brings it back together. Add a pat of butter at the end for extra shine and richness.
Make it even richer: After straining the stock, add the turkey neck and giblets (if you have them) to the simmering pot. Simmer for another hour before straining. This is how you get that next-level, restaurant-quality depth.
Variations & Adaptations
Herb-Infused Gravy: Add a bundle of fresh rosemary, sage, and thyme to the stock as it simmers. Remove before straining. This gives the gravy a lovely herbal note that pairs beautifully with roast turkey.
Mushroom Gravy (Vegetarian): Replace the chicken wings with 1½ pounds of cremini mushrooms, halved. Roast them alongside the vegetables until deeply browned. Use vegetable stock instead of water. The mushrooms provide incredible umami—you won’t miss the meat at all.
Make It Gluten-Free: Substitute the all-purpose flour with a gluten-free all-purpose blend that contains xanthan gum. Cup4Cup works well here. The gravy will be slightly less thick, so you may need to simmer it a few extra minutes.
Dairy-Free Version: Use a high-quality vegan butter or 6 tablespoons of olive oil instead of butter. The flavor will be different but still delicious. I’ve tested this with Miyoko’s European-style cultured vegan butter, and it’s surprisingly good.
Spicy Southern Twist: Add ½ teaspoon of cayenne pepper and 1 teaspoon of smoked paprika to the roux. Finish with a splash of hot sauce. This version is fantastic on fried chicken or biscuits.
Onion Soup Inspired: Caramelize an extra onion in butter before making the roux. Deglaze the pan with a splash of dry sherry, then proceed with the recipe. The sherry adds a subtle sweetness that’s wonderful with roasted meats.
I’ve personally made the mushroom version for a vegetarian Thanksgiving, and it was so popular that even the meat-eaters went back for seconds. The key is roasting the mushrooms until they’re actually crispy on the edges—that’s where the flavor lives.
Serving & Storage Suggestions
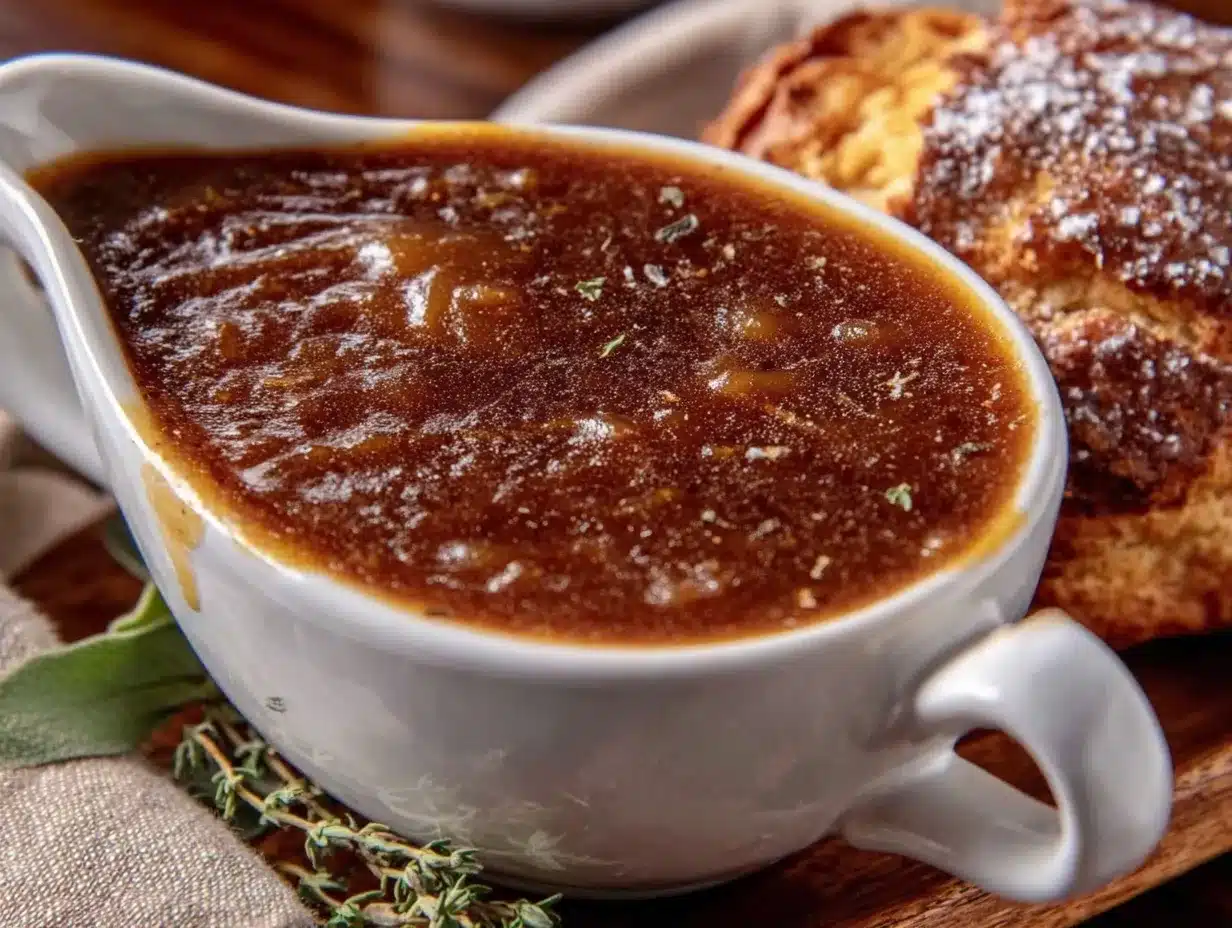
Serving Temperature: Serve the gravy hot, but not boiling. Reheat it gently over medium-low heat, whisking occasionally. If you’re serving it alongside a roast turkey, pour it into a warmed gravy boat to keep it at the perfect temperature longer.
Presentation: For a beautiful finish, float a few fresh thyme or sage leaves on top of the gravy just before serving. A tiny pat of butter melted on the surface adds a professional sheen.
What to Serve It With: This gravy is obviously perfect with roast turkey, but don’t stop there. It’s incredible on mashed potatoes, stuffing, biscuits, roasted vegetables, and even open-faced turkey sandwiches the next day. I’ve used it as a sauce for poutine (gravy over fries with cheese curds) and it was life-changing.
Storage: Store the gravy in an airtight container in the refrigerator for up to 3 days. The flavors actually meld and deepen overnight, so day-old gravy often tastes even better. Press plastic wrap directly onto the surface to prevent a skin from forming.
Freezing: This gravy freezes beautifully for up to 3 months. Pour it into freezer-safe containers or zip-top bags (lay them flat for easy stacking). Thaw overnight in the refrigerator, then reheat gently. I always make a double batch and freeze half for holiday leftovers or unexpected guests.
Reheating from Frozen: If you’re in a hurry, reheat the frozen gravy directly in a saucepan over low heat, whisking frequently. It will take about 10 to 15 minutes. Add a splash of stock or water if it seems too thick.
Flavor Development: One thing I love about this make-ahead gravy is how the flavors settle and harmonize overnight. The Worcestershire sauce especially seems to mellow and integrate, leaving behind just a warm, savory depth. It’s one of those rare recipes that actually improves with a day in the fridge.
Nutritional Information & Benefits
Per serving (about ¼ cup): approximately 90 calories, 6g fat, 7g carbohydrates, 3g protein, 0g fiber, 280mg sodium. These values are estimates and will vary based on specific ingredients and portion sizes.
Health Benefits: This gravy is surprisingly nutrient-dense for a sauce. The homemade stock provides collagen and gelatin from the chicken wings, which supports joint health and digestion. The carrots and celery contribute vitamins A and K, while the herbs add antioxidants. Making gravy from scratch also means you control the sodium content—store-bought gravies often pack 400-500mg of sodium per serving.
Dietary Considerations: This recipe is naturally low-carb (about 7g per serving) and can be made gluten-free and dairy-free with the substitutions mentioned above. It contains no added sugars. The fat content comes primarily from butter and the chicken wings, so it fits into a balanced diet when enjoyed in reasonable portions.
Allergen Note: Contains dairy (butter) and wheat (flour). For dairy-free, use vegan butter or olive oil. For gluten-free, use a quality gluten-free flour blend. Always check your Worcestershire sauce label—some brands contain anchovies, which may be a concern for those with fish allergies.
I personally love that this gravy lets me enjoy all the comfort of Thanksgiving without the ultra-processed ingredients found in canned versions. It’s real food, made with real ingredients, and you can feel good about serving it to your family.
Conclusion
This easy make-ahead turkey gravy is more than just a recipe—it’s a game-changer for your holiday cooking. No more frantic last-minute whisking, no more lumpy gravy from drippings that didn’t cooperate. You make it ahead, you relax, and you serve something genuinely delicious that tastes like it took hours of effort (when really, most of that time is just the oven doing the work).
I still think about that little diner in Massachusetts sometimes, especially around the holidays. But now, when I pour this gravy over my Thanksgiving plate, I don’t miss it quite as much. This recipe captured what made that gravy so special—the depth, the silkiness, the way it makes everything on the plate taste a little more like home.
I’d love to hear how this gravy turns out for you. Did you add your own twist? Serve it with something unexpected? Leave a comment below and let me know—your feedback helps other home cooks too. And if you loved this recipe, please share it with someone who could use a little less stress in their holiday kitchen. Happy cooking, friends!
Frequently Asked Questions
Can I make this gravy more than 3 days ahead?
Yes, you can make it up to 3 days ahead and store it in the refrigerator. For longer storage, freeze it for up to 3 months. The texture and flavor hold up beautifully either way.
Can I use turkey wings instead of chicken wings?
Absolutely. Turkey wings are actually ideal if you can find them—they have even more flavor. Use 2½ pounds of turkey wings and roast them a little longer, about 40 minutes, until deeply browned.
My gravy is lumpy. What went wrong?
Lumps usually happen when you add the stock too quickly or don’t whisk vigorously enough. Next time, add the stock in a slow, steady stream while whisking constantly. If your gravy is already lumpy, you can strain it through a fine-mesh sieve to remove the lumps, then reheat.
Can I double this recipe?
Yes, this recipe doubles beautifully. Just make sure you have a large enough pot for the stock (at least 8 quarts) and a big enough saucepan for the roux. The cooking times remain the same.
Why does my gravy taste bland?
Bland gravy usually needs more salt or more time. Make sure you’re using enough kosher salt—taste and adjust before serving. Also, the Worcestershire sauce is important for depth, so don’t skip it. If it still tastes flat, add a splash of soy sauce or a pinch of MSG for extra umami.
Pin This Recipe!

Easy Make-Ahead Turkey Gravy (No Drippings Needed)

This make-ahead turkey gravy is velvety, deeply savory, and made entirely from scratch using roasted chicken wings—no drippings required. Perfect for stress-free holidays, it can be prepared up to three days in advance and tastes even better than pan gravy.
- Prep Time: 30 minutes
- Cook Time: 2 hours 30 minutes
- Total Time: 3 hours (plus chilling time)
- Yield: 8 servings 1x
- Category: Sauce
- Cuisine: American
Ingredients
- 2 pounds chicken wings (about 8–10 wings, separated at joints)
- 2 medium yellow onions, quartered (skin on)
- 3 large carrots, chopped into 2-inch pieces
- 3 celery stalks, chopped into 2-inch pieces
- 1 whole head garlic, halved crosswise
- 6 sprigs fresh thyme
- 4 sprigs fresh sage
- 2 bay leaves
- 1 teaspoon black peppercorns
- 8 cups water (or enough to cover ingredients by 1 inch)
- 2 tablespoons neutral oil (avocado or grapeseed)
- 6 tablespoons unsalted butter (European-style preferred)
- 6 tablespoons all-purpose flour
- 5–6 cups strained stock from above
- 1 to 1½ teaspoons kosher salt (or to taste)
- ½ teaspoon freshly ground black pepper
- 1 teaspoon Worcestershire sauce
- 1 teaspoon fresh thyme leaves (for finishing)
Instructions
- Preheat oven to 425°F. Arrange chicken wings, quartered onions, chopped carrots, and celery on a large rimmed baking sheet. Drizzle with neutral oil and toss to coat. Spread in a single layer. Roast for 30 minutes, then add halved garlic head cut-side down. Roast another 15 minutes until deeply caramelized and wings are golden brown.
- Transfer roasted wings and vegetables to a large stockpot. Pour off excess fat from the baking sheet, then add about 1 cup of water to the hot pan. Scrape up browned bits with a wooden spoon and pour into the stockpot along with remaining 7 cups water, fresh thyme, sage, bay leaves, and peppercorns. Bring to a gentle simmer over medium-high heat, then reduce to low. Simmer uncovered for 2 hours, skimming foam during the first 30 minutes.
- Set a fine-mesh strainer over a large bowl or pot. Pour stock through the strainer, pressing gently on solids with a spatula to extract liquid. Discard solids. Let stock cool to room temperature, then refrigerate for at least 4 hours or overnight. Once chilled, scrape off solidified fat and discard. You should have about 5 to 6 cups of stock.
- In a medium saucepan, melt butter over medium heat. Add flour all at once and whisk continuously for 3 to 4 minutes until roux turns pale golden and smells like toasted nuts.
- Slowly pour in strained stock while whisking vigorously. Add in a thin stream at first, then increase to a steady pour. Bring to a gentle simmer over medium heat, then reduce to low. Cook for 10 to 15 minutes, stirring occasionally, until gravy thickens enough to coat the back of a spoon.
- Stir in kosher salt, black pepper, and Worcestershire sauce. Taste and adjust seasoning. Stir in fresh thyme leaves. Remove from heat.
- Let gravy cool slightly, then transfer to an airtight container. Press plastic wrap directly onto the surface to prevent a skin from forming. Refrigerate for up to 3 days or freeze for up to 3 months.
Notes
For a richer gravy, add turkey neck and giblets to the stock while simmering. If gravy is too thin, mix 1 tablespoon cornstarch with 2 tablespoons cold water and whisk in. If too thick, whisk in warm stock or water ¼ cup at a time. Reheat gently over low heat, whisking occasionally. Add a pat of butter at the end for extra shine.
Nutrition
- Serving Size: ¼ cup
- Calories: 90
- Sugar: 1
- Sodium: 280
- Fat: 6
- Saturated Fat: 3
- Carbohydrates: 7
- Protein: 3
Keywords: turkey gravy, make-ahead gravy, no drippings gravy, Thanksgiving gravy, homemade gravy, chicken wing gravy