Love this? Save it for later!
Share the inspiration with your friends
I was standing in my kitchen last Tuesday, staring into the fridge after a day that had gone on way too long. You know that feeling when your brain is just done, but your stomach is very much not? That was me. And then I opened the cheese drawer—the one where I toss random half-used blocks and forgotten bags of shredded cheese—and I caught a whiff of something. It wasn’t the cheese itself, honestly. It was something else, something buried in my memory that I couldn’t quite place at first.
And then it hit me. A parking lot. A Tuesday night, years ago, sitting in the back of my aunt’s station wagon. She had picked me up from afterschool care and handed me a warm container wrapped in foil. I was maybe eight. The smell of that foil packet—buttery, cheesy, with something crunchy on top—filled the whole car. I didn’t even know what mac and cheese with a crust was back then. I just knew it was the best thing I’d ever eaten in a car. My aunt is gone now, and I haven’t thought about that Tuesday night in ages. But standing there with the fridge door open, I knew exactly what I had to make.
This quick baked three-cheese mac and cheese with garlic panko is my attempt to grab that feeling back. It’s not a complicated project. It’s not a slow-simmered, roux-perfected, three-hour affair. It’s the version you make when you’re tired, when you need something warm and cheesy and crunchy on top, and you need it fast. I’ve made it maybe a dozen times since that night, tweaking the cheese ratios and the panko timing until it felt right. And now I’m sharing it with you, because maybe you’ve had one of those days too.
Why You’ll Love This Recipe
Let me tell you why this particular mac and cheese has earned a permanent spot in my weeknight rotation. I’ve tested a lot of mac and cheese recipes over the years—some that take forever, some that use a dozen different cheeses, some that are more trouble than they’re worth. This one is different. It’s the one I actually make on a Tuesday, not just the one I think about making.
- Quick & Easy: This comes together in about 30 minutes, start to finish. No standing over a béchamel sauce for 20 minutes. No complicated steps. Just straightforward, honest cooking that gets dinner on the table fast.
- Simple Ingredients: You probably have most of this in your kitchen right now. Cheddar, mozzarella, cream cheese, pasta, milk, butter, panko. That’s it. No fancy grocery store trips required.
- Perfect for Weeknights: This is the kind of meal you make when you’re tired, hungry, and just want something that feels like a hug in a bowl. It’s comfort food without the commitment of a long recipe.
- Crowd-Pleaser: I’ve served this to kids, picky eaters, and adults who claim they don’t eat “kid food.” Every single person went back for seconds. The garlic panko topping is what gets them every time.
- Unbelievably Delicious: The combination of three cheeses creates this creamy, tangy, slightly salty sauce that coats every piece of pasta perfectly. And that garlic panko crust? It’s crispy, buttery, and absolutely irresistible.
What makes this recipe different from the dozens of other mac and cheese recipes out there? It’s the cream cheese. That’s my secret. A block of cream cheese stirred into the sauce gives it this velvety texture and a subtle tang that you don’t get from just cheddar and mozzarella. It’s also what makes the sauce so stable—no graininess, no separation. Just smooth, creamy perfection every time. And the garlic panko topping isn’t an afterthought. It’s toasted in butter with fresh garlic before it even hits the pasta, so every bite has that deep, savory crunch.
This recipe isn’t just good—it’s the kind that makes you close your eyes after the first bite. It’s comfort food reimagined for people who don’t have all evening to make it. And honestly, it’s perfect for impressing guests without stress, or turning a regular Tuesday into something a little more special.
What Ingredients You Will Need
This recipe uses simple, mostly pantry-staple ingredients to deliver that rich, creamy, cheesy flavor without any fuss. The key is choosing the right cheeses and getting that garlic panko topping just right. Here’s what you’ll need and why each ingredient matters.
For the Mac and Cheese
- 8 ounces elbow macaroni (or any short pasta like cavatappi, shells, or rotini) — I prefer Barilla or De Cecco for their texture. Cook it one minute less than al dente since it will bake further.
- 2 cups shredded sharp cheddar cheese — Go for a block and shred it yourself. Pre-shredded cheese has anti-caking agents that prevent it from melting smoothly. Sharp cheddar gives you that classic mac and cheese flavor with a little bite.
- 1 cup shredded mozzarella cheese — This adds that beautiful stretchy texture. Low-moisture mozzarella works best here.
- 4 ounces cream cheese, softened — The secret ingredient. It makes the sauce incredibly creamy and stable. Full-fat cream cheese is best for texture, but reduced-fat works in a pinch.
- 1 ½ cups whole milk — Whole milk gives you the richest sauce. You can use 2% in a pinch, but avoid skim milk—it won’t give you the same creamy consistency.
- 2 tablespoons unsalted butter — For the sauce base.
- 1 tablespoon all-purpose flour — Just enough to thicken the sauce slightly.
- ½ teaspoon garlic powder — Adds a subtle savory note to the cheese sauce.
- ½ teaspoon mustard powder — Don’t skip this. It doesn’t make the mac and cheese taste like mustard; it just enhances the cheesy flavor and helps emulsify the sauce.
- ¼ teaspoon smoked paprika — Optional, but adds a lovely depth and a hint of smokiness.
- Salt and black pepper to taste — Go easy on the salt since cheddar is already salty.
For the Garlic Panko Topping
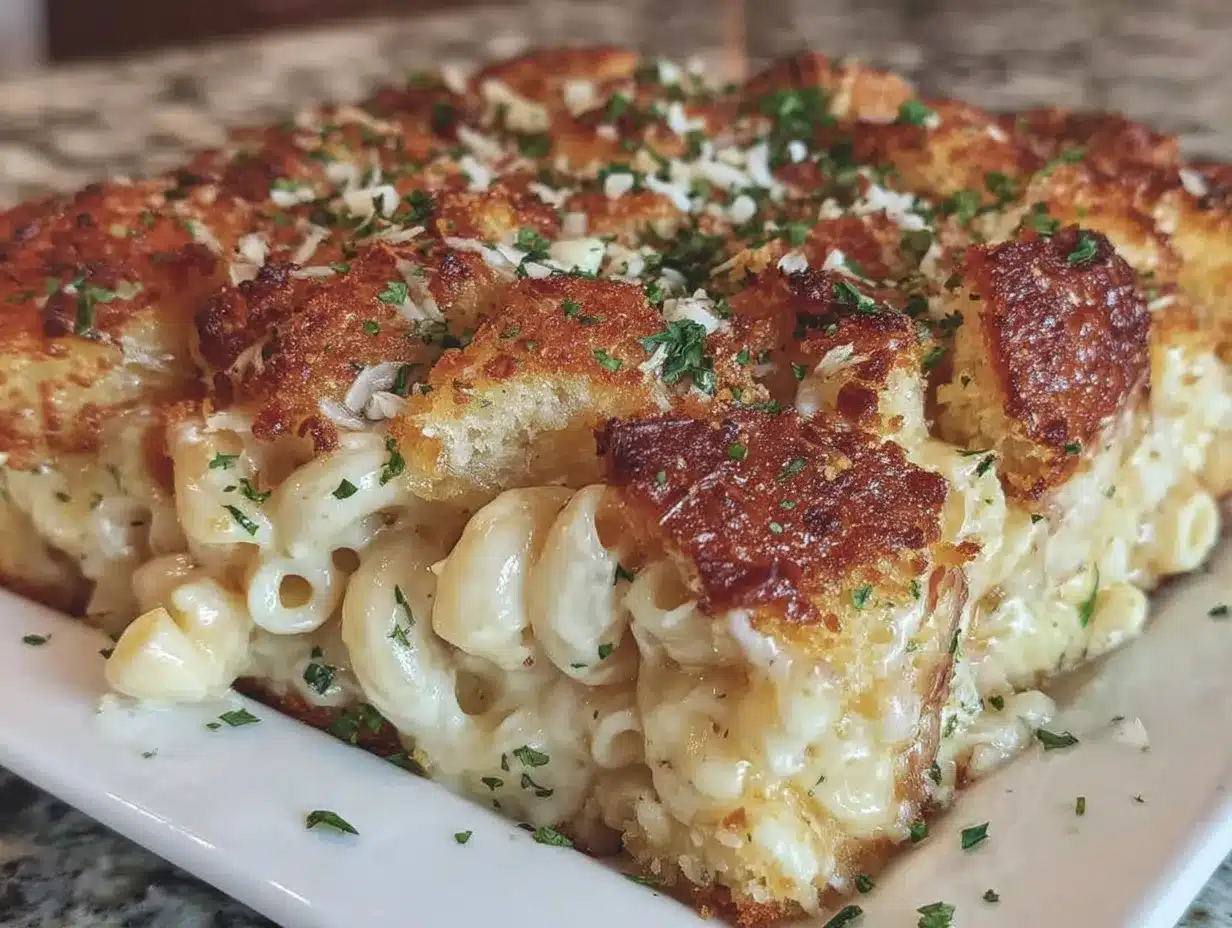
- ½ cup panko breadcrumbs — Panko gives you that light, airy crunch that regular breadcrumbs just can’t match. I prefer Kikkoman panko for consistent texture.
- 2 tablespoons unsalted butter, melted — For toasting the panko and giving it that golden color.
- 2 cloves garlic, minced — Fresh garlic is key here. Don’t use garlic powder for the topping—it won’t give you the same aromatic punch.
- 2 tablespoons grated Parmesan cheese — Adds a salty, nutty flavor to the crust. I recommend a good-quality Parmesan like Parmigiano-Reggiano if you can swing it.
- 1 tablespoon fresh parsley, chopped (optional) — For color and a fresh finish.
Ingredient Selection Tips
When choosing your cheddar, look for a block that’s a deep orange color—that usually indicates more flavor. For the cream cheese, Philadelphia is my go-to because it melts so smoothly. And for the panko, don’t be tempted to substitute regular breadcrumbs. Panko’s light, flaky texture is what makes that topping so special. If you’re lactose-sensitive, you can use lactose-free milk and cream cheese, but the texture will be slightly less rich.
Equipment Needed
You don’t need a lot of fancy equipment for this recipe, which is part of why I love it. Here’s what you’ll need:
- Large pot — For boiling the pasta. Any 4- to 6-quart pot will do.
- Medium saucepan — For making the cheese sauce. A heavy-bottomed saucepan works best to prevent scorching.
- 8×8-inch baking dish — This is the perfect size for this recipe. A 9×9-inch dish works too, but the mac and cheese will be slightly thinner. If you’re doubling the recipe, use a 9×13-inch dish.
- Whisk — Essential for a smooth cheese sauce without lumps.
- Wooden spoon or silicone spatula — For stirring the sauce and combining everything.
- Small skillet — For toasting the panko topping. A non-stick skillet works great here.
- Colander — For draining the pasta.
- Cheese grater — Seriously, grate your own cheese. It makes a huge difference in how the sauce melts. A box grater or a microplane works fine.
- Measuring cups and spoons — For accuracy, especially with the milk and butter.
If you don’t have an 8×8-inch baking dish, you can use a small cast-iron skillet or even individual ramekins for a fun presentation. Just adjust the baking time slightly. And if you don’t have a whisk, a fork works in a pinch—just be prepared to whisk a little longer to get the sauce smooth.
Preparation Method
Alright, let’s get cooking. This recipe moves pretty fast, so I like to have all my ingredients prepped and measured before I start. Trust me, it makes everything smoother.
- Preheat your oven to 375°F (190°C). While the oven is heating up, bring a large pot of salted water to a boil. Salt the water generously—it should taste like the sea. This is your only chance to season the pasta itself.
- Cook the pasta. Add the elbow macaroni to the boiling water and cook for 1 minute less than the package directions call for. For most brands, that’s about 6 to 7 minutes. You want it al dente—firm to the bite—because it will continue cooking in the oven. Drain the pasta in a colander, but don’t rinse it. You want that starch to help the sauce cling to the pasta. Set it aside.
- Start the cheese sauce. In a medium saucepan over medium heat, melt 2 tablespoons of unsalted butter. Once it’s bubbling, whisk in the flour. Cook this mixture, stirring constantly, for about 1 minute. It should smell slightly nutty and look like a thick paste. This is your roux, and it’s the foundation of the sauce.
- Add the milk. Slowly pour in the milk while whisking continuously. Keep whisking until the mixture is smooth and starts to thicken, about 3 to 4 minutes. You’ll know it’s ready when it coats the back of a spoon. Don’t walk away during this step—it can scorch easily.
- Add the cheeses. Reduce the heat to low. Add the softened cream cheese and whisk until it’s completely melted and smooth. Then add the shredded cheddar and mozzarella, one handful at a time, whisking after each addition until fully melted. The sauce should be thick, creamy, and a beautiful pale orange color.
- Season the sauce. Stir in the garlic powder, mustard powder, smoked paprika (if using), and a pinch of salt and pepper. Taste it and adjust the seasoning. Remember, you’ll be adding the salty panko topping later, so don’t go overboard on the salt.
- Combine the pasta and sauce. Add the drained pasta to the saucepan with the cheese sauce. Stir gently with a wooden spoon or silicone spatula until every piece of pasta is coated. The sauce should be thick enough to cling to the pasta but still a little loose—it will thicken more as it bakes.
- Transfer to the baking dish. Pour the mac and cheese into your greased 8×8-inch baking dish and spread it into an even layer. Don’t press it down; just let it settle naturally.
- Make the garlic panko topping. In a small skillet over medium heat, melt 2 tablespoons of butter. Add the minced garlic and cook for about 30 seconds until fragrant. Stir in the panko breadcrumbs and grated Parmesan. Cook, stirring constantly, for 2 to 3 minutes until the panko is golden brown and toasty. Remove from heat and stir in the parsley if you’re using it.
- Top and bake. Sprinkle the garlic panko mixture evenly over the mac and cheese. Bake for 15 to 18 minutes, until the sauce is bubbly around the edges and the topping is deep golden brown. If you want an extra-crispy topping, you can broil it for the last 1 to 2 minutes—but watch it closely so it doesn’t burn.
- Let it rest. Remove the dish from the oven and let it sit for 5 minutes before serving. This allows the sauce to set up a little so it’s creamy but not runny. I know it’s hard to wait, but trust me on this one.
Cooking Tips & Techniques
I’ve made this recipe enough times to know where things can go wrong. Here are the tips I’ve learned the hard way so you don’t have to.
Grate your own cheese. I know I’ve said this already, but it’s worth repeating. Pre-shredded cheese is coated with cellulose and other anti-caking agents that prevent it from melting smoothly. Your sauce will be grainy instead of silky. Take the extra 3 minutes to grate your own block of cheese. Your taste buds will thank you.
Don’t overcook the pasta. This is probably the most common mistake people make with baked mac and cheese. If you cook the pasta to fully tender, it will turn into mush in the oven. Cook it a full minute less than al dente. It should still have a slight bite to it when you drain it. The oven will finish the job.
Low and slow for the sauce. When you’re melting the cheese into the milk mixture, keep the heat on low. High heat can cause the cheese to seize up or become grainy. Be patient. Let the cheese melt gently, stirring constantly. If you see any steam rising from the sauce, turn the heat down.
Toast the panko separately. This is a game-changer. Most recipes have you sprinkle raw panko on top and bake it, but toasting it first in butter with garlic gives you so much more flavor and a guaranteed crispy texture. Plus, it keeps the garlic from burning in the oven.
Let it rest. I know you’re hungry. I know the smell is driving you crazy. But if you scoop into it right out of the oven, the sauce will be loose and runny. Letting it rest for 5 minutes allows the starches to set and the sauce to thicken to that perfect creamy consistency.
One mistake I made early on: I once used pre-shredded cheese and wondered why my sauce looked like it had curdled. It hadn’t—it was just those anti-caking agents doing their thing. I had to whisk in an extra splash of milk to smooth it out, and it still wasn’t as good as fresh-grated. Learn from my laziness.
Variations & Adaptations
One of the best things about this recipe is how easily it adapts to whatever you have on hand or whatever you’re craving. Here are some of my favorite variations.
Add some protein. Stir in 1 cup of cooked, crumbled bacon, diced ham, or shredded rotisserie chicken after you combine the pasta and sauce. It turns this side dish into a full meal. I’ve done it with leftover pulled pork too, and honestly, it was incredible.
Make it spicy. Add ½ teaspoon of cayenne pepper or red pepper flakes to the cheese sauce, or stir in a diced jalapeño with the garlic in the panko topping. The heat cuts through the richness beautifully. My neighbor swears by adding a dash of hot sauce to her bowl at the table.
Go gluten-free. Use gluten-free pasta (I like the brown rice pasta from Trader Joe’s) and substitute the all-purpose flour with a gluten-free all-purpose blend or cornstarch. Use gluten-free panko or crushed gluten-free crackers for the topping. The sauce will be slightly less thick, but still delicious.
Veggie-loaded version. Sauté 1 cup of chopped broccoli, cauliflower, or spinach and fold it into the mac and cheese before baking. Roasted cherry tomatoes or caramelized onions are also amazing. I’ve even added leftover roasted butternut squash, which made the sauce even creamier.
Different cheese combos. Swap out the mozzarella for Gruyère or Gouda for a more sophisticated flavor. Use white cheddar instead of orange for a different look. You can even use pepper jack for a spicy kick. Just keep the cream cheese—it’s the backbone of the creamy texture.
Individual servings. Divide the mac and cheese among 4 to 6 greased ramekins, top with the panko, and bake for 12 to 15 minutes. These are perfect for dinner parties or when you want to feel fancy on a weeknight.
Serving & Storage Suggestions
This mac and cheese is best served hot, straight from the oven, with that garlic panko topping still crispy. Let it rest for 5 minutes, then scoop it into bowls. I like to serve it with a simple green salad dressed with lemon vinaigrette to cut through the richness. Roasted broccoli or green beans are also perfect companions.
For a full meal, pair it with grilled chicken, meatloaf, or a juicy steak. It’s also incredible alongside barbecue—think pulled pork or smoked brisket. And if you’re serving it as a main dish, a side of roasted vegetables or a crisp slaw rounds it out nicely.
Storage: Leftover mac and cheese keeps in an airtight container in the refrigerator for up to 4 days. The panko topping will lose some of its crunch, but the flavor will still be there. To reheat, I recommend the oven or an air fryer rather than the microwave. The microwave tends to make the pasta mushy and the topping soggy.
To reheat in the oven: Place the mac and cheese in an oven-safe dish, add a splash of milk to loosen the sauce, cover with foil, and bake at 350°F for 15 to 20 minutes. Remove the foil for the last 5 minutes to re-crisp the topping.
To freeze: This mac and cheese freezes surprisingly well. Assemble the dish completely but don’t bake it. Cover tightly with foil and freeze for up to 3 months. When you’re ready to bake, thaw it in the refrigerator overnight, then bake as directed, adding 5 to 10 minutes to the baking time. The panko topping might not be as crispy after freezing, so you can make a fresh batch of topping to sprinkle on before baking.
Flavor development: Honestly, this mac and cheese tastes even better the next day. The flavors meld together overnight, and the sauce thickens to an almost pudding-like consistency. I’ve been known to make it just for the leftovers.
Nutritional Information & Benefits
Let’s be real—this is comfort food, not health food. But that doesn’t mean it can’t fit into a balanced diet. Here’s the estimated nutritional breakdown for one serving (about 1 cup, based on 6 servings):
- Calories: Approximately 480
- Protein: 22g
- Fat: 28g
- Carbohydrates: 38g
- Fiber: 2g
- Sugar: 6g
- Calcium: 35% of the Daily Value
- Iron: 10% of the Daily Value
The cheese provides a good amount of calcium and protein, which helps keep you full. The cream cheese adds a small amount of vitamin A. And while this isn’t a low-calorie dish, it’s made with real, whole ingredients—no processed cheese products or artificial flavors. If you’re watching your calories, you can use reduced-fat cheese and milk, but the texture won’t be quite as luxurious.
For those with dietary restrictions, this recipe contains gluten (from the pasta and panko) and dairy. It’s not suitable for vegans or those with lactose intolerance, but the gluten-free variation mentioned above works well. I personally see this as a once-in-a-while treat, not an everyday meal. But when you need it, it’s exactly what you need.
Conclusion
This quick baked three-cheese mac and cheese with garlic panko has become my go-to for those nights when I need something warm, comforting, and fast. It’s the recipe I turn to when I’m tired, when I’m stressed, when I just want to eat something that feels like a hug. And every time I make it, I think about that parking lot, that foil packet, and my aunt who knew exactly what I needed before I even knew myself.
I hope you give this recipe a try. Don’t be afraid to make it your own—swap the cheeses, add some veggies, throw in some bacon. The beauty of this dish is that it’s forgiving and adaptable. And if you make it on a Tuesday night when you’re exhausted and hungry, I promise it will deliver.
If you do make it, I’d love to hear how it turned out. Leave a comment below and let me know what variations you tried. Did you add bacon? Swap in Gouda? Make it spicy? Share your creation—I read every single comment, and your ideas might just inspire my next batch. Happy cooking, friends.
Frequently Asked Questions
Can I make this mac and cheese ahead of time?
Absolutely. You can assemble the entire dish (without the panko topping) up to 24 hours in advance. Cover and refrigerate. When you’re ready to bake, make the panko topping fresh, sprinkle it on, and bake as directed. You may need to add 5 to 10 minutes to the baking time since the dish will be cold from the fridge.
Why is my cheese sauce grainy?
Grainy cheese sauce is usually caused by one of two things: using pre-shredded cheese (which has anti-caking agents) or overheating the sauce. Always grate your own cheese from a block, and keep the heat on low when melting the cheese into the milk mixture. If your sauce does get grainy, try whisking in a splash of cold milk or a teaspoon of lemon juice to help smooth it out.
Can I use a different type of pasta?
Yes, any short pasta shape works well. Cavatappi, shells, rotini, penne, or even ditalini are all great choices. Just be sure to cook it 1 minute less than al dente since it will continue cooking in the oven. Avoid long pasta like spaghetti or fettuccine—they don’t hold the sauce as well.
How do I make the panko topping extra crispy?
The key is toasting the panko in butter before baking, as the recipe directs. For even more crunch, you can broil the mac and cheese for the last 1 to 2 minutes of baking. Just watch it closely so the panko doesn’t burn. You can also mix in a tablespoon of melted butter with the panko for extra richness and crispiness.
Can I double this recipe?
Yes, this recipe doubles beautifully. Use a 9×13-inch baking dish and increase the baking time by about 5 to 10 minutes. Make sure your pot is large enough to hold the extra pasta and sauce. Everything else scales up proportionally—just keep an eye on the sauce as it thickens, since a larger quantity may take slightly longer to come together.
Pin This Recipe!
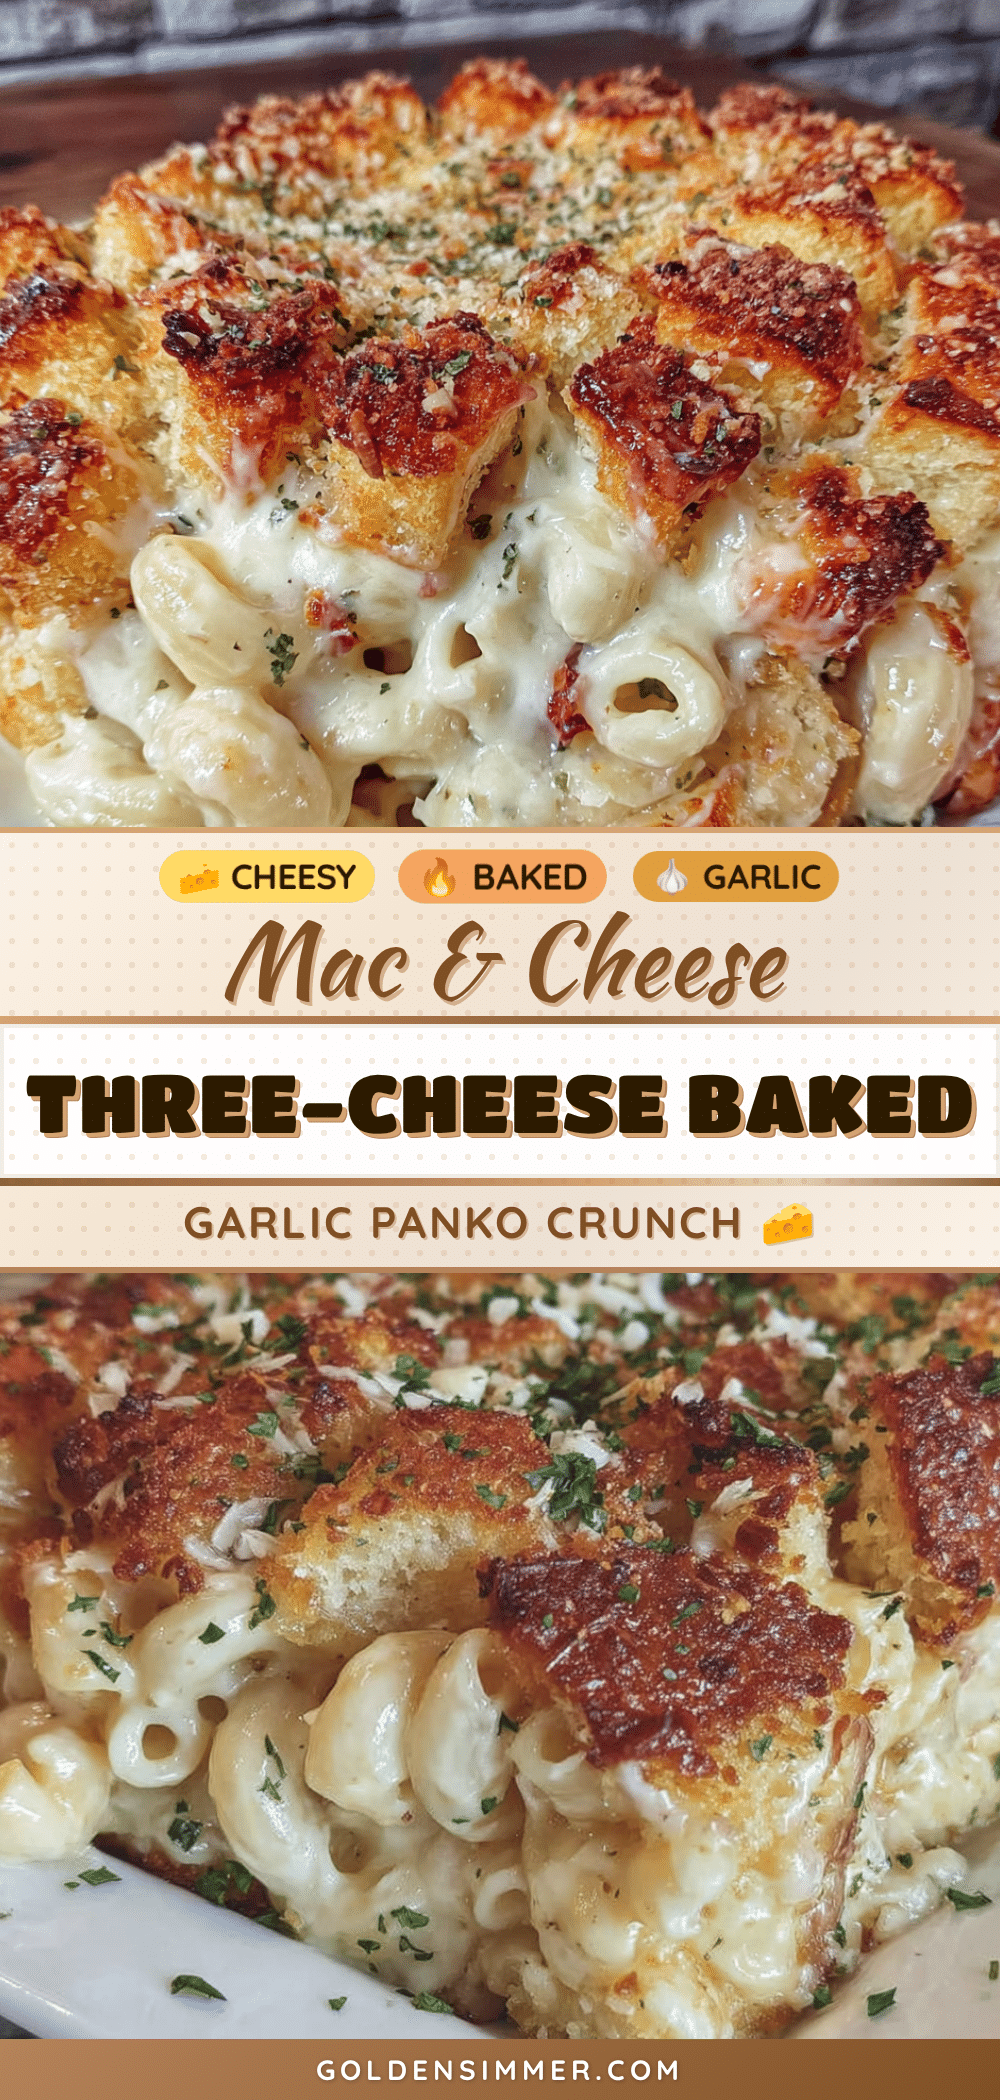
Quick Baked 3-Cheese Mac and Cheese with Garlic Panko
A quick and easy baked mac and cheese with three cheeses and a crispy garlic panko topping, perfect for weeknight comfort food.
- Prep Time: 10 minutes
- Cook Time: 20 minutes
- Total Time: 30 minutes
- Yield: 6 servings 1x
- Category: Main Course
- Cuisine: American
Ingredients
- 8 ounces elbow macaroni
- 2 cups shredded sharp cheddar cheese
- 1 cup shredded mozzarella cheese
- 4 ounces cream cheese, softened
- 1 ½ cups whole milk
- 2 tablespoons unsalted butter
- 1 tablespoon all-purpose flour
- ½ teaspoon garlic powder
- ½ teaspoon mustard powder
- ¼ teaspoon smoked paprika (optional)
- Salt and black pepper to taste
- ½ cup panko breadcrumbs
- 2 tablespoons unsalted butter, melted
- 2 cloves garlic, minced
- 2 tablespoons grated Parmesan cheese
- 1 tablespoon fresh parsley, chopped (optional)
Instructions
- Preheat your oven to 375°F (190°C). Bring a large pot of salted water to a boil.
- Cook the elbow macaroni for 1 minute less than al dente (about 6-7 minutes). Drain and set aside.
- In a medium saucepan over medium heat, melt 2 tablespoons of butter. Whisk in the flour and cook for 1 minute until nutty.
- Slowly pour in the milk while whisking continuously. Cook until thickened, about 3-4 minutes.
- Reduce heat to low. Add the cream cheese and whisk until melted. Gradually add the cheddar and mozzarella, whisking until smooth.
- Stir in garlic powder, mustard powder, smoked paprika (if using), salt, and pepper. Adjust seasoning.
- Add the drained pasta to the sauce and stir until coated.
- Transfer the mixture to a greased 8×8-inch baking dish and spread evenly.
- In a small skillet over medium heat, melt 2 tablespoons of butter. Add minced garlic and cook for 30 seconds. Stir in panko and Parmesan, cooking until golden brown (2-3 minutes). Stir in parsley if using.
- Sprinkle the panko mixture over the mac and cheese. Bake for 15-18 minutes until bubbly and golden. Optionally broil for 1-2 minutes for extra crispiness.
- Let rest for 5 minutes before serving.
Notes
Grate your own cheese for a smooth sauce. Cook pasta 1 minute less than al dente. Toast panko separately for best crunch. Let rest 5 minutes before serving.
Nutrition
- Serving Size: 1 cup
- Calories: 480
- Sugar: 6
- Sodium: 620
- Fat: 28
- Saturated Fat: 16
- Carbohydrates: 38
- Fiber: 2
- Protein: 22
Keywords: mac and cheese, baked mac and cheese, three cheese, garlic panko, quick dinner, comfort food