Love this? Save it for later!
Share the inspiration with your friends
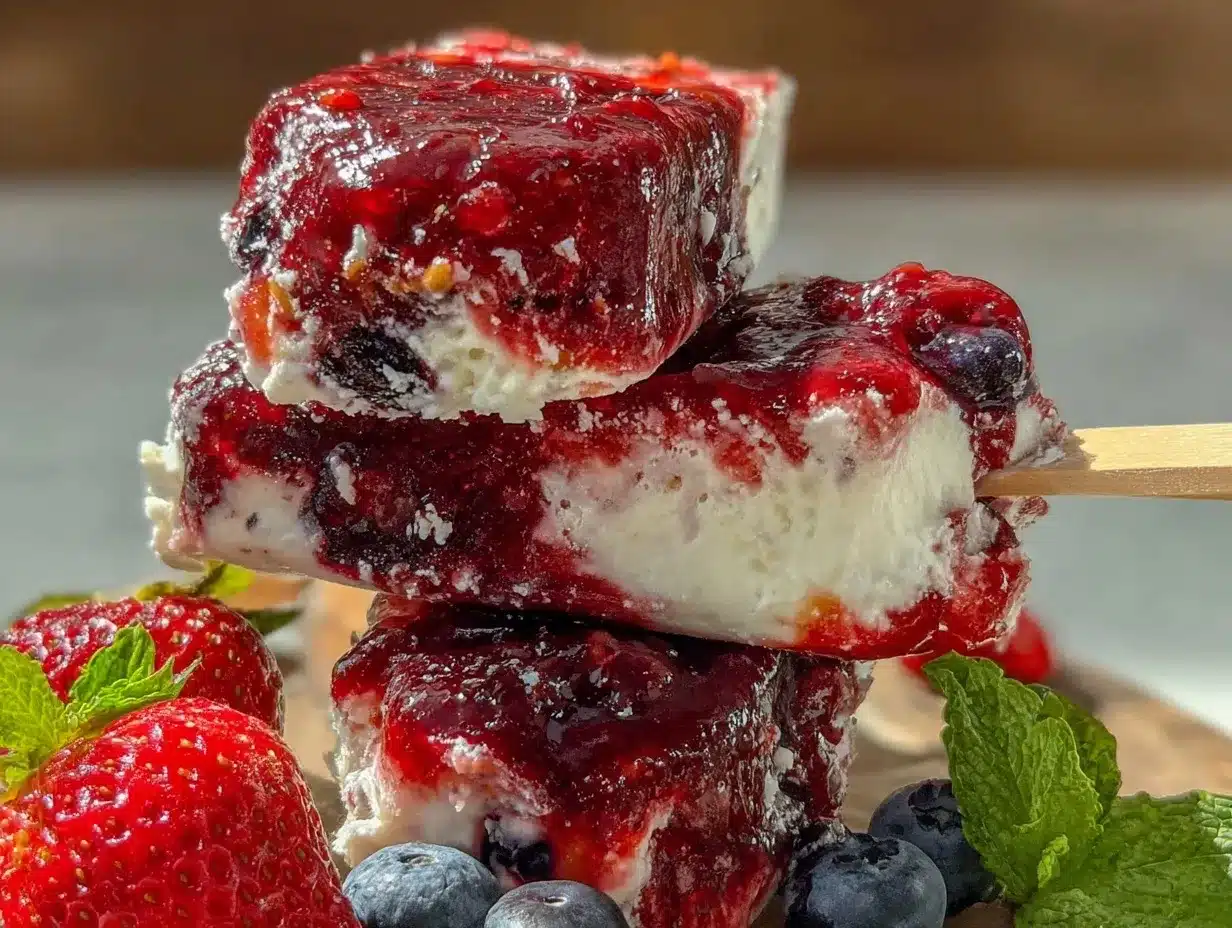
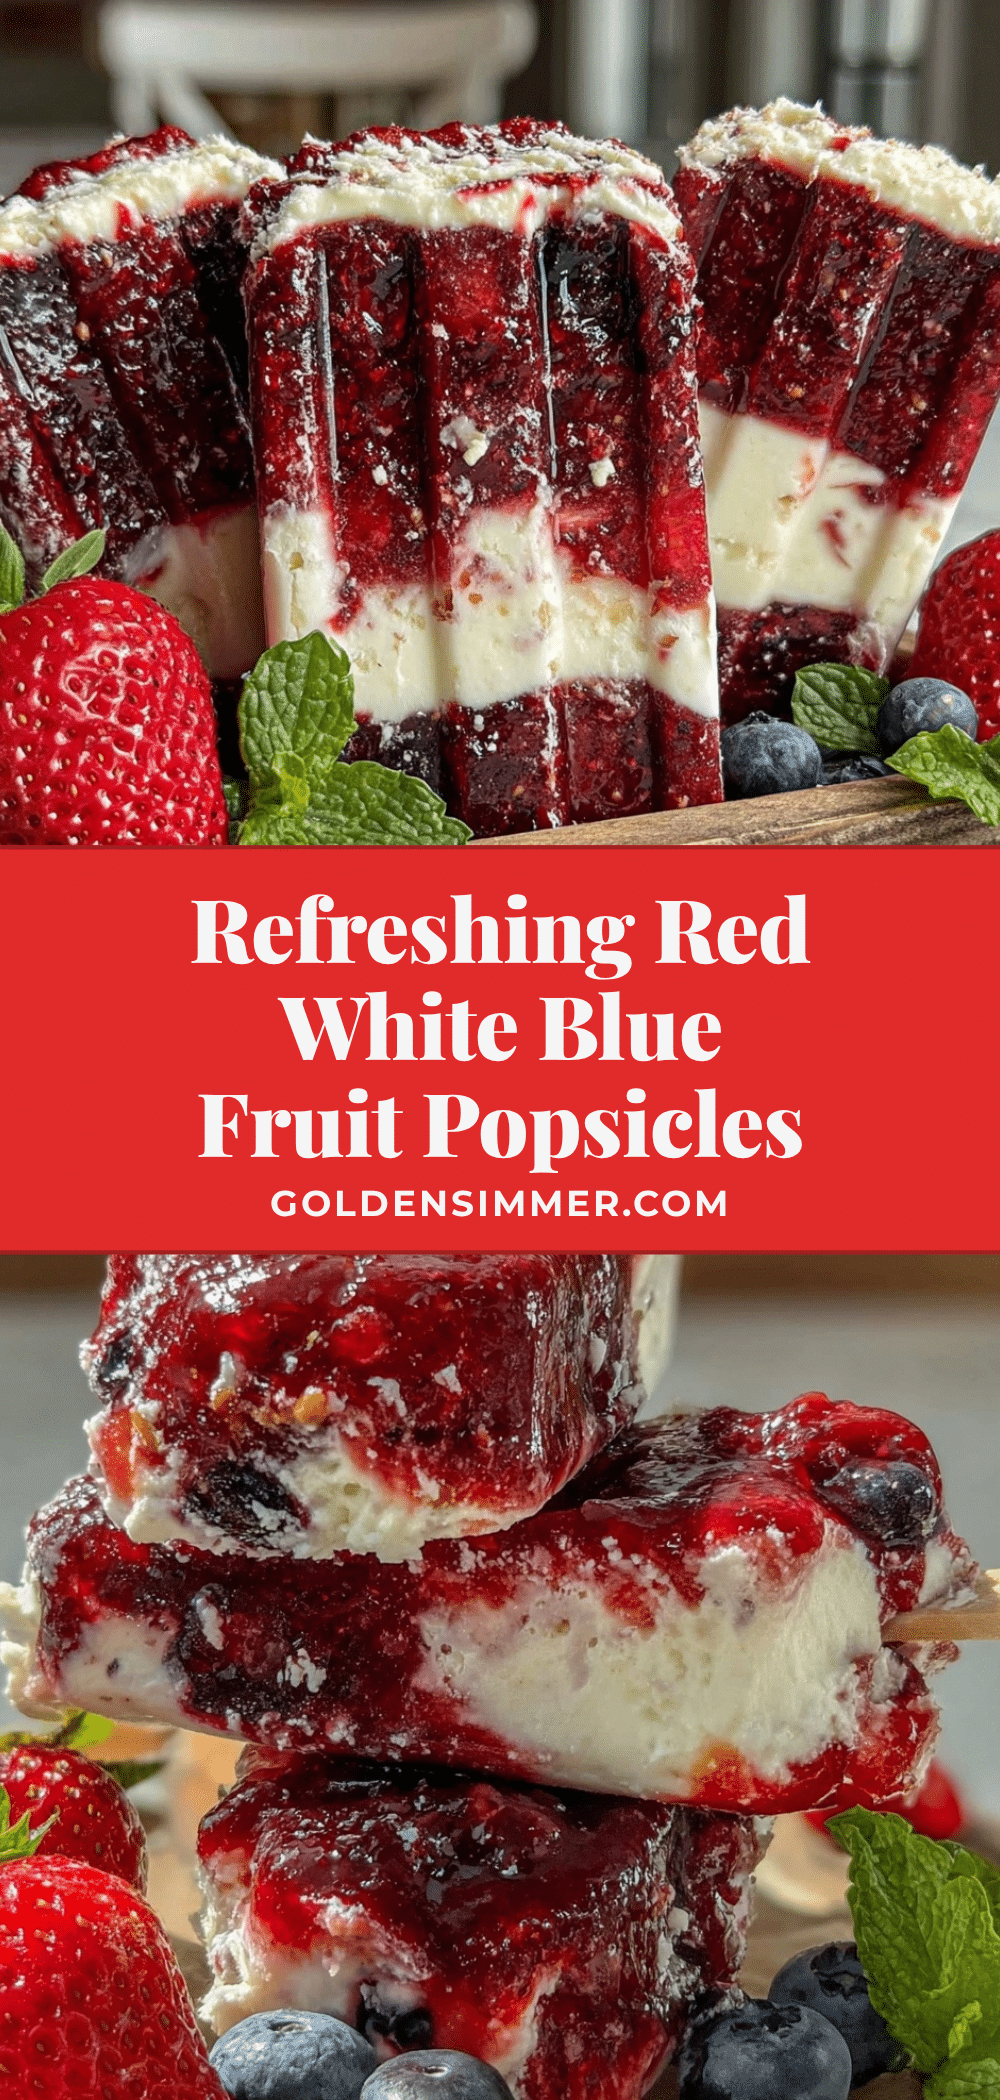
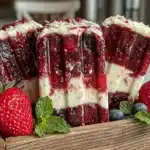
“The ice cream truck was nowhere in sight, and the July sun was relentless,” I remember thinking one blazing Saturday afternoon last summer. The neighborhood kids were all out front, clutching their melting treats, but I was determined to whip up something cooler — and healthier — right at home. I grabbed my blender, some fresh strawberries, blueberries, and coconut milk, and started experimenting. Honestly, it was a bit chaotic: juice spilled, popsicle sticks went missing, and the blender lid nearly jumped off mid-spin. But the result? These Fresh Red White and Blue Popsicles with Real Fruit Puree that tasted like summer itself.
Maybe you’ve been there — stuck craving a festive, refreshing dessert that’s not just sugar and artificial flavors. This recipe came out of that moment of necessity and turned into a seasonal staple. What’s great is that it’s vibrant, naturally sweet, and ridiculously easy to make with ingredients you probably already have on hand. Plus, it brings a little nostalgia — that feeling you get from those classic Fourth of July treats — but with a fresh, homemade twist. I still laugh when I think about my cat knocking over a bowl of blueberry puree mid-prep, leaving a beautiful purple trail across my counter. Imperfect? Absolutely. Delicious? Without a doubt.
These popsicles have stuck with me because they’re not just pretty to look at; they’re the perfect balance of sweet and tangy, cold and creamy, with real fruit flavor shining through every bite. Whether you’re hosting a backyard barbecue or just want to beat the heat, this recipe is a keeper. Let me tell you, once you try making popsicles with real fruit puree, you won’t want to go back to store-bought ones.
Why You’ll Love This Fresh Red White and Blue Popsicles Recipe
After testing this recipe more times than I care to admit (especially on hot afternoons), I can confidently say it’s a winner for so many reasons. Here’s why you’ll want to make these popsicles again and again:
- Quick & Easy: Ready in under 20 minutes plus freezing time — ideal for last-minute summer cravings or when the kids suddenly demand a cool treat.
- Simple Ingredients: No need for fancy syrups or artificial colors. Just fresh berries, a touch of natural sweetener, and creamy coconut milk.
- Perfect for Summer Celebrations: Whether it’s the Fourth of July, a picnic, or just a sunny afternoon, these popsicles bring festive vibes in every bite.
- Crowd-Pleaser: Kids and adults alike love the fresh fruit flavors and creamy texture without feeling weighed down.
- Unbelievably Delicious: The layers of pureed strawberries, creamy coconut milk, and blueberry bursts make each popsicle a flavor-packed delight.
This isn’t just another popsicle recipe. The layering technique combined with real fruit puree makes the texture silky yet fresh. I love that the coconut milk adds a subtle creaminess that softens the tartness of the berries, and the natural sweetness shines through without any artificial aftertaste. Honestly, it’s the kind of treat that makes you pause and savor, closing your eyes after that first bite. It’s summer nostalgia in a popsicle mold, with a healthier, homemade soul.
What Ingredients You Will Need
This recipe relies on simple, wholesome ingredients to give you bold, fresh flavors without fuss. Most are pantry staples or easily found at your local market, and you can swap some out depending on your diet or what’s in season.
- Fresh Strawberries (about 2 cups, hulled and rinsed) – the base for the red layer; ripe and juicy ones work best.
- Fresh Blueberries (1 ½ cups, rinsed) – for the blue layer; if you can find wild blueberries, even better for a deeper flavor.
- Unsweetened Coconut Milk (1 cup) – adds creaminess to the white layer; I personally trust Native Forest brand for its rich texture.
- Honey or Maple Syrup (2-3 tablespoons) – natural sweeteners to balance tartness; adjust to taste.
- Fresh Lemon Juice (1 tablespoon) – brightens the fruit flavors and adds a zing.
- Vanilla Extract (1 teaspoon) – optional but adds a lovely depth to the creamy layer.
- Water (a splash, about 2 tablespoons) – to thin out the fruit purees if needed for better blending.
Ingredient Tips: If strawberries aren’t in season, frozen ones thawed slightly work well too, just drain excess liquid before pureeing. For a dairy-free version, coconut milk is perfect, but you could swap with almond or oat milk for a different creaminess. Want to make it vegan? Use maple syrup instead of honey. Feel free to add a pinch of sea salt to the berry layers to really bring out their natural sweetness.
Equipment Needed
- High-Speed Blender or Food Processor: Essential for turning fresh berries into smooth purees quickly. I’ve tried an older blender before and ended up with chunky popsicles — not the vibe.
- Popsicle Molds: You can find these in various sizes and materials; silicone molds are my favorite for easy popping.
- Mixing Bowls: For combining ingredients (a couple of medium bowls work well).
- Measuring Cups and Spoons: Precision helps get the balance of sweetness and tartness right.
- Fine Mesh Sieve: Optional but helpful if you want to strain out seeds for a smoother texture, especially for strawberry puree.
- Wooden Popsicle Sticks: If your molds don’t come with sticks, grab these separately.
If you don’t have popsicle molds, small paper cups with toothpicks as sticks can work in a pinch. Just be sure to double-wrap the sticks with foil so they stand upright. Also, cleaning your blender right after use saves a headache later — trust me, those berry stains can be stubborn!
Preparation Method
- Prepare the Strawberry Puree (Red Layer): In your blender, add 2 cups of hulled strawberries, 1 tablespoon honey, and 1 teaspoon fresh lemon juice. Blend until smooth. If you want a seedless texture, pour the puree through a fine mesh sieve into a bowl. This step takes about 5 minutes.
- Fill the Molds with the Red Layer: Spoon the strawberry puree into the popsicle molds until they’re about one-third full. Gently tap the molds on the counter to remove air bubbles. Freeze for 30-45 minutes, or until the layer is firm but not fully frozen.
- Make the Creamy White Layer: Combine 1 cup unsweetened coconut milk, 1 teaspoon vanilla extract, and 1 tablespoon honey in a bowl. Whisk until smooth. Pour gently over the frozen strawberry layer, filling the molds another third of the way. Freeze again for 30-45 minutes.
- Prepare the Blueberry Puree (Blue Layer): Blend 1 ½ cups fresh blueberries with 1 tablespoon honey and 1 teaspoon lemon juice until smooth. If needed, add up to 2 tablespoons of water to help blend. Strain for a smooth finish, if desired.
- Finish Filling the Molds: Pour the blueberry puree over the white layer, filling the molds to the top. Insert popsicle sticks and freeze for at least 4 hours, preferably overnight, until completely firm.
- Unmold and Serve: To release the popsicles, run warm water briefly on the outside of the molds. Avoid soaking the popsicles, or they can get soggy. Enjoy immediately or store in a freezer-safe bag.
Pro Tips: Patience is key! Letting each layer set properly prevents colors from bleeding together. If you’re in a hurry, a mini freezer works faster but keep an eye to avoid over-freezing. Also, if you find the coconut milk layer too thick, stir in a splash of water before pouring.
Cooking Tips & Techniques
Making popsicles might seem simple, but a few tricks make all the difference. When I first started, I rushed the layering, and the colors blended into a less fun purple mess. Waiting for each layer to firm up is crucial — you can test by gently pressing your finger on the surface to see if it’s set.
Using fresh, ripe berries is a game changer. I once used old frozen berries, and the flavor was dull. Fresh fruit tastes brighter and sweeter, reducing the need for extra sweetener.
For extra smoothness, I strain the berry purees, especially the strawberry one, to remove seeds. It takes a couple of minutes but makes the texture more pleasant, especially for kids.
Multitasking helps too: while one layer freezes, prep the next. This keeps your workflow smooth and avoids long waiting periods. If you’re making large batches, consider freezing in smaller molds or ice cube trays for quick, bite-sized treats.
Lastly, don’t forget to label your popsicles if you make different flavors or variations. I’ve lost count of how many times I accidentally grabbed the wrong one!
Variations & Adaptations
- Vegan & Allergy-Friendly: Use maple syrup instead of honey and swap coconut milk with almond or oat milk for a nutty twist.
- Lower Sugar Option: Reduce the sweetener by half; the natural fruit sweetness often shines enough, especially with ripe berries.
- Other Seasonal Fruits: Swap strawberries and blueberries with mango and kiwi for a tropical red-green-yellow version, or raspberries and blackberries for a deeper berry medley.
- Adult Version: Add a splash of lemon vodka or rum to the berry purees before freezing for a grown-up twist (freeze thoroughly for safety).
- Extra Creamy: Mix Greek yogurt into the white layer instead of coconut milk for a tangier, protein-packed option.
One personal favorite I tried was adding fresh mint leaves to the blueberry puree for a refreshing lift. I muddled the leaves lightly before blending, and it added a surprising, delightful flavor that became an instant hit.
Serving & Storage Suggestions
These popsicles are best served straight from the freezer — cold and firm, but not rock solid. Let them sit at room temperature for a minute or two before unmolding for easier removal.
They pair wonderfully with light summertime snacks like crispy garlic chicken or a fresh garden salad. For drinks, a sparkling lemonade or iced tea complements the fruity flavors perfectly.
Store leftovers in an airtight freezer-safe container or zip-top bag to prevent freezer burn. They keep well for up to two weeks. When ready to enjoy again, thaw briefly at room temperature or run under warm water to loosen from the mold.
Flavors stay bright and fresh even after freezing, but the texture is always best within the first week. Trust me, these popsicles rarely last that long in my house!
Nutritional Information & Benefits
Each popsicle roughly contains:
| Nutrient | Per Serving (1 popsicle) |
|---|---|
| Calories | 80-100 kcal |
| Carbohydrates | 18g (mostly natural sugars) |
| Fat | 2.5g (from coconut milk) |
| Protein | 1g |
| Fiber | 2g |
The fresh berries provide antioxidants like vitamin C and manganese, which support immune health and skin vitality. Coconut milk adds healthy medium-chain triglycerides (MCTs), which are good fats that the body readily uses for energy. Plus, this recipe is naturally gluten-free and can be made dairy-free or vegan with simple swaps.
From a wellness perspective, I appreciate that these popsicles satisfy sweet cravings without refined sugars or artificial additives, helping me feel good about what I’m eating even on indulgent days.
Conclusion
This recipe for Fresh Red White and Blue Popsicles with Real Fruit Puree is truly a summer favorite that’s simple, colorful, and packed with real fruit flavor. Whether you’re looking for a fun project with kids or a way to impress guests at your next barbecue, these popsicles bring that perfect cool-down treat with a homemade touch.
Feel free to tweak the sweetness and fruit combos to suit your taste — that’s the best part about making them yourself! Honestly, this recipe has stayed in my rotation because it’s straightforward, healthy, and a little nostalgic all at once. I’d love to hear how you make them your own, so don’t hesitate to share your thoughts or creative twists in the comments below.
Now, grab your blender and popsicle molds — summer just got a whole lot tastier!
FAQs About Fresh Red White and Blue Popsicles
Can I use frozen berries instead of fresh?
Yes! Thaw frozen berries slightly and drain excess liquid before pureeing to avoid watery popsicles. Frozen berries are a great year-round alternative.
How long do these popsicles last in the freezer?
Stored properly in an airtight container, they keep well for up to two weeks. For best texture and flavor, enjoy within the first week.
Can I make these popsicles without coconut milk?
Absolutely. You can substitute with almond, oat, or even Greek yogurt for the white layer, depending on your dietary preferences.
Do I need to strain the fruit purees?
Straining is optional but recommended if you want a smoother texture without seeds, especially for strawberries. It’s a quick step that improves mouthfeel.
What if I don’t have popsicle molds?
You can use small paper cups with wooden sticks or even silicone muffin liners. Just be sure to support the sticks upright while freezing.
Pin This Recipe!
Fresh Red White and Blue Popsicles Recipe Easy Homemade Real Fruit Puree
These vibrant and naturally sweet popsicles combine fresh strawberries, creamy coconut milk, and blueberries for a refreshing summer treat that’s quick and easy to make.
- Prep Time: 15 minutes
- Cook Time: 5 minutes blending + freezing time
- Total Time: 5 hours (including freezing)
- Yield: 6 popsicles 1x
- Category: Dessert
- Cuisine: American
Ingredients
- 2 cups fresh strawberries, hulled and rinsed
- 1 ½ cups fresh blueberries, rinsed
- 1 cup unsweetened coconut milk
- 2–3 tablespoons honey or maple syrup
- 1 tablespoon fresh lemon juice
- 1 teaspoon vanilla extract (optional)
- 2 tablespoons water (optional, to thin purees)
Instructions
- Prepare the Strawberry Puree (Red Layer): In your blender, add 2 cups of hulled strawberries, 1 tablespoon honey, and 1 teaspoon fresh lemon juice. Blend until smooth. If desired, strain through a fine mesh sieve for a seedless texture. This takes about 5 minutes.
- Fill the molds with the Red Layer: Spoon the strawberry puree into the popsicle molds until about one-third full. Tap molds gently to remove air bubbles. Freeze for 30-45 minutes until firm but not fully frozen.
- Make the Creamy White Layer: Combine 1 cup unsweetened coconut milk, 1 teaspoon vanilla extract, and 1 tablespoon honey in a bowl. Whisk until smooth. Pour gently over the frozen strawberry layer, filling molds another third of the way. Freeze again for 30-45 minutes.
- Prepare the Blueberry Puree (Blue Layer): Blend 1 ½ cups fresh blueberries with 1 tablespoon honey and 1 teaspoon lemon juice until smooth. Add up to 2 tablespoons water if needed for blending. Strain if desired.
- Finish Filling the Molds: Pour the blueberry puree over the white layer, filling molds to the top. Insert popsicle sticks and freeze for at least 4 hours or overnight until completely firm.
- Unmold and Serve: Run warm water briefly on the outside of the molds to release popsicles. Avoid soaking to prevent sogginess. Serve immediately or store in a freezer-safe bag.
Notes
Patience is key to prevent colors from bleeding; let each layer freeze until firm before adding the next. Straining purees improves texture, especially for kids. Use fresh ripe berries for best flavor. If coconut milk layer is too thick, stir in a splash of water before pouring. Popsicles keep well up to two weeks in an airtight container.
Nutrition
- Serving Size: 1 popsicle
- Calories: 90
- Sugar: 15
- Sodium: 5
- Fat: 2.5
- Saturated Fat: 2
- Carbohydrates: 18
- Fiber: 2
- Protein: 1
Keywords: popsicles, summer dessert, fresh fruit, strawberry, blueberry, coconut milk, homemade, healthy, gluten-free, vegan option