Love this? Save it for later!
Share the inspiration with your friends
My friend Carla watched me staring blankly into her fridge one October afternoon, my own kids bouncing off the walls while hers played quietly with Play-Doh. She didn’t say anything at first. Then she pulled out a tube of crescent dough and a pack of hot dogs, and winked. “You’re overthinking it,” she said, handing me a butter knife. “Halloween food is supposed to be fun, not fancy.” That afternoon, as we wrapped strips of dough around those little sausages and stuck mustard eyes on them, I realized she was right. The kids squealed, the adults laughed, and those silly mummy hot dogs disappeared before the punch bowl was even touched. Honestly, I’ve made them for every Halloween gathering since—they’re the one thing guests actually fight over.
Maybe you’ve been there, scrambling for a dish that looks festive but doesn’t stress you out. That’s exactly what these mummy hot dogs deliver. They’re ridiculously simple, come together in twenty minutes flat, and somehow manage to look both adorable and spooky. I mean, what’s not to love? Let me show you how to make them the star of your next Halloween party.
Why You’ll Love This Recipe
I’ve tested this recipe more times than I care to admit—through burnt edges, soggy dough, and one memorable incident where the mustard eyes slid off entirely. But after years of trial and error, I can confidently say this version is foolproof. Here’s why it works so well:
- Quick & Easy: From fridge to table in under 20 minutes. Perfect for last-minute party prep or when you need a crowd-pleaser fast.
- Simple Ingredients: Just three main components—hot dogs, crescent dough, and mustard. You probably already have everything in your kitchen.
- Perfect for Halloween Gatherings: These little guys steal the show at any spooky-themed party, potluck, or family movie night.
- Crowd-Pleaser: Kids devour them. Adults sneak seconds. I’ve never seen leftovers.
- Unbelievably Delicious: Buttery, flaky crescent dough wrapped around juicy hot dogs—it’s comfort food at its finest.
What makes this recipe different from the dozens you’ll find online? It’s the technique. Most recipes tell you to wrap dough strips haphazardly, but I’ve learned that spacing them just right gives you that perfect mummy look without doughy gaps or burnt edges. Plus, I’ll share my trick for keeping those mustard eyes in place—because nothing ruins the spooky vibe like a mummy with no face.
This isn’t just another appetizer. It’s the kind of dish that makes people close their eyes after the first bite, then immediately reach for another. Perfect for impressing guests without breaking a sweat, or turning a simple snack into something memorable.
What Ingredients You Will Need
This recipe uses simple, pantry-friendly ingredients to deliver big flavor and maximum fun without any fuss. Most of these are staples you likely already have on hand, which makes this the perfect last-minute Halloween treat.
- Hot dogs (8 standard-size) – Use your favorite brand. I personally prefer beef hot dogs for their richer flavor, but turkey or chicken work great too. For a fancier twist, try cocktail sausages for mini mummies.
- Crescent dough (1 can, 8 oz) – Pillsbury is my go-to for consistent results. The dough is buttery, flaky, and wraps beautifully. Look for the seamless sheet version if you want to cut your own strips—it’s easier to handle.
- Yellow mustard – For the eyes. The bright color pops against the golden dough. You can also use ketchup or sriracha for a different look, but mustard gives that classic spooky mummy face.
- Egg wash (1 large egg + 1 tablespoon water) – This gives the dough that gorgeous golden-brown finish. Skip it if you’re in a rush, but honestly, it makes a huge difference.
- Sesame seeds or poppy seeds (optional) – For extra texture and a fun “bandage” effect. Totally optional, but my kids love the crunch.
- Cooking spray or parchment paper – To prevent sticking. I’ve used both, and parchment paper makes cleanup a breeze.
Ingredient Selection Tips: For the best texture, choose hot dogs that are plump but not overly thick—they should fit comfortably inside the dough strips. If you’re using cocktail sausages, you’ll get about 16-20 mini mummies from one can of dough. For a gluten-free option, use gluten-free crescent dough (available at most major grocery stores) and check your hot dog labels.
Substitution Guidance: No crescent dough? Try puff pastry sheets cut into thin strips—they bake up even flakier. For a dairy-free version, use dairy-free crescent dough and skip the egg wash (brush with olive oil instead). And if you’re feeding a crowd, double the recipe—trust me, they’ll disappear fast.
Equipment Needed
You don’t need fancy gadgets for this recipe, which is part of its charm. Here’s what you’ll need:
- Baking sheet – Standard half-sheet pan works perfectly. Line it with parchment paper for easy cleanup.
- Sharp knife or pizza cutter – For slicing the crescent dough into strips. A pizza cutter gives cleaner edges, but a knife works fine.
- Pastry brush – For applying the egg wash. A silicone brush is my favorite—it doesn’t shed bristles.
- Small bowl – To whisk the egg wash.
- Toothpicks (optional) – For securing the dough ends if they start to unravel. I rarely need them, but they’re good to have on hand.
- Cooling rack – Lets the mummies cool evenly without getting soggy on the bottom.
Budget-Friendly Options: If you don’t have a pastry brush, use a clean paper towel dipped in egg wash. No pizza cutter? A butter knife works—just be gentle so the dough doesn’t tear. I’ve made these in a friend’s kitchen with nothing but a butter knife and a baking sheet, and they turned out perfectly.
Preparation Method
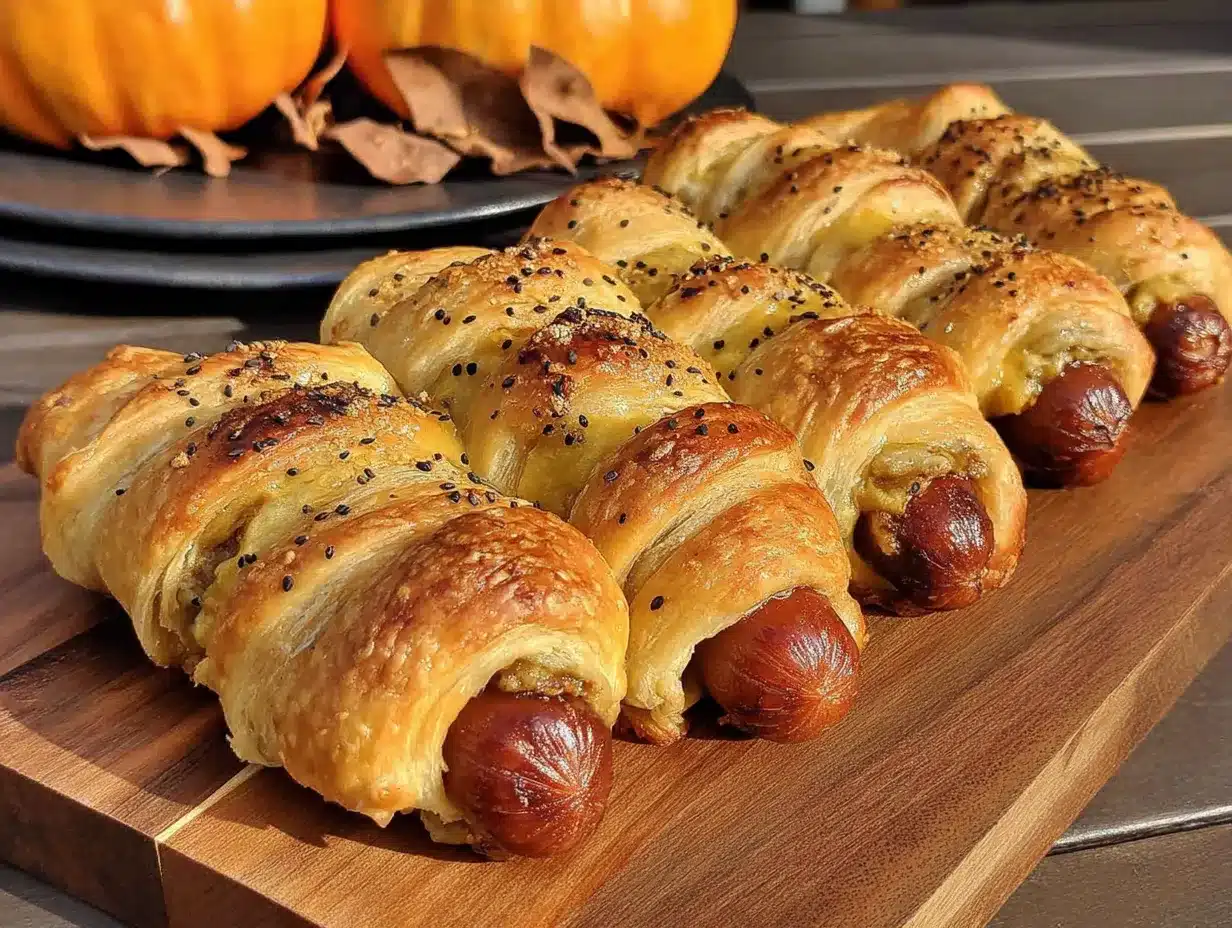
Follow these steps carefully, and you’ll have the most adorable mummy hot dogs on the block. I’ve included timing and sensory cues so you know exactly what to look for.
- Preheat your oven to 375°F (190°C). Line a baking sheet with parchment paper. This is non-negotiable—trust me, cleanup is so much easier.
- Unroll the crescent dough onto a clean cutting board. If you’re using the perforated sheets, press the seams together gently to create one solid rectangle. You should have a roughly 12×8-inch piece of dough.
- Cut the dough into thin strips using a sharp knife or pizza cutter. Aim for strips about 1/2-inch wide. You want them thin enough to wrap multiple times but thick enough to hold together. I usually get about 12-14 strips per can.
- Pat the hot dogs dry with a paper towel. This helps the dough stick better. If your hot dogs are cold from the fridge, let them sit at room temperature for 5 minutes—cold dogs can make the dough soggy.
- Wrap each hot dog with 2-3 strips of dough, starting at one end and working your way to the other. Leave a small gap at the top for the face—about 1/2 inch. Don’t wrap too tightly; the dough needs room to expand as it bakes. Space the strips slightly apart so you can see the hot dog peeking through, like bandages on a mummy.
- Place the wrapped hot dogs on the prepared baking sheet, spacing them about 2 inches apart. They’ll puff up as they bake, so give them room to breathe.
- Whisk the egg and water together in a small bowl until smooth. Brush the egg wash generously over each mummy, making sure to coat all the dough strips. This is what gives them that gorgeous golden color.
- Bake for 12-15 minutes, or until the dough is golden brown and the hot dogs are heated through. At the 10-minute mark, check on them—if the edges are browning too fast, tent loosely with foil. You’ll know they’re done when the kitchen smells buttery and the dough looks flaky and crisp.
- Remove from the oven and let cool on the baking sheet for 2 minutes. Then transfer to a cooling rack. This step is crucial—if you add the mustard eyes while the mummies are too hot, the mustard will melt and slide right off.
- Add the mustard eyes once the mummies are cool enough to handle, about 5 minutes. Use a toothpick to dab two small dots of mustard on the exposed hot dog at the top. For a spookier look, make the eyes slightly uneven—like a real mummy waking up from a thousand-year nap.
Pro Tip: If the dough strips start to unravel while baking, gently press them back into place with a spatula as soon as they come out of the oven. The residual heat will set them in position.
Cooking Tips & Techniques
I’ve made these mummy hot dogs more times than I can count, and I’ve learned a few things the hard way. Here are my best tips for guaranteed success:
Don’t Overwork the Dough: Crescent dough is delicate. Handle it as little as possible, or it will become tough and dense. If the dough starts to feel sticky, dust your hands lightly with flour.
Space the Strips Strategically: This is the secret to the perfect mummy look. Leave about 1/4 inch between each strip of dough. Too close together, and they’ll bake into a solid mass. Too far apart, and it won’t look like a mummy at all. Think of it like bandages—you want some skin showing through.
Watch the Baking Time: Every oven runs differently. Start checking at the 12-minute mark. The dough should be golden brown, not dark brown. If you’re using cocktail sausages, reduce the baking time to 10-12 minutes.
The Mustard Eye Trick: Here’s something I learned after a particularly disastrous batch: add the mustard eyes only after the mummies have cooled for at least 5 minutes. If you do it too soon, the mustard turns into a runny mess. For extra staying power, use a toothpick to create a tiny divot in the hot dog before adding the mustard—it holds the dot in place.
Make Ahead Strategy for Parties: You can wrap the hot dogs up to 4 hours in advance and keep them covered in the refrigerator. Brush with egg wash just before baking. This is a lifesaver when you’re hosting—just pop them in the oven when guests arrive, and they’ll be ready in 15 minutes.
Variations & Adaptations
One of the best things about this recipe is how easy it is to customize. Here are some variations I’ve tried and loved:
Spicy Mummy Dogs: Use spicy Italian sausages or chorizo instead of regular hot dogs. Add a tiny dot of sriracha to the mustard eyes for an extra kick. My brother-in-law requests these every year.
Cheesy Mummies: Before wrapping, slice the hot dog lengthwise (not all the way through) and stuff with a thin strip of cheddar or mozzarella cheese. The cheese oozes out as it bakes—it’s messy but incredible.
Veggie Mummies: Use vegetarian hot dogs or veggie sausages. I’ve tried this with plant-based options, and they work beautifully. Just check the baking time—some veggie dogs cook faster than traditional ones.
Breakfast Mummies: Swap the hot dogs for breakfast sausages and serve with maple syrup for dipping. Yes, it’s weirdly good. My kids call them “breakfast mummies” and ask for them year-round.
Gluten-Free Option: Use gluten-free crescent dough (I like the brand from the freezer section) and gluten-free hot dogs. The texture is slightly different—a bit more crumbly—but the taste is still fantastic.
Serving & Storage Suggestions
These mummy hot dogs are best served warm, straight from the oven. The dough is at its flakiest, and the hot dogs are perfectly juicy. Here’s how to make them shine at your party:
Presentation Ideas: Arrange the mummies on a large platter lined with black or orange napkins. Scatter a few pretzel sticks around them to look like “bones.” For a spooky touch, serve them on a bed of shredded lettuce (it looks like grass) with a plastic spider or two hidden among them.
Dipping Sauces: These are fantastic with ketchup, mustard, or ranch dressing. For a Halloween twist, try “zombie blood” (spicy ketchup) or “ghost goo” (garlic aioli). My personal favorite is honey mustard—the sweetness balances the saltiness perfectly.
What to Serve Alongside: These pair beautifully with other finger foods: pumpkin-shaped cheese crackers, veggie sticks with dip, or a bowl of popcorn tossed with nutritional yeast for a cheesy flavor. If you’re serving a full meal, try them with a simple green salad or roasted sweet potato wedges.
Storage Instructions: Leftover mummy hot dogs (if you have any!) can be stored in an airtight container in the refrigerator for up to 3 days. To reheat, place them on a baking sheet in a 350°F (175°C) oven for 5-7 minutes, or until warmed through. The microwave works in a pinch, but the dough won’t be as crispy.
Freezer Tips: You can freeze the unbaked wrapped hot dogs on a baking sheet until solid, then transfer to a freezer bag. Bake from frozen, adding 3-5 minutes to the baking time. This is perfect for last-minute Halloween parties.
Nutritional Information & Benefits
While these mummy hot dogs are definitely a treat, they’re not totally devoid of nutritional value. Here’s a rough estimate per serving (2 mummies):
- Calories: 320
- Protein: 12g
- Carbohydrates: 22g
- Fat: 20g
- Sodium: 900mg
Health Benefits: Hot dogs provide a decent amount of protein, which helps keep you full. The crescent dough offers carbohydrates for quick energy—perfect for fueling a night of trick-or-treating. If you’re watching your sodium, opt for low-sodium hot dogs and use half the amount of mustard.
Dietary Considerations: This recipe is not gluten-free unless you use specific substitutions (see variations above). It contains dairy from the crescent dough and eggs from the wash. For a lower-carb version, use cheese wraps or lettuce leaves instead of crescent dough—though honestly, it’s not quite the same.
My Personal Take: I don’t make these for their nutritional value. I make them because they bring people together, make kids giggle, and turn an ordinary snack into something special. And sometimes, that’s exactly what we need.
Frequently Asked Questions
Can I use puff pastry instead of crescent dough?
Absolutely! Puff pastry works beautifully and gives an even flakier texture. Just thaw it according to package directions, cut into thin strips, and bake at 400°F (200°C) for about 15 minutes. The look is slightly different—more elegant, less “bandage-like”—but just as delicious.
How do I prevent the dough from unraveling during baking?
This happens when the dough strips are too short or wrapped too loosely. Make sure each strip wraps around the hot dog at least one and a half times. Press the end of the strip gently against the dough to seal it. If you’re still worried, secure the ends with a toothpick (just remember to remove them before serving).
Can I make these ahead for a party?
Yes! You can wrap the hot dogs up to 4 hours in advance and keep them covered in the refrigerator. Brush with egg wash just before baking. This is my go-to strategy for Halloween parties—I prep everything in the afternoon, then pop them in the oven when guests arrive. They’re ready in 15 minutes, and the kitchen smells amazing.
What’s the best way to reheat leftover mummy hot dogs?
The oven is your best friend here. Reheat them on a baking sheet at 350°F (175°C) for 5-7 minutes. The microwave works in a pinch, but the dough will be soft rather than crispy. For a fun twist, try reheating them in an air fryer at 350°F (175°C) for 3-4 minutes—they come out perfectly crispy.
Can I use different types of sausages?
Absolutely! I’ve made these with bratwurst, kielbasa, chicken sausages, and even vegetarian options. Just adjust the baking time based on the thickness of the sausage. Thicker sausages may need an extra 2-3 minutes in the oven. And if you’re using pre-cooked sausages, you’re just warming them through, so the dough is your main guide.
Conclusion
These mummy hot dogs are more than just a Halloween snack—they’re a little piece of joy wrapped in buttery dough. Every time I make them, I think back to that afternoon in Carla’s kitchen, watching her transform simple ingredients into something that made everyone smile. That’s the magic of cooking, isn’t it? Taking ordinary things and making them extraordinary through a little creativity and a lot of love.
I hope you’ll give these a try at your next Halloween gathering. Don’t be afraid to make them your own—add your favorite dipping sauce, experiment with different sausages, or let the kids help with the wrapping. They’re forgiving, fun, and guaranteed to be a hit.
Have you tried these mummy hot dogs? I’d love to hear how they turned out! Drop a comment below with your variations, tag me in your photos, or share your spooky party spread. And if you’re looking for more Halloween inspiration, check out our creepy spiderweb dip and ghost-shaped sugar cookies to complete your menu. Happy Halloween, and happy cooking!
Pin This Recipe!

Best Spooky Mummy Hot Dogs with Crescent Dough (Easy 20-Min Recipe)
These mummy hot dogs are ridiculously simple, come together in twenty minutes flat, and somehow manage to look both adorable and spooky. Perfect for Halloween gatherings, they’re a crowd-pleaser that kids and adults love.
- Prep Time: 10 minutes
- Cook Time: 12-15 minutes
- Total Time: 20 minutes
- Yield: 8 servings (2 mummies per serving) 1x
- Category: Appetizer
- Cuisine: American
Ingredients
- 8 standard-size hot dogs
- 1 can (8 oz) crescent dough
- Yellow mustard (for eyes)
- 1 large egg (for egg wash)
- 1 tablespoon water (for egg wash)
- Sesame seeds or poppy seeds (optional)
- Cooking spray or parchment paper
Instructions
- Preheat your oven to 375°F (190°C). Line a baking sheet with parchment paper.
- Unroll the crescent dough onto a clean cutting board. If using perforated sheets, press the seams together to create one solid rectangle (roughly 12×8 inches).
- Cut the dough into thin strips about 1/2-inch wide using a sharp knife or pizza cutter (about 12-14 strips per can).
- Pat the hot dogs dry with a paper towel. Let cold hot dogs sit at room temperature for 5 minutes.
- Wrap each hot dog with 2-3 strips of dough, starting at one end and working to the other. Leave a small gap at the top for the face (about 1/2 inch). Space the strips slightly apart so the hot dog peeks through.
- Place the wrapped hot dogs on the prepared baking sheet, spacing them about 2 inches apart.
- Whisk the egg and water together in a small bowl until smooth. Brush the egg wash generously over each mummy.
- Bake for 12-15 minutes, or until the dough is golden brown and the hot dogs are heated through. Check at 10 minutes; if edges brown too fast, tent loosely with foil.
- Remove from the oven and let cool on the baking sheet for 2 minutes, then transfer to a cooling rack.
- Add the mustard eyes once the mummies are cool enough to handle (about 5 minutes). Use a toothpick to dab two small dots of mustard on the exposed hot dog at the top.
Notes
For the best mummy look, space dough strips about 1/4 inch apart. Add mustard eyes only after mummies have cooled for at least 5 minutes to prevent melting. You can wrap the hot dogs up to 4 hours in advance and refrigerate; brush with egg wash just before baking. For gluten-free, use gluten-free crescent dough and check hot dog labels.
Nutrition
- Serving Size: 2 mummies
- Calories: 320
- Sodium: 900
- Fat: 20
- Carbohydrates: 22
- Protein: 12
Keywords: Halloween, mummy hot dogs, crescent dough, easy appetizer, spooky snack, party food, hot dog recipe