Love this? Save it for later!
Share the inspiration with your friends
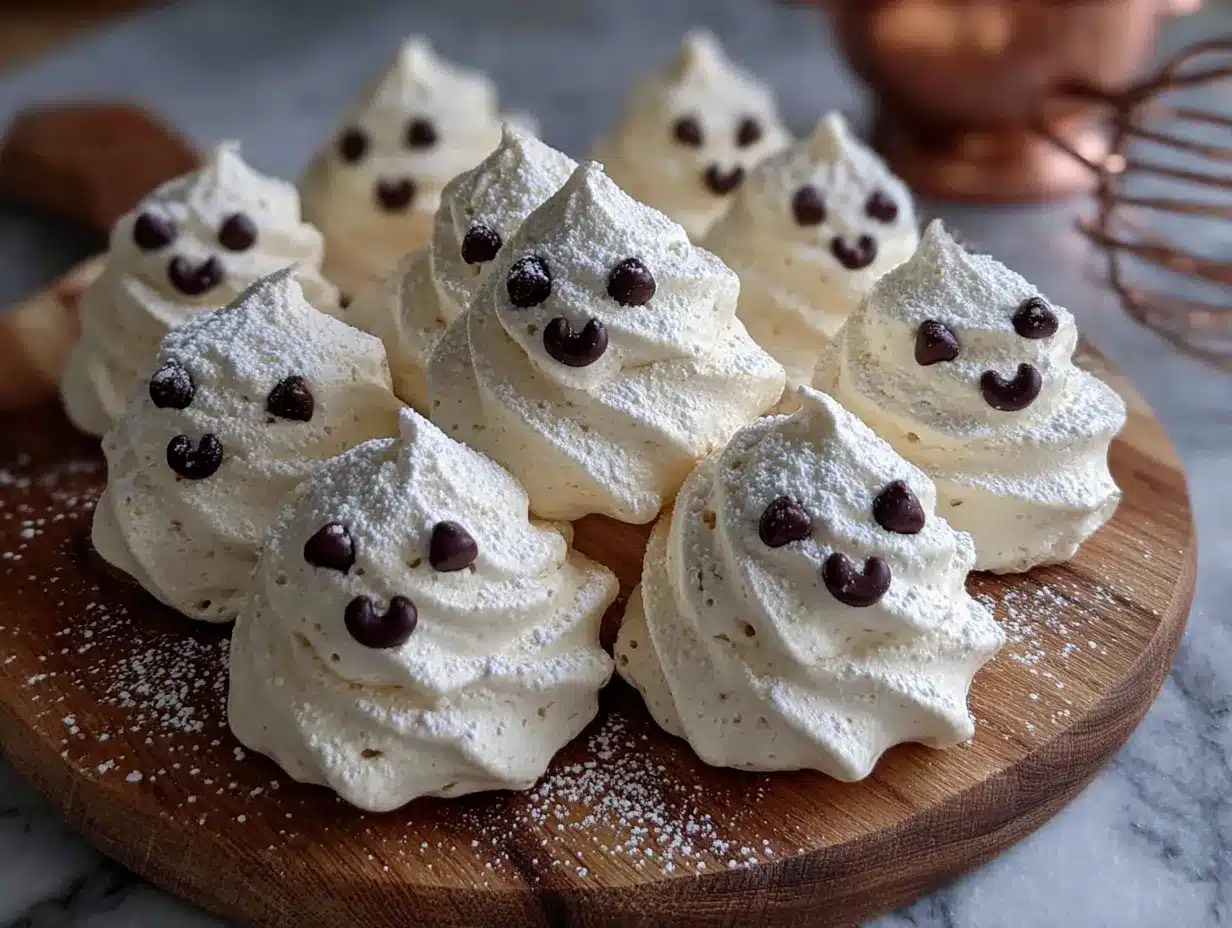
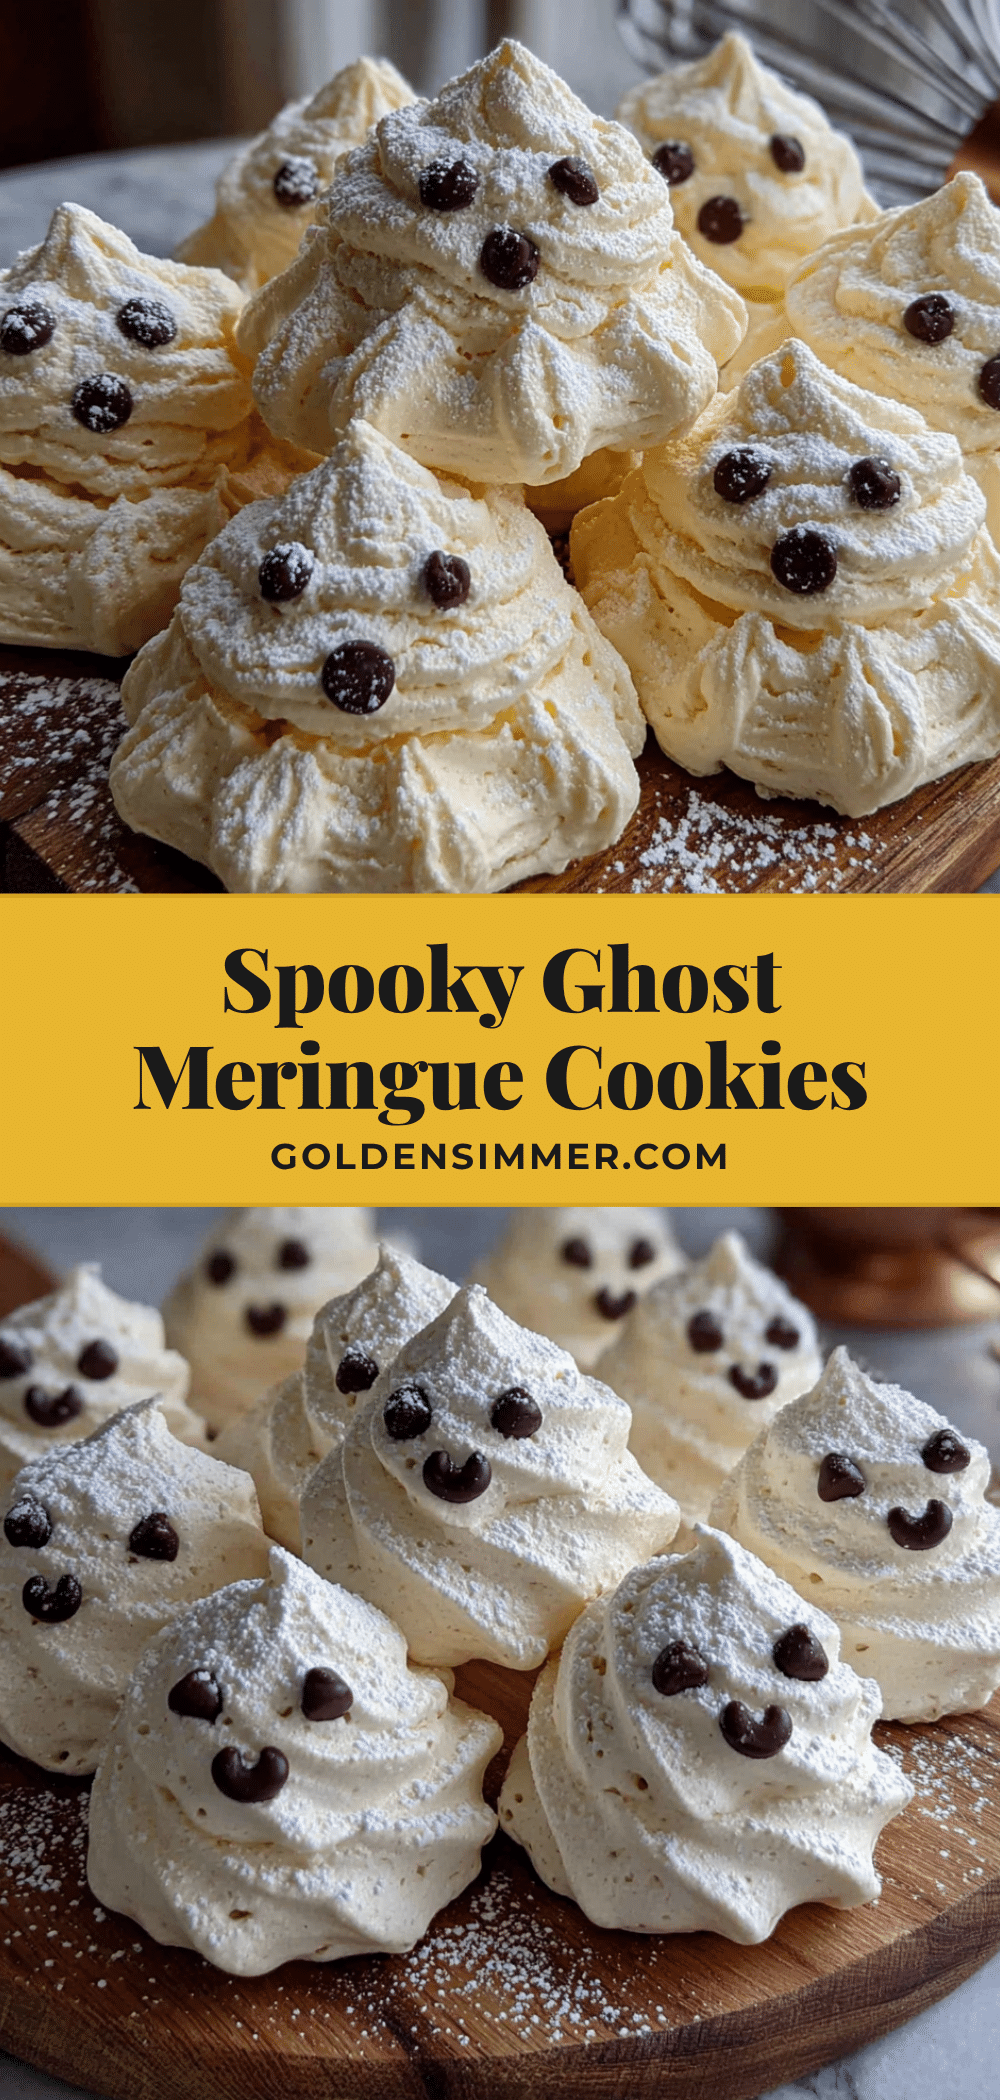
There used to be a tiny French patisserie tucked inside a dusty old bookshop in Portland that made the most perfect meringue ghosts you could imagine. When the bookshop closed its doors three years ago, I honestly felt a little pang of loss, not just for the creaky floors and the smell of old paper, but specifically for those little cookies. They were just so happy-looking, floating in the display case with their tiny chocolate chip eyes. After about five tries—some were too flat, others looked like sad blobs—I finally cracked the code. They’re light as air, perfectly crisp, and honestly, they make me smile every single time I pull a tray out of the oven. You know that feeling when a recipe just brings you joy before you even take a bite?
The trick, I learned after a few messy batches, is all in the meringue itself. It has to be stiff enough to hold that perfect little ghost shape without spreading into a puddle. I mean, the first time I tried, I ended up with what looked like deflated ghosts, which was pretty funny but not exactly what I was going for. Let me tell you, the satisfaction of finally piping those perfect little peaks is something else. Maybe you’ve been there, chasing a memory of a dessert from a place that no longer exists. This is my way of bringing a little bit of that magical bookshop back into my kitchen, and I think you’re going to love it.
Why You’ll Love This Recipe
These ghost-shaped meringue cookies are more than just a pretty face. They’re genuinely simple to make, and they always steal the show at any Halloween gathering. I’ve tested this method more times than I can count, and it’s foolproof when you follow a few key steps.
- Quick & Easy: The active prep time is only about 15 minutes. The oven does all the hard work while you get on with your day.
- Simple Ingredients: You only need four basic ingredients that you probably already have in your pantry. No fancy trips to a specialty store.
- Perfect for Halloween: These are the ultimate spooky treat for parties, school events, or just a fun afternoon baking with the kids. They look incredible on a dessert table.
- Crowd-Pleaser: They’re naturally gluten-free and low in fat, so almost everyone can enjoy them. Kids and adults alike go crazy for them.
- Unbelievably Delicious: They melt in your mouth with a sweet, vanilla flavor and a satisfyingly crisp texture. It’s pure, simple joy.
What makes this recipe different from the rest is the specific technique for piping the ghosts. I’m not just telling you to make meringue; I’m showing you how to get that perfect, puffy ghost shape that holds its form. It’s not another version, it’s the best version I’ve found after years of trial and error. This is the kind of recipe that makes you close your eyes after the first bite, just for a second, because it’s that good. It’s comfort food reimagined as a cute, spooky treat.
What Ingredients You Will Need
This recipe relies on a few key players to create that perfect, light-as-air texture. The magic is in the simplicity, so using the right kind of each ingredient really matters here.
- Egg Whites: You’ll need 3 large egg whites, at room temperature. This is crucial. Cold egg whites won’t whip up to the same volume. I always separate my eggs when they’re cold and then let the whites sit on the counter for about 30 minutes. (Avoid any trace of yolk, or your meringue won’t stiffen properly.)
- Cream of Tartar: Just 1/4 teaspoon. This is the stabilizer that helps the egg whites hold their structure and prevents them from collapsing. It’s a tiny ingredient with a big job. (You can substitute with 1/2 teaspoon of lemon juice or white vinegar in a pinch.)
- Superfine Sugar: You’ll need 3/4 cup (150 grams). Superfine sugar dissolves faster than regular granulated sugar, which is key for a smooth, not gritty, meringue. You can easily make your own by pulsing regular sugar in a food processor for a few seconds. I swear by this trick.
- Vanilla Extract: 1/2 teaspoon. It adds that classic, warm flavor. I prefer using a good quality pure vanilla extract, but imitation will work just fine. (For a different flavor, try almond or peppermint extract.)
- Mini Chocolate Chips: About 2 tablespoons, for the eyes. You want the mini ones so they look like cute little ghost faces. I’ve also used black sanding sugar for a different look, but chocolate chips are the classic.
Equipment Needed
You don’t need a ton of fancy gear for this recipe, which is part of its charm. A few basic tools will get the job done beautifully.
- Electric Mixer: A stand mixer or a hand-held electric mixer is a must. Whipping meringue by hand is possible, but it takes forever and your arm will definitely get a workout. I use my trusty hand mixer for this because it’s easier to control.
- Large Mixing Bowl: Make sure it’s spotlessly clean and completely dry. Any grease or moisture can prevent your egg whites from whipping up. Glass or metal bowls work best.
- Baking Sheets: You’ll need two large baking sheets. Line them with parchment paper. Do not use wax paper or foil.
- Piping Bag & Tip: A piping bag fitted with a large round tip (like a Wilton 1A or 2A) is ideal. If you don’t have one, you can use a sturdy zip-top bag with a corner snipped off. I’ve done it both ways, and honestly, the piping bag is easier to control for the ghost shape.
- Spatula: A rubber spatula for scraping down the bowl.
Preparation Method
Alright, let’s make some ghosts! This process is all about patience and paying attention to the cues. Don’t rush it.
- Preheat and Prep: Preheat your oven to 200°F (93°C). Line your baking sheets with parchment paper. This low temperature is what dries the meringues out without browning them.
- Start Whipping: Place your room-temperature egg whites and cream of tartar in the clean, dry mixing bowl. Begin whipping on medium speed. You’ll see them go from clear and liquidy to frothy and bubbly. This takes about 1-2 minutes.
- Add the Sugar Slowly: This is the most important step. With the mixer running on medium-high, start adding the superfine sugar one tablespoon at a time. I know it feels tedious, but doing it slowly allows the sugar to dissolve completely. If you dump it all in at once, your meringue can collapse. Keep adding until all the sugar is incorporated.
- Whip to Stiff Peaks: Once all the sugar is in, increase the speed to high and whip. You’re looking for stiff, glossy peaks. This means when you lift the beater, the meringue stands up straight and doesn’t flop over. It should feel smooth, not gritty, when you rub a tiny bit between your fingers. This usually takes another 5-7 minutes. Add the vanilla extract during the last 30 seconds of whipping.
- Pipe the Ghosts: Transfer the meringue to your piping bag fitted with the round tip. Hold the bag straight up and down, about 1/2 inch above the baking sheet. Squeeze gently to create a round base, then lift the bag straight up as you continue squeezing to form a tall, teardrop shape. Stop squeezing and pull the bag away with a quick flick. You want a little peak on top. Leave about 1 inch between each ghost.
- Add the Eyes: Before the meringue starts to dry, gently press two mini chocolate chips into each ghost for eyes. Don’t push them in too deep, or they’ll sink. Just nestle them in.
- Bake Low and Slow: Place the baking sheets in the preheated oven. Bake for 60-75 minutes. The meringues are done when they are completely dry and can be lifted easily off the parchment paper. They should not be sticky. If they are, give them another 10 minutes. I like to turn the oven off and leave them inside to cool completely for another hour. This ensures they’re perfectly crisp all the way through.
Cooking Tips & Techniques
I’ve made a lot of meringue in my time, and I’ve definitely learned a few things the hard way. Here are my best tips for perfect ghosts every time.
The Humidity Factor: Meringue is a diva when it comes to humidity. It’s best to make these on a dry day. If it’s raining or super humid outside, the sugar can absorb moisture from the air, and your meringue might end up sticky or weepy. Trust me, I learned this lesson on a particularly soggy October afternoon.
The Bowl Must Be Perfect: A tiny speck of grease or a drop of water in your bowl will ruin your meringue. I always wipe my bowl and beaters down with a little lemon juice or white vinegar on a paper towel before I start. It’s an extra step, but it’s cheap insurance.
Don’t Overbake: The goal is to dry them out, not bake them. If your oven runs a little hot, your ghosts might start to turn a light tan color. That’s okay! They’ll still taste great, but they won’t be that perfect, pure white. If you’re worried, you can prop the oven door open with a wooden spoon for the last 30 minutes of baking to let the moisture escape.
Multitasking Strategy: While the egg whites are whipping, you can line your baking sheets and set up your piping bag. It saves a little time. Also, make sure your chocolate chips are measured and ready to go before you start piping. You don’t want to be fumbling with the bag while trying to place eyes.
Variations & Adaptations
Once you’ve mastered the basic ghost, the possibilities are pretty fun. Here are a few ways I like to change things up.
- Spooky Colors: Add a drop or two of gel food coloring to the meringue before you pipe it. A little orange or purple swirl makes them extra festive. Just be careful not to overmix, or you’ll deflate the meringue.
- Different Faces: Instead of chocolate chips, use a tiny bit of melted dark chocolate in a piping bag to draw different expressions on your ghosts after they’ve baked and cooled. You can make them look surprised, grumpy, or super silly.
- Flavor Twists: Swap the vanilla extract for peppermint or almond extract. A little peppermint makes them taste like a light, airy candy cane. You could also add a pinch of cinnamon or pumpkin pie spice for a fall twist.
- Chocolate Drizzle: Once the ghosts are cool, drizzle them with a little melted white or dark chocolate. It adds a nice richness and looks really pretty.
Serving & Storage Suggestions
These little guys are best served at room temperature. They’re a fantastic, light dessert after a heavy meal, and they look amazing on a Halloween dessert board alongside some brownies and caramel apples.
Storage: This is the most important part. Meringue hates moisture. You must store them in an airtight container at room temperature. Do not put them in the refrigerator. If you do, they will become soft and sticky within hours. I like to layer them between sheets of parchment paper in a tin or a glass jar. Stored correctly, they will stay crisp for up to two weeks. Honestly, they never last that long in my house.
Freezing: You can freeze baked meringues in an airtight container for up to a month. Let them thaw at room temperature for about 30 minutes before serving. The texture might be slightly less crisp, but they’ll still be delicious.
Nutritional Information & Benefits
While these are a treat, they’re a relatively light one! A single ghost-shaped cookie is very low in fat and calories compared to a slice of cake or a brownie. The main ingredient is egg whites, which are a great source of protein. Of course, they are high in sugar, so they’re best enjoyed as part of a balanced diet.
Estimated per ghost (makes 24):
- Calories: 25
- Fat: 0g
- Carbohydrates: 6g
- Protein: 1g
- Sugar: 6g
Please note these are estimates and will vary based on specific ingredients used.
This recipe is naturally gluten-free and dairy-free, making it a great option for many dietary needs. Just double-check your chocolate chips are dairy-free if that’s a concern.
Conclusion
These adorable ghost-shaped meringue cookies are more than just a Halloween treat; they’re a little piece of edible happiness. They’re surprisingly easy to make, they look incredibly impressive, and they taste like a sweet, vanilla cloud. I hope you give them a try and find the same joy in making them that I do. Don’t be afraid to make them your own—give them silly faces, try different colors, or just enjoy the process of piping those perfect little peaks.
I’d love to hear how they turn out for you! Drop a comment below and let me know if your ghosts were cute, spooky, or maybe a little bit lopsided. And if you loved this recipe, please share it with a friend who loves Halloween as much as we do. Happy baking, and happy Halloween!
Frequently Asked Questions
Can I make these meringue cookies on a rainy day?
It’s not ideal, but you can! The key is to bake them a little longer to ensure all the moisture is dried out. You can also leave them in the turned-off oven with the door slightly ajar for an extra hour to help them stay crisp.
Why did my meringue turn out flat?
This usually happens for a few reasons. The most common is that a tiny bit of yolk got into the egg whites, or your bowl wasn’t perfectly clean and grease-free. Another reason is that you added the sugar too quickly, which can deflate the structure.
Can I use liquid egg whites from a carton?
I really don’t recommend it. Liquid egg whites are pasteurized, which changes the protein structure and makes them much harder to whip into a stable meringue. Fresh egg whites from whole eggs will give you the best results.
How do I know when the meringues are done baking?
They are done when they are completely dry to the touch and lift easily off the parchment paper without sticking. They should sound hollow if you tap the bottom. If they feel soft or sticky, they need more time in the oven.
Can I use regular granulated sugar instead of superfine?
You can, but you run the risk of a gritty texture. Superfine sugar dissolves much more easily. If you only have regular sugar, just pulse it in a food processor for about 10-15 seconds to make it finer. It makes a big difference in the final texture.
Pin This Recipe!
Adorable Ghost-Shaped Meringue Cookies: Easy Halloween Treat
These light-as-air meringue ghosts are a perfect Halloween treat. With a crisp exterior and sweet vanilla flavor, they’re easy to make with just four ingredients and always steal the show.
- Prep Time: 15 minutes
- Cook Time: 60-75 minutes
- Total Time: 1 hour 30 minutes
- Yield: 24 servings 1x
- Category: Dessert
- Cuisine: French
Ingredients
- 3 large egg whites, at room temperature
- 1/4 teaspoon cream of tartar
- 3/4 cup (150 grams) superfine sugar
- 1/2 teaspoon vanilla extract
- 2 tablespoons mini chocolate chips
Instructions
- Preheat your oven to 200°F (93°C). Line your baking sheets with parchment paper.
- Place the room-temperature egg whites and cream of tartar in a clean, dry mixing bowl. Begin whipping on medium speed until frothy and bubbly, about 1-2 minutes.
- With the mixer running on medium-high, add the superfine sugar one tablespoon at a time, allowing it to dissolve completely between additions.
- Once all the sugar is incorporated, increase the speed to high and whip until stiff, glossy peaks form (the meringue stands up straight when the beater is lifted). Add the vanilla extract during the last 30 seconds of whipping. This takes about 5-7 minutes total.
- Transfer the meringue to a piping bag fitted with a large round tip (like Wilton 1A or 2A). Hold the bag straight up and down, about 1/2 inch above the baking sheet. Squeeze gently to create a round base, then lift the bag straight up as you continue squeezing to form a tall, teardrop shape. Stop squeezing and pull the bag away with a quick flick to create a peak on top. Leave about 1 inch between each ghost.
- Before the meringue starts to dry, gently press two mini chocolate chips into each ghost for eyes. Do not push them in too deep.
- Bake for 60-75 minutes, until the meringues are completely dry and lift easily off the parchment paper. For best results, turn off the oven and leave them inside to cool completely for another hour.
Notes
Make meringue on a dry day for best results. Ensure bowl and beaters are completely clean and grease-free. Wipe with lemon juice or vinegar before starting. Store in an airtight container at room temperature for up to two weeks. Do not refrigerate. Can be frozen for up to a month.
Nutrition
- Serving Size: 1 ghost cookie
- Calories: 25
- Sugar: 6
- Sodium: 10
- Carbohydrates: 6
- Protein: 1
Keywords: meringue cookies, ghost cookies, Halloween treats, easy Halloween dessert, gluten-free cookies, dairy-free dessert, meringue ghosts