Love this? Save it for later!
Share the inspiration with your friends
This isn’t just another ice cream recipe. This is the one that makes you feel like a kitchen wizard without breaking a sweat. Honestly, I’ve made a lot of ice cream in my day—some good, some, well, let’s just say “learning experiences”—but this no-churn salted caramel version is the one I come back to again and again. It’s the kind of recipe that gets passed around at playdates and whispered about at school pickup. Here’s why it works so well for families like yours.
- No Ice Cream Maker Needed: Seriously, none. No bulky machine, no rock salt, no ice packs. Just a bowl, a whisk, and a little patience.
- Simple Pantry Ingredients: You probably have most of these in your kitchen right now—heavy cream, sweetened condensed milk, sugar, butter, and salt. No fancy extracts or hard-to-find stabilizers.
- Kid-Approved & Budget-Friendly: It’s sweet, creamy, and has that perfect salty crunch. My kids go wild for it, and I love that I can make a big batch for under ten bucks. Leftovers? They’re a myth in our house.
- Perfect for Hot Days & Last-Minute Cravings: The hardest part is waiting for it to freeze. You can whip up the base in about 15 minutes, then let the freezer do the work. It’s the ultimate “I need a treat right now” solution.
- Completely Customizable: Once you master the base, you can riff on it endlessly. I’ll show you how to turn it into a chocolate-caramel swirl, a coffee-flavored dream, or even a dairy-free version that still tastes incredible.
What makes this recipe different from the rest? It’s the texture. No-churn ice cream can sometimes turn icy or rock-hard, but this method—whipping the cream to stiff peaks and folding it into the caramel-sweetened condensed milk mixture—creates a silky, scoopable ice cream that rivals anything from the store. It’s the kind of dessert that makes you close your eyes after the first bite. Comfort food reimagined, faster and cheaper, but with the same soul-soothing satisfaction.
What Ingredients You Will Need
Let’s talk about what goes into this magic. The beauty is in the simplicity—each ingredient has a job to do, and together, they create something truly special. I’ve tested this with a few different brands and tweaks, so I’ll share what works best.
- 2 cups (480 ml) heavy cream or heavy whipping cream – This is the backbone. It needs to be cold, straight from the fridge. I prefer Horizon Organic or Land O’Lakes for the richest texture. Don’t use half-and-half; it won’t whip up stiff enough.
- 1 can (14 oz / 397 g) sweetened condensed milk – This is your sweetener and your texture secret. The sugar in it helps keep the ice cream soft and scoopable. I usually grab Eagle Brand or Nestlé. For a dairy-free option, use Nature’s Charm coconut sweetened condensed milk.
- 1/2 cup (100 g) granulated sugar – For the caramel. Plain white sugar works best. Don’t try to use brown sugar here; it changes the flavor and the caramel consistency.
- 3 tablespoons (42 g) unsalted butter – Cut into small pieces. I use Kerrygold for its deep flavor, but any unsalted butter is fine. Salted butter works too, just reduce the added salt a bit.
- 1/2 teaspoon flaky sea salt (like Maldon) plus more for topping – This is the star. The flaky salt gives you those little bursts of salty goodness that make the caramel sing. If you only have table salt, use a scant 1/4 teaspoon and mix it in well.
- 1 teaspoon vanilla extract – Pure vanilla, not imitation. It rounds out the caramel flavor beautifully. I’m partial to Nielsen-Massey.
For the Salted Caramel Sauce (makes about 1 cup):
- 1/2 cup (120 ml) water – Just tap water is fine.
- 1/2 cup (100 g) granulated sugar – Same as above.
- 1/4 teaspoon cream of tartar (optional but helpful) – This prevents the sugar from crystallizing. If you don’t have it, you can add a squeeze of lemon juice instead. I’ve done it both ways, and it works.
- 1/2 cup (120 ml) heavy cream – Warm it slightly before adding (I just microwave it for 20 seconds). This prevents the caramel from seizing up.
- 2 tablespoons (28 g) unsalted butter – Softened, cut into pieces.
- 1/2 teaspoon flaky sea salt – Plus more for sprinkling on top of the finished ice cream.
Ingredient Selection Tips: When making caramel, use a light-colored saucepan so you can see the color change. I’ve burned a batch or two in a dark pot—learn from my mistake! Also, make sure your heavy cream is at least 36% milk fat. Anything less won’t whip properly.
Equipment Needed
You don’t need a fancy kitchen to pull this off. Here’s what you’ll actually use:
- Large mixing bowl – Glass or metal is best. Plastic can hold onto grease, which ruins whipped cream.
- Hand mixer or stand mixer – You can whisk by hand, but your arm will get a workout. A hand mixer is faster and easier. I use my trusty KitchenAid hand mixer.
- Medium saucepan – For the caramel. Light-colored so you can watch the color.
- Candy thermometer (optional but helpful) – If you’re nervous about caramel, this takes the guesswork out. Aim for 240°F (115°C) for a soft-ball stage.
- 8×4 or 9×5 inch loaf pan – For freezing. I like a glass or ceramic one. Metal works too, but the ice cream freezes faster in metal.
- Parchment paper or plastic wrap – To line the pan for easy removal.
- Spatula and whisk – Silicone spatula for folding, whisk for the caramel.
Budget-Friendly Tip: Don’t have a hand mixer? You can use a whisk and a lot of elbow grease. Or, if you have a food processor, you can whip the cream in that—just watch it carefully so you don’t over-whip it into butter!
Preparation Method
Alright, let’s get into the kitchen. This is where the magic happens. I’ve broken it down into manageable steps, with all the little tricks I’ve learned along the way.
Step 1: Make the Salted Caramel Sauce
In a medium saucepan, combine the water, 1/2 cup sugar, and cream of tartar (if using). Stir gently with a whisk—just until the sugar is mostly dissolved. Don’t stir after this point, or you risk crystallization. Place the pan over medium heat and bring to a boil. Let it boil without stirring until it turns a deep amber color, like a new penny. This takes about 6-8 minutes. Watch it carefully; it goes from perfect to burnt in seconds. I once got distracted by a phone call and ended up with black caramel. Not my finest moment.
Once it’s amber, remove from heat and carefully pour in the warmed heavy cream. It will bubble up violently—don’t panic! Whisk it in until smooth. Add the butter and salt, whisking until glossy. Let it cool for 10 minutes, then set aside. You’ll have about 1 cup of caramel. Use 1/2 cup for the ice cream base and save the rest for swirling on top.
Step 2: Whip the Cream
In a large mixing bowl, pour the cold heavy cream. Using your hand mixer, beat on medium-high speed until stiff peaks form. This takes about 3-4 minutes. You’ll know it’s ready when you lift the beaters and the cream stands up in firm peaks. Be careful not to over-whip—it can turn into butter. If that happens, don’t throw it out; use it on toast!
Step 3: Combine the Base
In a separate bowl, whisk together the sweetened condensed milk, 1/2 cup of the cooled caramel sauce, and vanilla extract. It should be smooth and well combined.
Step 4: Fold Everything Together
Take about a third of the whipped cream and fold it into the condensed milk mixture with a spatula. This lightens the base. Then gently fold in the rest of the whipped cream. Use a gentle, figure-eight motion until no white streaks remain. Don’t over-mix, or you’ll deflate the air that makes it creamy.
Step 5: Layer and Swirl
Line your loaf pan with parchment paper, leaving some overhang for easy lifting. Pour half of the ice cream mixture into the pan. Drizzle with half of the remaining caramel sauce and sprinkle with a pinch of flaky sea salt. Use a butter knife to gently swirl it in. Add the rest of the ice cream mixture, then top with the last of the caramel and another pinch of salt. Swirl again.
Step 6: Freeze
Cover the pan tightly with plastic wrap or a lid. Freeze for at least 6 hours, but overnight is better. The longer it freezes, the firmer and more scoopable it gets. I usually make it in the morning for dessert that night.
Step 7: Serve
Let it sit at room temperature for 5-10 minutes before scooping. This softens it just enough. Scoop into bowls, add an extra drizzle of caramel and a pinch of salt if you’re feeling fancy, and enjoy!
Cooking Tips & Techniques
I’ve made this recipe more times than I can count, and I’ve learned a few things the hard way. Let me save you some trouble.
- Don’t Skip the Cream of Tartar: I know it’s optional, but it really helps keep the caramel smooth. If you don’t have it, a tiny squeeze of lemon juice works as a substitute. I’ve forgotten it before, and my caramel turned grainy. Still tasted good, but not as silky.
- Warm Your Cream for the Caramel: Cold cream makes the caramel seize up into a hard lump. I microwave mine for 20 seconds. If it does seize, just put the pan back on low heat and whisk gently until it melts again. No big deal.
- Watch the Color, Not the Clock: Every stove is different. Your caramel might be ready at 6 minutes or 8. I start checking at 5 minutes. The color should be a rich amber, like a maple leaf in autumn.
- Whipped Cream Must Be Cold: If your cream is warm, it won’t whip. I keep it in the fridge until the last minute. If you’re in a hot kitchen, put the bowl and beaters in the freezer for 5 minutes first.
- Don’t Over-Swirl: A few gentle swirls are enough. Too much mixing will make the caramel disappear into the base. You want distinct ribbons of sweet, salty goodness.
- Patience is Key: I know it’s hard to wait, but don’t dig in after 4 hours. It will be too soft. Give it the full 6 hours, or better yet, overnight. The texture is so much better.
Variations & Adaptations
Once you’ve got the basic recipe down, the possibilities are endless. Here are a few of my favorite twists.
- Chocolate Salted Caramel: Add 1/4 cup cocoa powder to the sweetened condensed milk before mixing. I love Ghirardelli unsweetened cocoa. It makes a rich, fudgy base that pairs perfectly with the caramel.
- Vegan & Dairy-Free: Use full-fat coconut cream (chilled) and Nature’s Charm coconut sweetened condensed milk. Whip the coconut cream just like heavy cream. The caramel can be made with coconut cream and vegan butter. It’s a little different but still delicious.
- Cookie Crunch: Crush up some graham crackers or shortbread cookies and layer them in with the caramel. My kids love this version. It’s like a salted caramel ice cream pie in a bowl.
- Mocha Swirl: Dissolve 2 teaspoons of instant espresso powder in 1 tablespoon of hot water and swirl it into the ice cream before freezing. It gives a subtle coffee kick that adults will love.
- Nutty Delight: Toast 1/2 cup of pecans or walnuts and chop them. Sprinkle them in with the caramel layers. The crunch is amazing.
Serving & Storage Suggestions
This ice cream is best served with a little fanfare. Here’s how I like to do it.
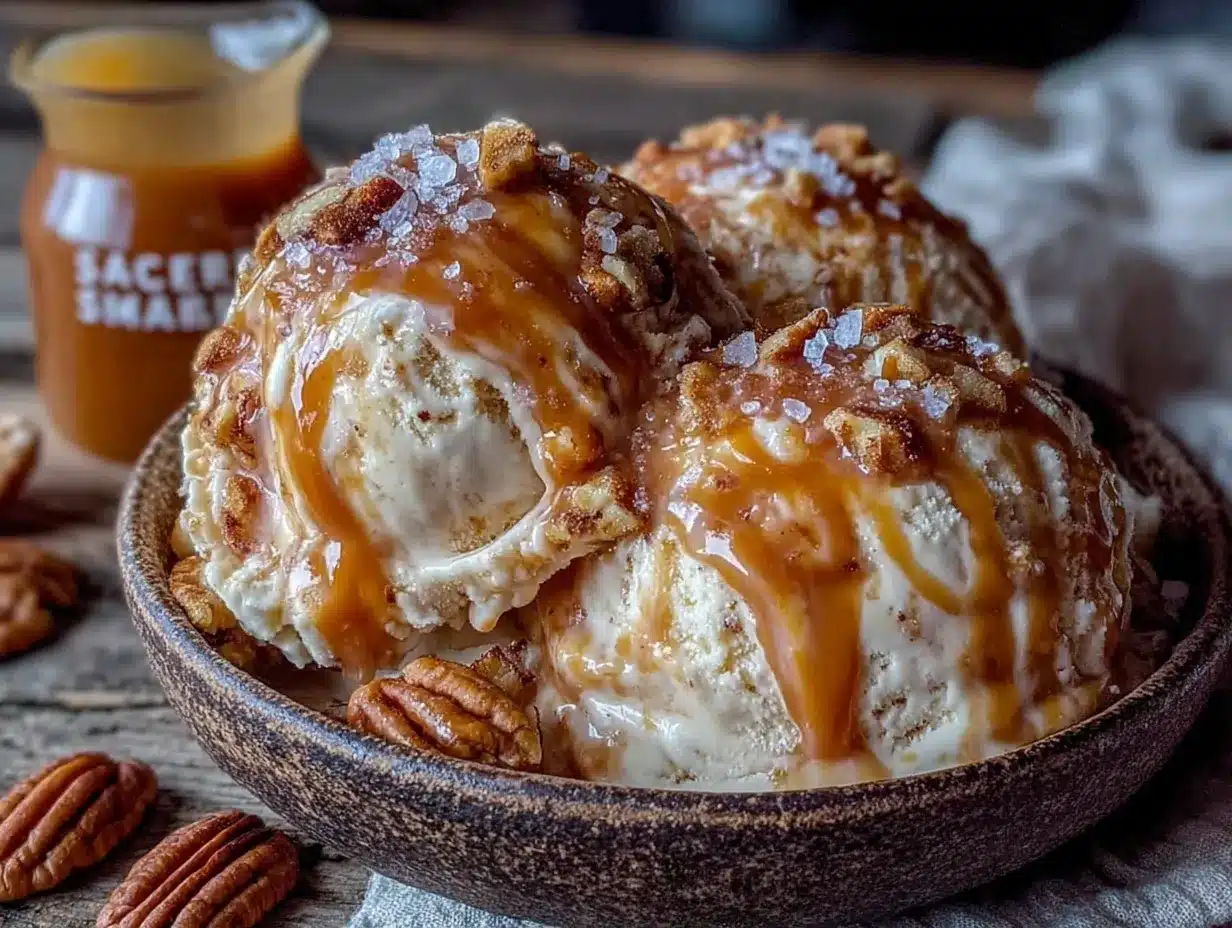
Serving: Let the ice cream sit at room temperature for 5-10 minutes before scooping. I use a warm ice cream scoop (dip it in hot water and dry it off) for perfect round scoops. Serve in chilled bowls for a professional touch. A drizzle of extra caramel and a sprinkle of flaky salt on top makes it look like it came from a fancy ice cream parlor.
What to Serve With It: This is amazing on its own, but it’s also incredible on a warm brownie or a slice of apple pie. For a fun family dessert, set up a “sundae bar” with sprinkles, chocolate sauce, whipped cream, and cherries. My kids go nuts for it.
Storage: Keep the ice cream in an airtight container (or the loaf pan covered tightly with plastic wrap) in the freezer. It will stay good for up to 2 weeks, but I doubt it will last that long. The caramel swirl may soften slightly over time, but the flavor only gets better.
Reheating (if needed): If the ice cream gets too hard after a few days, let it sit at room temperature for 10-15 minutes. You can also microwave the whole container for 10-15 seconds on low power to soften it up. Don’t overdo it, or you’ll have soup.
Flavor Development: Honestly, this ice cream is best after it’s been frozen for at least 12 hours. The flavors meld together beautifully. I’ve made it a day ahead for parties, and it’s always a hit.
Nutritional Information & Benefits
I’m not a nutritionist, but I can give you a rough idea of what’s in a serving. This is based on a 1/2 cup serving (about 4 ounces).
- Calories: ~320
- Fat: 22g (14g saturated)
- Carbohydrates: 30g (28g sugar)
- Protein: 3g
- Sodium: 180mg (from the salt)
Health Benefits: Okay, let’s be real—this is a treat. But the heavy cream does provide some calcium and vitamin A. The salt helps with electrolyte balance (if you’re sweating on a hot day). And honestly, there’s a mental health benefit to enjoying a bowl of homemade ice cream with your family. That counts for something, right?
Dietary Considerations: This recipe is gluten-free (just check your vanilla extract). For a lower-sugar version, you can use a sugar substitute in the caramel, but I haven’t tested it. Let me know if you try it! It’s not vegan or dairy-free as written, but I’ve given substitutions above.
Potential Allergens: Contains dairy. If you’re sensitive, try the coconut cream version.
Conclusion
This easy no-churn salted caramel ice cream is more than just a recipe—it’s a little bit of magic you can create in your own kitchen. It’s the kind of dessert that makes you feel like you’ve accomplished something special, even though it only took 15 minutes of active work. The kids will love it, your wallet will thank you, and you’ll feel like a rockstar every time you pull a scoop out of the freezer.
I want to hear about your variations! Did you add chocolate? Crushed cookies? A hint of espresso? Drop a comment below and tell me how it turned out. And if you share a photo on Pinterest or Instagram, tag me—I love seeing your creations. This recipe is meant to be shared, so pass it along to a friend who needs a little sweetness in their life. Happy cooking, and enjoy every single bite!
Frequently Asked Questions
Can I use low-fat milk or half-and-half instead of heavy cream?
No, I wouldn’t recommend it. Heavy cream has a high fat content (at least 36%) that whips up into stiff peaks and creates that creamy, scoopable texture. Half-and-half or milk won’t whip properly, and you’ll end up with an icy, thin ice cream. Stick with heavy cream for the best results.
My caramel turned out grainy. What went wrong?
That usually happens when sugar crystals form. This can be caused by stirring the caramel while it’s boiling, or by using a dirty pan. Next time, add a pinch of cream of tartar or a squeeze of lemon juice to prevent crystallization. Also, make sure your pan is clean and don’t stir once the sugar starts boiling. If it’s already grainy, you can try reheating it gently with a splash of water and whisking until smooth.
How long does this ice cream last in the freezer?
It will stay good for up to 2 weeks in an airtight container. After that, it might start to develop ice crystals or lose some of its creamy texture. But honestly, in my house, it’s gone in 3 days. If you notice it getting too hard, let it sit at room temperature for 10 minutes before scooping.
Can I make this without a hand mixer?
Absolutely! You can whisk the cream by hand with a balloon whisk—it just takes some elbow grease and about 5-7 minutes of vigorous whisking. Alternatively, you can use a food processor or even a blender (pulse carefully). Just watch closely so you don’t over-whip it into butter.
Is this recipe safe for kids to help make?
Yes, with supervision! The caramel-making step involves hot sugar, so that’s best for adults. But kids can help measure ingredients, pour the cream, and do the folding and swirling. My 6-year-old loves drizzling the caramel and sprinkling the salt. It’s a great way to get them excited about homemade treats.
Pin This Recipe!

Easy No-Churn Salted Caramel Ice Cream: Best Homemade Recipe

This no-churn salted caramel ice cream is a creamy, scoopable treat made without an ice cream maker. With simple pantry ingredients and a silky caramel swirl, it’s a kid-approved, budget-friendly dessert perfect for hot days.
- Prep Time: 15 minutes
- Cook Time: 10 minutes
- Total Time: 6 hours 25 minutes (includes freezing time)
- Yield: 8 servings 1x
- Category: Dessert
- Cuisine: American
Ingredients
- 2 cups (480 ml) heavy cream or heavy whipping cream
- 1 can (14 oz / 397 g) sweetened condensed milk
- 1/2 cup (100 g) granulated sugar
- 3 tablespoons (42 g) unsalted butter, cut into small pieces
- 1/2 teaspoon flaky sea salt (like Maldon), plus more for topping
- 1 teaspoon vanilla extract
- For the Salted Caramel Sauce (makes about 1 cup):
- 1/2 cup (120 ml) water
- 1/2 cup (100 g) granulated sugar
- 1/4 teaspoon cream of tartar (optional but helpful)
- 1/2 cup (120 ml) heavy cream, warmed slightly
- 2 tablespoons (28 g) unsalted butter, softened and cut into pieces
- 1/2 teaspoon flaky sea salt, plus more for sprinkling
Instructions
- Make the Salted Caramel Sauce: In a medium saucepan, combine water, 1/2 cup sugar, and cream of tartar (if using). Stir gently with a whisk until sugar is mostly dissolved. Place over medium heat and bring to a boil. Boil without stirring until deep amber, about 6-8 minutes. Remove from heat and carefully pour in warmed heavy cream (it will bubble up). Whisk until smooth. Add butter and salt, whisking until glossy. Let cool for 10 minutes. Set aside. You’ll have about 1 cup; use 1/2 cup for the …
- Whip the Cream: In a large mixing bowl, pour cold heavy cream. Beat with a hand mixer on medium-high speed until stiff peaks form, about 3-4 minutes. Be careful not to over-whip.
- Combine the Base: In a separate bowl, whisk together sweetened condensed milk, 1/2 cup of the cooled caramel sauce, and vanilla extract until smooth.
- Fold Everything Together: Take about a third of the whipped cream and fold it into the condensed milk mixture with a spatula to lighten. Then gently fold in the rest of the whipped cream using a figure-eight motion until no white streaks remain. Do not over-mix.
- Layer and Swirl: Line a loaf pan (8×4 or 9×5 inch) with parchment paper, leaving overhang. Pour half of the ice cream mixture into the pan. Drizzle with half of the remaining caramel sauce and sprinkle with a pinch of flaky sea salt. Use a butter knife to gently swirl. Add the rest of the ice cream mixture, then top with the last of the caramel and another pinch of salt. Swirl again.
- Freeze: Cover the pan tightly with plastic wrap or a lid. Freeze for at least 6 hours, but overnight is better.
- Serve: Let sit at room temperature for 5-10 minutes before scooping. Scoop into bowls, drizzle with extra caramel and a pinch of salt if desired.
Notes
Don’t skip the cream of tartar to prevent caramel crystallization. Warm the cream for the caramel to avoid seizing. Watch the caramel color carefully—it burns quickly. Keep whipped cream cold for best results. Don’t over-swirl the caramel. Freeze for at least 6 hours for best texture. For variations, try adding cocoa powder for chocolate salted caramel, or use coconut cream and vegan butter for a dairy-free version.
Nutrition
- Serving Size: 1/2 cup (about 4 oun
- Calories: 320
- Sugar: 28
- Sodium: 180
- Fat: 22
- Saturated Fat: 14
- Carbohydrates: 30
- Protein: 3
Keywords: no-churn ice cream, salted caramel, homemade ice cream, easy dessert, no ice cream maker, summer treat, kid-friendly