Love this? Save it for later!
Share the inspiration with your friends
This was supposed to be a proper Halloween party—the kind with a bubbling cauldron of chili, scary music playing from the speakers, and maybe even a fog machine if I could find one on sale. I had the whole thing planned out in my head for weeks. Then Tuesday happened. I grabbed the wrong bag of chocolate cookies at the store—the chocolate wafers, not the sandwich ones I needed for the crust. My mixer decided to start making this horrible grinding noise right when I needed to whip the cream. And I was already running late because I’d spent twenty minutes trying to untangle a string of battery-operated spider lights that absolutely refused to cooperate. What came out of that chaotic mess was nothing like the plan—and better.
I mean, honestly, let me tell you how it went down. I stood there in my kitchen, staring at the wrong cookies, a bowl of cream I’d had to whip by hand (hello, arm workout), and a bag of gummy worms I’d bought for decoration. Maybe you’ve been there—that moment where you realize the original plan is just not happening, and you have to pivot fast. I grabbed some clear plastic cups from the back of the cabinet, crushed those chocolate wafers into crumbs, and started layering. It was pure desperation, honestly. I thought I was making a sad, last-minute compromise.
But then my kid walked in, saw the layers of crushed cookies and creamy filling with a gummy worm poking out the top, and her face just lit up. She called them “dirt cups” and asked if we could make them every Halloween. That’s when I knew I’d stumbled onto something special. This cozy Halloween dirt cups with gummy worms recipe stayed with me because it wasn’t about the perfect party anymore—it was about that moment of accidental magic. It’s the recipe I keep making because it reminds me that sometimes the best things happen when you stop trying so hard.
Why You’ll Love This Recipe
Let me share why this cozy Halloween dirt cups with gummy worms has become my go-to for every spooky season celebration. I’ve tested this recipe through multiple Halloween parties, several last-minute school events, and even one particularly memorable movie night where we watched Hocus Pocus for the fourth time. It’s never let me down.
- Quick & Easy : Comes together in under 15 minutes, no baking required. Perfect for those evenings when you realize Halloween is tomorrow and you have nothing prepared.
- Simple Ingredients : No fancy grocery trips needed. Chocolate cookies, cream cheese, whipped topping, and gummy worms—that’s it. You likely already have most of this in your kitchen.
- Perfect for Halloween Fun : Great for classroom parties, spooky movie nights, or just a cozy treat after a long day of trick-or-treating.
- Crowd-Pleaser : Always gets rave reviews from kids and adults alike. I’ve watched grown adults giggle when they see the gummy worm peeking out.
- Unbelievably Delicious : The creamy, chocolatey texture with that chewy gummy worm surprise is next-level comfort food.
What makes this cozy Halloween dirt cups with gummy worms different from the rest is the texture. Most recipes use instant pudding, which can get grainy or weird. I use a cream cheese and whipped topping base that stays silky smooth. Plus, I add a tiny pinch of salt to the cookie crumbs that balances the sweetness perfectly. This isn’t just another version—it’s your best version.
This recipe is the kind that makes you close your eyes after the first bite. It’s comfort food reimagined—easier, faster, but with the same soul-soothing satisfaction. Perfect for impressing guests without stress, or turning a simple Halloween evening into something memorable.
What Ingredients You Will Need
This recipe uses simple, wholesome ingredients to deliver that cozy Halloween feeling without any fuss. Most of these are pantry staples, which makes this perfect for last-minute Halloween cravings.
- Chocolate sandwich cookies – 24 cookies (about 2 cups crushed). I recommend Oreos for the best flavor and texture. You’ll crush them finely to create the “dirt” layer.
- Cream cheese – 8 ounces, softened to room temperature. This gives the filling that rich, creamy texture. Full-fat works best here.
- Powdered sugar – 1/2 cup, sifted if lumpy. Adds sweetness without grittiness.
- Vanilla extract – 1 teaspoon. Use pure vanilla if you have it—it makes a difference.
- Frozen whipped topping – 8 ounces, thawed. I prefer Cool Whip for stability, but you can whip your own heavy cream if you’re feeling ambitious.
- Milk – 2-3 tablespoons, to adjust consistency. Whole milk works great, but any kind will do.
- Gummy worms – 1 cup (about 12-15 worms). Get the colorful sour ones for extra fun. I like the black and red ones for Halloween vibes.
- Green food coloring – Optional, a few drops for a spooky green tint in the cream layer.
- Chocolate sprinkles – 2 tablespoons, optional for extra texture on top.
For the cream layer, I’ve tested this with both regular and reduced-fat cream cheese. The full-fat version gives a much silkier texture that doesn’t get that weird chalky feeling. If you’re dairy-free, use a vegan cream cheese and coconut whipped topping—just know the texture will be slightly different.
When picking gummy worms, avoid the ones that are too hard or stale. Fresh, soft gummy worms make the experience so much better. I personally love the Trolli brand for their bright colors and chewy texture.
Equipment Needed
You don’t need fancy equipment for this cozy Halloween dirt cups with gummy worms, which is part of the beauty. Here’s what you’ll need:
- Clear plastic cups or small glass jars – 6-8 cups, about 6-8 ounces each. Clear cups let you see those beautiful layers. I use the small plastic cups from the party supply store.
- Food processor or ziplock bag with rolling pin – For crushing cookies. The food processor gives you finer crumbs, but a bag and rolling pin work in a pinch. I’ve done both, and honestly, the bag method is oddly satisfying.
- Electric mixer or whisk – For beating the cream cheese. An electric mixer makes it smooth in seconds; a whisk takes a bit more elbow grease but works fine.
- Mixing bowls – Medium and small sizes.
- Spatula – For scraping every bit of that creamy goodness.
- Measuring cups and spoons – Standard set.
- Small spoon or piping bag – For layering. A spoon works perfectly; a piping bag makes it neater.
Maintenance tip: If you use glass jars, hand wash them gently. The cream cheese can be stubborn, but warm soapy water does the trick. Budget-friendly option: reuse small yogurt or pudding cups instead of buying new ones.
Preparation Method
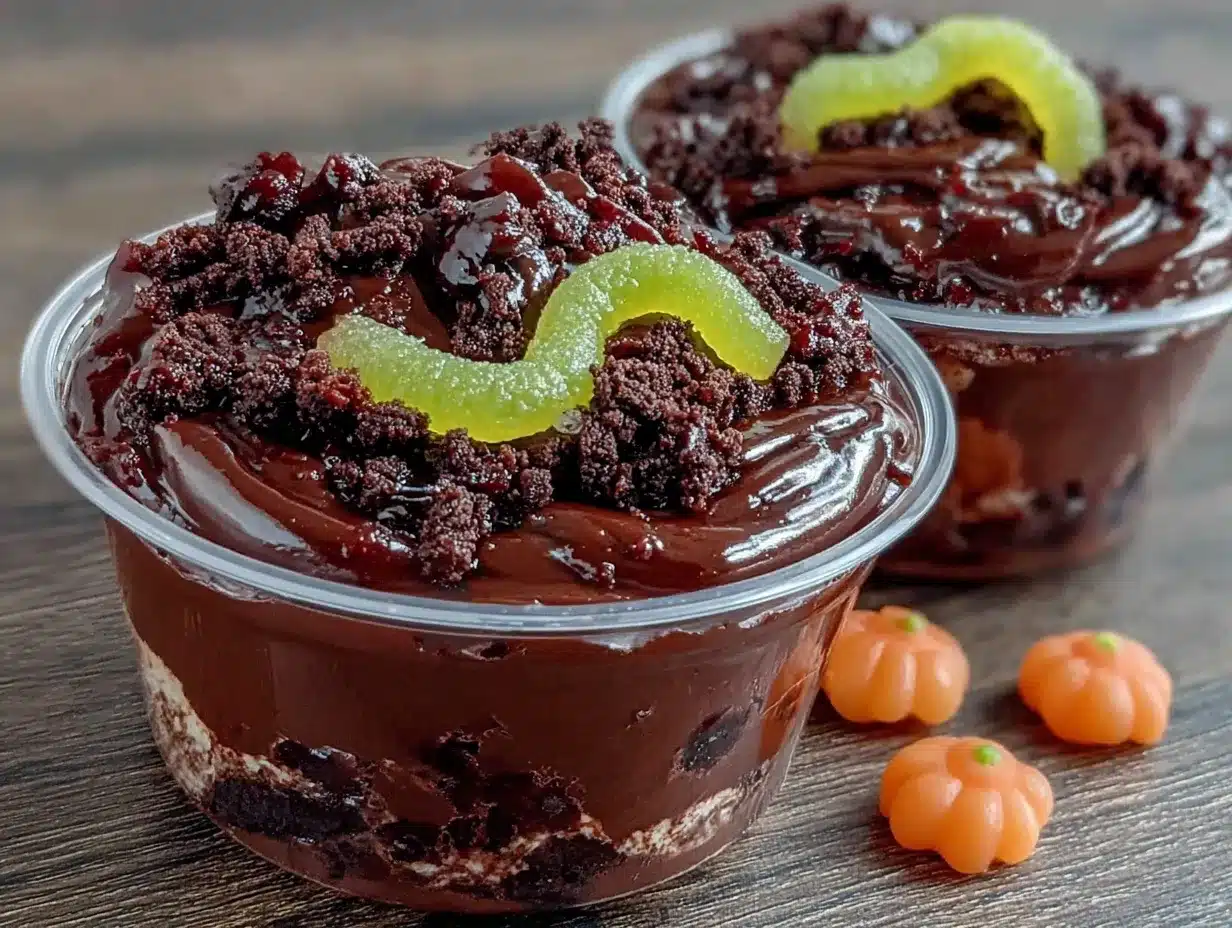
Let me walk you through making these cozy Halloween dirt cups with gummy worms step by step. I’ve made these so many times that I’ve got the process down to a science.
- Crush the cookies – Place 24 chocolate sandwich cookies in a food processor and pulse until you get fine crumbs. You want them to look like dirt—no large chunks. If using a bag, put cookies in a ziplock bag, seal it tight, and crush with a rolling pin. This takes about 3-4 minutes. The crumbs should be uniform and dark brown.
- Set aside the dirt – Transfer the cookie crumbs to a small bowl. Set aside about 1/4 cup for topping later. You’ll use the rest for layering.
- Beat the cream cheese – In a medium mixing bowl, beat 8 ounces of softened cream cheese with an electric mixer on medium speed until smooth and fluffy, about 2 minutes. Scrape down the sides with a spatula.
- Add sugar and vanilla – Add 1/2 cup powdered sugar and 1 teaspoon vanilla extract to the cream cheese. Beat on low speed until combined, then increase to medium for 1 minute until smooth. The mixture should be light and airy.
- Fold in whipped topping – Gently fold in 8 ounces of thawed whipped topping using a spatula. Use a slow, cutting motion—don’t stir vigorously or you’ll deflate the mixture. Fold until no white streaks remain. The texture should be silky and thick.
- Adjust consistency – Add 2-3 tablespoons of milk, one tablespoon at a time, until the mixture is smooth and spreadable. You want it thick enough to hold its shape but soft enough to layer easily. If you’re using green food coloring, add a few drops now and fold gently.
- Prepare the cups – Arrange your 6-8 clear cups on a tray. You’ll want them stable and easy to fill.
- Layer the dirt – Add about 2 tablespoons of cookie crumbs to the bottom of each cup. Press down gently with the back of a spoon to create an even base layer.
- Add the cream layer – Spoon or pipe the cream cheese mixture over the cookie crumbs, filling each cup about halfway. Use the back of a spoon to spread it evenly to the edges.
- Add gummy worms – Place 2-3 gummy worms into the cream layer, pushing them down slightly so they’re partially buried. Let a little bit stick out for that creepy effect.
- Top with more cream – Add another layer of the cream mixture, filling each cup almost to the top. Leave about 1/2 inch of space.
- Finish with dirt – Sprinkle the reserved cookie crumbs over the top of each cup. Cover the cream completely. You want it to look like a little pot of dirt.
- Add final worms – Place one more gummy worm on top of each cup, pushing it in just enough so it looks like it’s crawling out of the dirt.
- Chill before serving – Refrigerate for at least 30 minutes before serving. This helps the layers set and makes the texture perfect. The cups will keep in the fridge for up to 2 days.
Sensory cue: When you press the cookie crumbs, they should feel like fine sand. The cream mixture should smell sweet and vanilla-y. When you’re done, the cups should look like little pots of earth with worms peeking out—deliciously creepy!
Cooking Tips & Techniques
After making these cozy Halloween dirt cups with gummy worms more times than I can count, I’ve picked up some tricks that make the process smoother.
Get the cookie crumbs right – The biggest mistake I made early on was not crushing the cookies finely enough. Big chunks look weird and don’t feel like dirt. Pulse those cookies until they’re practically dust. If you’re using the bag method, really go at it with that rolling pin. Your arm might get tired, but the result is worth it.
Room temperature cream cheese is non-negotiable – I learned this the hard way when I tried to use cold cream cheese straight from the fridge. It clumps up and you get lumpy filling. Let it sit on the counter for 30 minutes before you start. If you’re in a rush, cut it into small cubes and microwave for 10 seconds.
Don’t overmix the whipped topping – When you fold in the whipped topping, be gentle. Overmixing deflates it and your filling becomes dense instead of light and fluffy. I use a folding motion—cut down through the center, scrape along the bottom, and bring it up over the top. Stop as soon as it’s combined.
Layer strategically – Press the first cookie layer down firmly so it doesn’t float up into the cream. Use a spoon to spread the cream to the edges of the cup so you see those beautiful layers through the clear cup.
Timing matters – These taste best after at least 30 minutes in the fridge, but they’re also good right away if you can’t wait. I’ve made them the night before a party and they were perfect the next day.
Keep gummy worms fresh – Stale gummy worms ruin the experience. If your worms are a bit hard, microwave them for 5 seconds to soften them up before adding to the cups.
Variations & Adaptations
One of the best things about this cozy Halloween dirt cups with gummy worms recipe is how adaptable it is. Here are some variations I’ve tried and loved.
Spooky Green Cream – Add green food coloring to the cream mixture for a slime-green layer. It looks extra creepy and kids absolutely love it. I did this for a monster-themed party and the green against the dark brown dirt was striking.
Peanut Butter Cup Version – Swap the chocolate cookies for peanut butter cookies and add a layer of melted peanut butter between the cream and dirt. This is my personal favorite variation—the salty-sweet combo is incredible.
Vegan Option – Use vegan cream cheese, coconut whipped topping, and dairy-free chocolate cookies. I tested this for a friend with dairy allergies and it worked beautifully. The coconut flavor adds a nice twist.
Gluten-Free Version – Use gluten-free chocolate sandwich cookies. Most major brands make a gluten-free version now. The texture is slightly different, but the taste is still amazing.
Extra Spooky Add-Ins – Mix in some crushed candy corn or candy eyeballs into the cream layer for extra Halloween fun. I added orange and black sprinkles once and it looked like a Halloween party in a cup.
Individual vs. Large Format – Instead of individual cups, make one large dish for a party. Layer everything in a 9×9 dish and let people scoop their own. It’s less cute but easier for a crowd.
Serving & Storage Suggestions
These cozy Halloween dirt cups with gummy worms are best served chilled, straight from the fridge. The cold cream contrasts perfectly with the crunchy cookie dirt.
For presentation, arrange the cups on a tray with some fake spider webs or plastic spiders around them. I like to add a few extra gummy worms on the tray for decoration. If you’re serving these at a party, put a small Halloween-themed spoon in each cup.
These pair wonderfully with warm apple cider or a hot chocolate. The cold, creamy dessert against a warm drink is a cozy combination that screams fall. For a grown-up twist, serve with a pumpkin spice latte.
Storage: Keep the cups covered in the refrigerator for up to 2 days. The cookie crumbs will soften over time, which some people actually prefer. If you want to keep the dirt crunchy, store the cookie crumbs separately and add them just before serving.
Freezing: You can freeze these for up to 1 month. Wrap each cup tightly in plastic wrap and then foil. Thaw in the refrigerator overnight. The texture will be slightly different after freezing—the cream becomes a bit icier—but it’s still delicious.
Reheating: Don’t. These are meant to be served cold. If you want a warm dessert, this isn’t the recipe for you.
Flavors develop nicely over time. The cream absorbs some of the chocolate flavor from the cookie crumbs, creating a more unified taste. I actually think they’re better the next day.
Nutritional Information & Benefits
Let’s be real—this is a treat, not a health food. But here’s the breakdown per serving (one cup, about 6 servings):
Estimated per serving: 380 calories, 22g fat, 44g carbohydrates, 5g protein, 28g sugar, 1g fiber.
Health benefits to highlight: The cream cheese provides some calcium and protein. The dark chocolate cookies contain antioxidants from cocoa. Gummy worms? Well, they make you smile, which is good for your mental health.
Dietary considerations: This recipe contains dairy and gluten. For a gluten-free option, use gluten-free cookies. For a dairy-free option, use vegan alternatives. It’s not suitable for vegans in its original form.
Potential allergens: Milk, wheat, soy (in some cookies). Check your ingredient labels carefully.
My personal wellness perspective: I believe in balance. We eat healthy most of the time, and Halloween is a time for fun treats. These dirt cups are a perfect way to celebrate without going overboard. One cup is satisfying and doesn’t leave you feeling overly full or guilty.
Conclusion
This cozy Halloween dirt cups with gummy worms recipe is worth trying because it captures everything I love about Halloween—the fun, the spooky vibes, and the joy of sharing something delicious with people you care about. It started as a mistake, a moment of kitchen chaos, but it turned into a tradition that my family looks forward to every October.
I encourage you to customize this recipe based on your preferences. Use different cookies, add different candies, make it your own. That’s the beauty of simple recipes like this—they’re a canvas for your creativity.
Personally, I love this recipe because it reminds me that perfection is overrated. Some of the best things in life come from happy accidents. So go ahead, make a mess in your kitchen, and enjoy every bite of these spooky, creamy, crunchy treats.
I’d love to hear how yours turn out! Leave a comment below with your favorite variation, or tag me in your photos on social media. Happy Halloween, and happy eating!
Frequently Asked Questions
Can I make these Halloween dirt cups ahead of time?
Absolutely! You can make them up to 2 days in advance. Just keep them covered in the refrigerator. The cookie crumbs will soften slightly, but many people prefer that texture.
Can I use homemade whipped cream instead of Cool Whip?
Yes, you can. Whip 1 cup of heavy cream with 2 tablespoons of powdered sugar until stiff peaks form. The texture will be lighter and less stable, so the cups won’t hold their shape as well after a day.
What if I can’t find gummy worms?
Any gummy candy works! Gummy spiders, gummy bats, or even gummy bears are great substitutes. You can also use candy eyeballs for a fun twist.
How do I keep the cookie crumbs crunchy?
Store the cookie crumbs separately and add them just before serving. Keep the cream-filled cups in the fridge, and sprinkle the dirt on top right before you serve them.
Can I make these in a large dish instead of individual cups?
Definitely! Use a 9×9 baking dish or a trifle bowl. Layer everything the same way, and let people scoop their own portions. It’s less cute but perfect for a crowd.
Pin This Recipe!
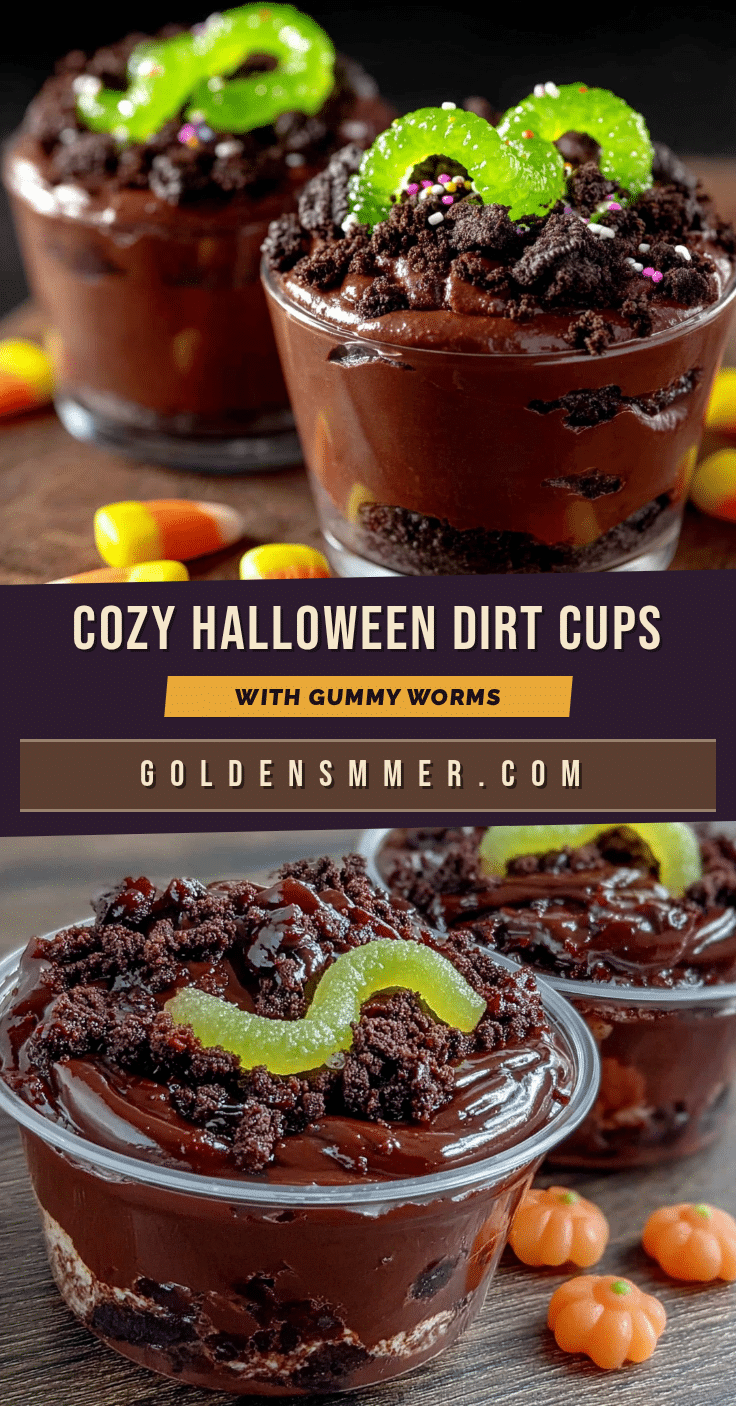
Cozy Halloween Dirt Cups with Gummy Worms
These no-bake Halloween dirt cups feature a creamy, silky filling layered with chocolate cookie crumbs and gummy worms. Perfect for spooky parties or a cozy treat after trick-or-treating.
- Prep Time: 15 minutes
- Cook Time: 0 minutes
- Total Time: 45 minutes (includes 30 minutes chilling)
- Yield: 6-8 servings 1x
- Category: Dessert
- Cuisine: American
Ingredients
- 24 chocolate sandwich cookies (about 2 cups crushed)
- 8 ounces cream cheese, softened
- 1/2 cup powdered sugar, sifted if lumpy
- 1 teaspoon vanilla extract
- 8 ounces frozen whipped topping, thawed
- 2–3 tablespoons milk
- 1 cup gummy worms (about 12–15 worms)
- Green food coloring (optional, a few drops)
- 2 tablespoons chocolate sprinkles (optional)
Instructions
- Crush the cookies: Place 24 chocolate sandwich cookies in a food processor and pulse until you get fine crumbs. If using a bag, put cookies in a ziplock bag, seal it tight, and crush with a rolling pin. Transfer to a small bowl and set aside about 1/4 cup for topping.
- Beat the cream cheese: In a medium mixing bowl, beat 8 ounces of softened cream cheese with an electric mixer on medium speed until smooth and fluffy, about 2 minutes. Scrape down the sides with a spatula.
- Add sugar and vanilla: Add 1/2 cup powdered sugar and 1 teaspoon vanilla extract to the cream cheese. Beat on low speed until combined, then increase to medium for 1 minute until smooth.
- Fold in whipped topping: Gently fold in 8 ounces of thawed whipped topping using a spatula. Fold until no white streaks remain. The texture should be silky and thick.
- Adjust consistency: Add 2-3 tablespoons of milk, one tablespoon at a time, until the mixture is smooth and spreadable. If using green food coloring, add a few drops now and fold gently.
- Prepare the cups: Arrange 6-8 clear cups on a tray.
- Layer the dirt: Add about 2 tablespoons of cookie crumbs to the bottom of each cup. Press down gently with the back of a spoon.
- Add the cream layer: Spoon or pipe the cream cheese mixture over the cookie crumbs, filling each cup about halfway. Spread evenly to the edges.
- Add gummy worms: Place 2-3 gummy worms into the cream layer, pushing them down slightly so they’re partially buried.
- Top with more cream: Add another layer of the cream mixture, filling each cup almost to the top. Leave about 1/2 inch of space.
- Finish with dirt: Sprinkle the reserved cookie crumbs over the top of each cup, covering the cream completely.
- Add final worms: Place one more gummy worm on top of each cup, pushing it in just enough so it looks like it’s crawling out of the dirt.
- Chill before serving: Refrigerate for at least 30 minutes before serving. The cups will keep in the fridge for up to 2 days.
Notes
For best results, use room temperature cream cheese and crush cookies finely. Store cookie crumbs separately if you want them to stay crunchy. These can be made up to 2 days ahead.
Nutrition
- Serving Size: 1 cup
- Calories: 380
- Sugar: 28
- Sodium: 280
- Fat: 22
- Saturated Fat: 12
- Carbohydrates: 44
- Fiber: 1
- Protein: 5
Keywords: Halloween dirt cups, gummy worms, no-bake dessert, Halloween treat, chocolate cream cheese dessert



