Love this? Save it for later!
Share the inspiration with your friends
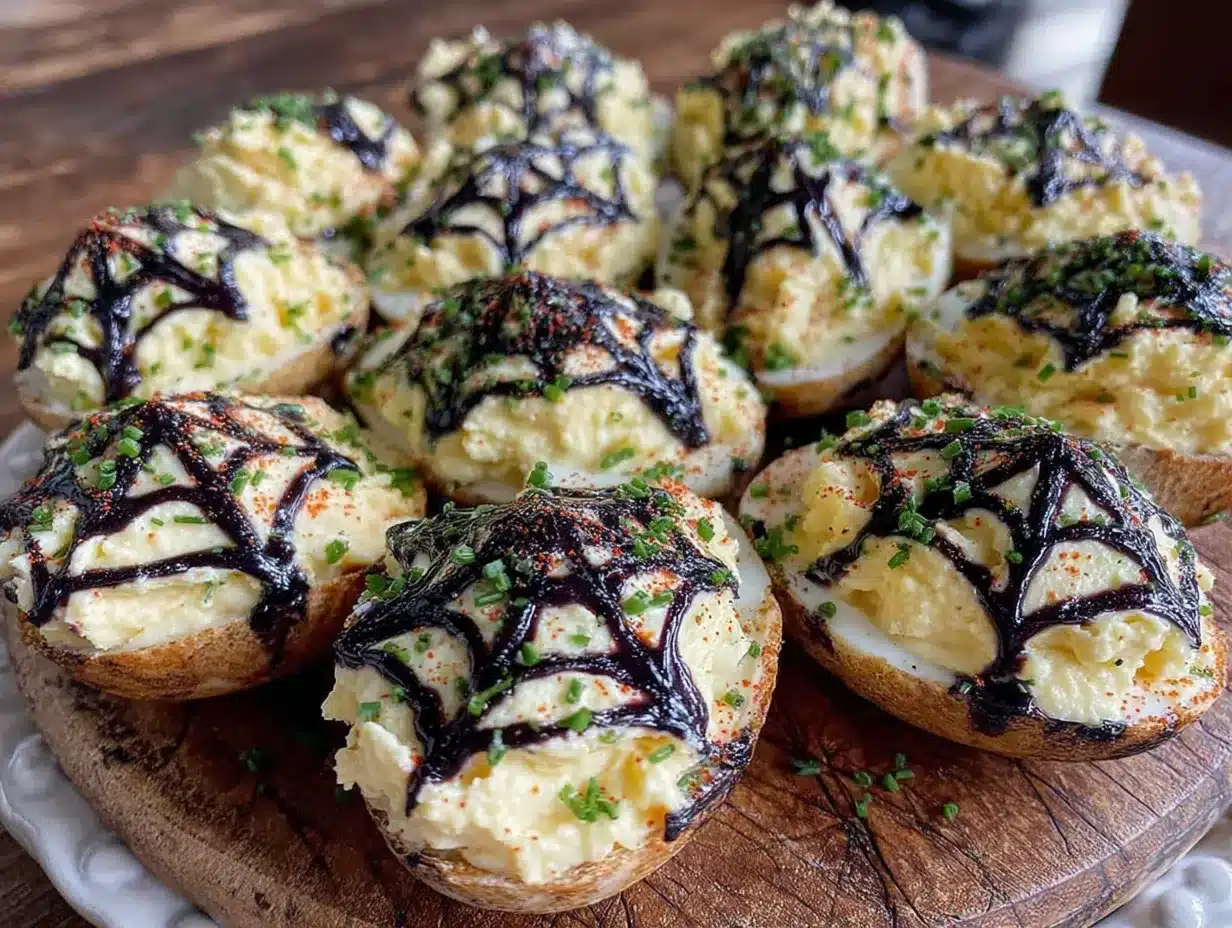
There used to be a tiny, dimly lit café called The Cauldron on a side street in Portland that made the most hauntingly beautiful deviled eggs I’d ever seen. They called them “Ghost Eggs” on the menu, and they had this delicate spiderweb pattern piped right onto the yolk filling. When they closed unexpectedly two Octobers ago, I felt a weird pang of loss—honestly, it sounds dramatic, but those eggs were my secret Halloween tradition. After about seven tries—the first batch looked like a cracked sidewalk—I finally got it. This cozy spiderweb deviled eggs recipe is my little victory lap, and I’m pretty proud of how it turned out.
The trickiest part wasn’t the flavor, which I nailed on attempt three, but the web design itself. I mean, who knew you could pipe a spiderweb with just a squeeze bottle and a toothpick? The first time I tried, I ended up with something that looked more like a tangled slinky than a web. But let me tell you, once you get the hang of it, it’s almost meditative. You sit there, swirling the black sesame paste or black food coloring into the creamy yellow, and it feels like you’re decorating tiny little canvases.
Maybe you’ve been there—looking for an appetizer that’s both spooky and sophisticated, something that says “I love Halloween” without being covered in fake blood. These spiderweb deviled eggs are that dish. They’re perfect for a cozy night in with a scary movie, or for a Halloween party where you want to impress without stress. The first time I served them, my friend Sarah actually gasped. That’s the kind of reaction that makes all those failed attempts worth it.
Why You’ll Love This Recipe
Let’s get real for a second. Halloween appetizers can be a total mess. You’ve got the store-bought stuff that tastes like cardboard, or the creepy finger foods that are more about shock value than actual flavor. These spiderweb deviled eggs are different. They’re the perfect balance of spooky and sophisticated, and honestly, they taste incredible.
- Quick & Easy: You can have these ready in under 30 minutes, which is perfect for those last-minute Halloween cravings or when you’re juggling costume prep.
- Simple Ingredients: No need for a special trip to a fancy grocery store. You probably have everything you need right now, minus maybe some black food coloring or black sesame paste.
- Perfect for Halloween: Whether it’s a cozy night in with a scary movie or a full-blown costume party, these eggs fit right in. They’re spooky but not gory, which makes them great for kids and adults alike.
- Crowd-Pleaser: I’ve served these at three different Halloween gatherings now, and they disappear every single time. People can’t resist the combination of creamy yolk and that cool spiderweb design.
- Unbelievably Delicious: The texture is silky smooth, and the flavor is classic deviled egg perfection—tangy, creamy, and just a little bit rich. The spiderweb design is just the cherry on top.
What makes this recipe different from all the other Halloween deviled eggs out there? It’s the technique. Instead of just sprinkling paprika on top and calling it spooky, you’re actually creating a web pattern that looks like it came from a professional bakery. And the best part? It’s way easier than it looks. I promise, after your first successful web, you’ll feel like a kitchen wizard.
This recipe isn’t just good—it’s the kind that makes you close your eyes after the first bite. It’s comfort food with a Halloween twist, and it has the same soul-soothing satisfaction as the classic version, just with a little more flair. Perfect for impressing guests without the stress, or turning a simple Halloween snack into something memorable.
What Ingredients You Will Need
This recipe uses simple, wholesome ingredients to deliver that classic deviled egg flavor with a spooky twist. Most of these are pantry staples, so you likely have them on hand already.
For the Deviled Eggs
- 6 large eggs (room temperature works best for easy peeling)
- 3 tablespoons mayonnaise (I prefer Hellmann’s or Duke’s for the creamiest texture)
- 1 teaspoon yellow mustard (adds that classic tangy flavor)
- 1/2 teaspoon white vinegar (helps balance the richness)
- Salt and black pepper to taste
- 1/4 teaspoon paprika (for a subtle smoky flavor)
For the Spiderweb Design
- 1-2 tablespoons black food coloring gel (I recommend AmeriColor or Wilton for the best consistency)
- OR 1 tablespoon black sesame paste (for a natural option that adds a nutty flavor)
- 1 toothpick or wooden skewer (for creating the web pattern)
For Garnish
- 1 tablespoon fresh chives, finely chopped (adds a pop of green color)
- Optional: small edible spider decorations (for extra Halloween flair)
- Optional: smoked paprika (for a dusting of color)
A quick note on the black coloring: if you’re using black food coloring gel, start with just a little. A little goes a long way, and you don’t want the yolk filling to taste like chemicals. The black sesame paste is a great alternative if you want a more natural approach—it adds a subtle nuttiness that actually pairs beautifully with the eggs. I’ve tried both, and honestly, I prefer the sesame paste for flavor, but the food coloring gives a more dramatic black color.
For the eggs, look for ones that are at least a week old. Fresh eggs are actually harder to peel, so older eggs are your friend here. If you’re not sure, check the carton date—eggs that are 7-10 days old are perfect for hard boiling.
Equipment Needed
You don’t need any fancy gadgets for this recipe, which is one of the things I love about it. Here’s what you’ll need:
- Medium saucepan (for boiling the eggs)
- Mixing bowl (for the yolk mixture)
- Fork or potato masher (for mashing the yolks)
- Piping bag OR zip-top bag (for filling the eggs—a zip-top bag works just fine)
- Small squeeze bottle or piping tip (for the spiderweb design)
- Toothpick or wooden skewer (for creating the web pattern)
- Sharp knife (for cutting the eggs cleanly)
- Serving platter (a dark one makes the webs pop!)
If you don’t have a piping bag, don’t worry. Just snip a small corner off a zip-top bag and use that. For the spiderweb design, you can also use a small plastic squeeze bottle—the kind you get at craft stores for painting works perfectly. I’ve used both methods, and the squeeze bottle gives you a little more control, but the piping bag works great too.
One tip: keep a damp paper towel nearby. The black coloring can be messy, and having something to wipe your hands on will save your countertops from looking like a crime scene.
Preparation Method
Alright, let’s get to the fun part. Here’s how to make these cozy spiderweb deviled eggs step by step.
Step 1: Hard Boil the Eggs
Place your eggs in a single layer in a medium saucepan. Cover them with cold water by about an inch. Bring the water to a rolling boil over high heat, then cover the pot and remove it from the heat. Let the eggs sit in the hot water for exactly 12 minutes. While they’re sitting, prepare an ice bath in a large bowl. After 12 minutes, transfer the eggs to the ice bath and let them cool for at least 5 minutes. This method gives you perfectly cooked yolks with no green ring, and the ice bath makes them easy to peel. I’ve tried every method out there, and this one never fails me.
Step 2: Peel and Prepare the Eggs
Gently tap each egg on the counter to crack the shell, then roll it between your palms to loosen the shell. Start peeling from the wider end where the air pocket is—this makes it easier. Rinse the peeled eggs under cold water to remove any tiny shell fragments. Pat them dry with a paper towel. Using a sharp knife, slice each egg in half lengthwise. A clean cut is important here because you want nice, smooth surfaces for the spiderweb design.
Step 3: Make the Yolk Filling
Carefully pop the yolks out into a mixing bowl. Arrange the egg white halves on your serving platter. Mash the yolks with a fork until they’re completely crumbly with no large chunks. Add the mayonnaise, yellow mustard, white vinegar, salt, pepper, and paprika. Mix everything together until it’s smooth and creamy. Taste it and adjust the seasoning—I usually add a little more pepper because I like the kick. The filling should be thick enough to hold its shape but soft enough to pipe easily. If it’s too thick, add a tiny splash of vinegar or a little more mayo.
Step 4: Pipe the Filling
Spoon the yolk mixture into your piping bag or zip-top bag. If using a zip-top bag, snip about 1/2 inch off one corner. Pipe the filling into each egg white half, mounding it slightly. You want a nice rounded top that gives you a good surface for the spiderweb. Don’t worry if they’re not all exactly the same—a little variation looks more natural. I usually pipe a little extra into each one because who doesn’t want more filling?
Step 5: Create the Spiderweb Design
Here’s where the magic happens. Mix your black food coloring gel with a tiny drop of water to thin it out slightly. You want it to flow easily but not be watery. Dip your toothpick or skewer into the black mixture. Starting from the center of each filled egg, drag the toothpick outward in a straight line to the edge. Do this 4-6 times around the egg, like drawing spokes on a wheel. Then, using a clean toothpick (or wipe it off), drag it in a curved line connecting the spokes, starting from the center and working your way out. This creates the spiral web effect. It takes a little practice, but after the first two eggs, you’ll get the hang of it. I promise.
Step 6: Garnish and Serve
Sprinkle the chopped chives over the finished eggs for a pop of green. If you’re using edible spider decorations, place one on each egg or on the platter around them. Dust lightly with smoked paprika for extra color. Serve immediately or refrigerate until you’re ready to serve. These can be made up to 4 hours ahead, which is perfect for party prep.
Cooking Tips & Techniques
Let me share some hard-won wisdom from my many attempts at perfecting these spiderweb deviled eggs.
The Perfect Boil: I cannot stress this enough—don’t overcook your eggs. That 12-minute rest method is gold. The first time I made these, I left the eggs on the stove for 15 minutes, and the yolks had that unappealing green ring. Not only did they look sad, but the texture was chalky. Trust the 12-minute rule, and your yolks will be bright yellow and creamy.
Peeling Without Tears: Fresh eggs are the enemy of easy peeling. If you can, buy your eggs a week before you plan to make these. Also, peeling under running water helps wash away tiny shell fragments. I learned this the hard way after finding a crunch in my first batch. Not cute.
The Web Technique: The key to a good spiderweb is not overthinking it. Start with the spokes, then do the curved lines. If you mess up, just wipe the filling off and start over—it’s not wasted because you can mix it back into the bowl. I ruined about six eggs before I got the hang of it, and honestly, the imperfect ones have their own charm.
Multitasking: While the eggs are boiling and then cooling, use that time to prep your other ingredients. Chop the chives, mix the black coloring, and set up your piping bag. This makes the whole process flow much smoother and keeps you from feeling rushed.
Consistency is Key: For the best texture, make sure your mayonnaise is at room temperature. Cold mayo can make the filling seize up and become difficult to pipe. Just let it sit on the counter for 10 minutes while the eggs are boiling.
Variations & Adaptations
One of the best things about this recipe is how easy it is to customize. Here are some variations I’ve tried and loved.
Spicy Halloween Eggs
Add 1/2 teaspoon of sriracha or hot sauce to the yolk mixture for a spicy kick. The heat pairs surprisingly well with the creamy filling. I made these for a friend’s costume party, and they were a hit with the spice lovers.
Smoky Bacon Version
Crumble 2-3 slices of crispy bacon and mix half into the filling. Sprinkle the rest on top before adding the spiderweb design. The smoky flavor adds depth and makes these feel even more indulgent. Plus, bacon makes everything better, right?
Vegetarian-Friendly Option
These are already vegetarian, but if you want to make them vegan, swap the eggs for tofu-based deviled eggs (yes, it’s a thing!) and use vegan mayo. The spiderweb technique works the same way. I tried this for a vegan friend, and while it’s not exactly the same, it’s surprisingly good.
Color Variations
Instead of black spiderwebs, try using purple or orange food coloring for a different Halloween vibe. Purple webs look especially cool against the yellow filling. Or go for a gradient effect by using both colors.
Mini Spiderweb Bites
Use quail eggs instead of chicken eggs for adorable mini versions. They take a little more time to peel, but they’re perfect for cocktail parties. Just adjust the boiling time to 4-5 minutes.
Serving & Storage Suggestions
These spiderweb deviled eggs are best served chilled or at room temperature. I prefer them straight from the fridge because the filling holds its shape better, but they’re delicious either way.
Presentation: Arrange them on a dark-colored platter to make the spiderweb designs really pop. A black slate board or a dark ceramic plate works beautifully. Add some fake spiderwebs around the edges of the platter for extra Halloween flair. I like to scatter a few plastic spiders around too—just make sure they’re not edible!
Complementary Dishes: These eggs pair wonderfully with other Halloween appetizers like mummy hot dogs, pumpkin-shaped cheese balls, or a bowl of warm witch’s brew soup. For drinks, a crisp white wine or a dark stout complements the creamy filling nicely.
Storage: Store any leftovers in an airtight container in the refrigerator for up to 2 days. The spiderweb design will start to blur after about 24 hours, so they look best when served fresh. I don’t recommend freezing these—the texture of the filling changes and becomes watery when thawed.
Reheating: These are served cold, so no reheating needed! Just take them out of the fridge about 15 minutes before serving to take the chill off.
Flavor Development: Interestingly, the flavors actually meld together and get better after a few hours in the fridge. So if you’re making these for a party, preparing them in the morning is a great idea. Just add the spiderweb design right before serving for the best visual effect.
Nutritional Information & Benefits
Let’s talk about what’s actually in these little beauties. Per serving (2 deviled egg halves):
- Calories: Approximately 120-140
- Protein: 7-8 grams
- Fat: 10-11 grams
- Carbohydrates: 1-2 grams
- Fiber: 0 grams
- Sugar: 0.5 grams
Eggs are a fantastic source of high-quality protein and contain essential nutrients like vitamin D, vitamin B12, and choline, which is important for brain health. The mayonnaise adds healthy fats that help keep you full and satisfied. If you use the black sesame paste option for the web design, you’ll also get a boost of healthy fats and minerals like copper and magnesium.
These deviled eggs are naturally gluten-free and low-carb, making them a great option for those following a keto or paleo diet. They’re also relatively low in sugar, which is always a win in my book. Just keep in mind that they are higher in cholesterol, so if you have dietary restrictions around that, you might want to enjoy them in moderation.
From a wellness perspective, I love that these eggs are a protein-packed snack that actually satisfies you. They’re perfect for keeping hunger at bay during a long Halloween party without weighing you down.
Conclusion
These cozy spiderweb deviled eggs are more than just a Halloween appetizer—they’re a little piece of edible art that brings a smile to everyone’s face. I love how they combine the comforting nostalgia of classic deviled eggs with the playful spirit of Halloween. Every time I make them, I think back to that little café in Portland and feel grateful that I kept trying until I got it right.
I encourage you to make these your own. Experiment with different colors, try the bacon version, or go spicy if that’s your thing. The beauty of this recipe is that it’s forgiving and fun. And honestly, even if your first spiderweb looks a little wonky, it’ll still taste amazing.
So go ahead—boil those eggs, pipe those webs, and get ready to impress your Halloween guests. And when you do, come back and tell me about it. I’d love to hear how your spiderwebs turned out, what variations you tried, and whether anyone gasped when they saw them. Happy Halloween, and happy cooking!
Frequently Asked Questions
Can I make these spiderweb deviled eggs ahead of time?
Absolutely! You can prepare the deviled eggs (without the spiderweb design) up to 24 hours in advance. Store them in an airtight container in the refrigerator. Add the spiderweb design about 1-2 hours before serving for the best visual effect. The design will start to blur after about 24 hours, so fresh is best.
What can I use instead of black food coloring?
Black sesame paste is a fantastic natural alternative. It gives a slightly grayish-black color and adds a subtle nutty flavor that pairs beautifully with the eggs. You can also use squid ink if you’re feeling adventurous, though it has a stronger flavor. For a non-food option, you can skip the web design altogether and just dust the eggs with black salt or activated charcoal powder mixed with a little water.
My spiderweb design keeps smudging. What am I doing wrong?
This usually happens if the black coloring is too thin or if you’re pressing too hard with the toothpick. Try thickening the black mixture slightly by adding a tiny bit more food coloring gel. Also, make sure your toothpick is clean before you start the curved lines. I find that using a very light touch and working quickly gives the best results.
Can I use a different piping method for the filling?
Of course! If you don’t have a piping bag, a zip-top bag with the corner snipped off works perfectly. You can also use a small spoon to fill the eggs, though it won’t look as smooth. For a more professional look, use a piping bag with a star tip to create a ridged effect on the filling before adding the spiderweb.
How do I get perfectly peeled hard-boiled eggs every time?
The key is using older eggs (7-10 days old) and shocking them in an ice bath immediately after boiling. Start peeling from the wider end where the air pocket is, and peel under running water to help wash away shell fragments. If you’re still struggling, try adding a teaspoon of baking soda to the boiling water—it helps loosen the shells.
Pin This Recipe!

Cozy Spiderweb Deviled Eggs: Best Halloween Appetizer

These hauntingly beautiful deviled eggs feature a delicate spiderweb pattern piped onto creamy yolk filling. Perfect for Halloween parties or a cozy night in, they’re spooky yet sophisticated and taste incredible.
- Prep Time: 15 minutes
- Cook Time: 12 minutes
- Total Time: 27 minutes
- Yield: 6 servings (12 deviled egg halves) 1x
- Category: Appetizer
- Cuisine: American
Ingredients
- 6 large eggs (room temperature)
- 3 tablespoons mayonnaise (Hellmann’s or Duke’s recommended)
- 1 teaspoon yellow mustard
- 1/2 teaspoon white vinegar
- Salt and black pepper to taste
- 1/4 teaspoon paprika
- 1–2 tablespoons black food coloring gel (AmeriColor or Wilton recommended)
- OR 1 tablespoon black sesame paste (natural alternative)
- 1 toothpick or wooden skewer
- 1 tablespoon fresh chives, finely chopped
- Optional: small edible spider decorations
- Optional: smoked paprika for dusting
Instructions
- Hard boil the eggs: Place eggs in a single layer in a medium saucepan. Cover with cold water by about an inch. Bring to a rolling boil over high heat, then cover and remove from heat. Let sit for exactly 12 minutes. Meanwhile, prepare an ice bath. Transfer eggs to ice bath and cool for at least 5 minutes.
- Peel and prepare eggs: Gently tap each egg on the counter to crack the shell, roll between palms to loosen, and peel starting from the wider end. Rinse under cold water and pat dry. Slice each egg in half lengthwise with a sharp knife.
- Make the yolk filling: Pop yolks into a mixing bowl. Arrange egg white halves on a serving platter. Mash yolks with a fork until crumbly. Add mayonnaise, yellow mustard, white vinegar, salt, pepper, and paprika. Mix until smooth and creamy. Adjust seasoning to taste.
- Pipe the filling: Spoon yolk mixture into a piping bag or zip-top bag (snip 1/2 inch off corner if using zip-top). Pipe filling into each egg white half, mounding slightly.
- Create the spiderweb design: Mix black food coloring gel with a tiny drop of water to thin slightly. Dip toothpick into black mixture. Starting from center of each filled egg, drag toothpick outward in straight lines to edge (4-6 spokes). Using a clean toothpick, drag curved lines connecting spokes, starting from center and working outward to create spiral web effect.
- Garnish and serve: Sprinkle chopped chives over finished eggs. Add optional edible spider decorations. Dust lightly with smoked paprika if desired. Serve immediately or refrigerate up to 4 hours.
Notes
Use eggs that are 7-10 days old for easier peeling. The spiderweb design can be made with black food coloring gel or black sesame paste for a natural option. For best visual effect, add the spiderweb design 1-2 hours before serving. Leftovers can be stored in an airtight container in the refrigerator for up to 2 days, but the design will blur after 24 hours.
Nutrition
- Serving Size: 2 deviled egg halves
- Calories: 130
- Sugar: 0.5
- Sodium: 180
- Fat: 10.5
- Saturated Fat: 2.5
- Carbohydrates: 1.5
- Protein: 7.5
Keywords: Halloween deviled eggs, spiderweb deviled eggs, spooky appetizer, Halloween party food, deviled eggs recipe, easy Halloween appetizer



