Easy Spooky Graveyard Dirt Pudding Cups: Best Halloween Treat
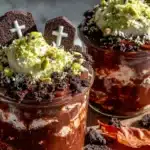
These spooky graveyard dirt pudding cups are a fun, delicious, and ridiculously simple Halloween dessert that looks impressive but takes almost no real effort. Perfect for parties, they feature layers of creamy chocolate pudding, crunchy cookie ‘dirt,’ and gummy worms with tombstones.
- Prep Time: 20 minutes
- Cook Time: 0 minutes
- Total Time: 50 minutes (including 30 minutes chilling)
- Yield: 12 servings 1x
- Category: Dessert
- Cuisine: American
Ingredients
- 2 (3.9-ounce) boxes instant chocolate pudding mix (Jell-O brand recommended)
- 4 cups (960 ml) cold whole milk (2% works too)
- 1/2 teaspoon vanilla extract (optional)
- 1 (14.3-ounce) package chocolate sandwich cookies (like Oreos, about 36 cookies)
- 2 tablespoons unsalted butter, melted
- 1/8 teaspoon salt
- 1 cup gummy worms (Trolli or Black Forest recommended)
- 12 small rectangular cookies (like Milano or Pirouline, for tombstones)
- Black decorating gel or icing pen (for writing ‘RIP’ on tombstones)
- Optional: candy bones, plastic skeletons, or edible eyeballs for extra spookiness
Instructions
- Make the Pudding (5 minutes): In a large bowl, whisk together the instant chocolate pudding mix and cold milk. Whisk vigorously for about 2 minutes, until the mixture thickens. It should look glossy and smooth, with no lumps. Add the vanilla extract and whisk once more. Let it sit for 5 minutes to set slightly.
- Crush the Cookies (5 minutes): While the pudding sets, crush the chocolate sandwich cookies. If using a food processor, pulse until you have a mixture of fine crumbs and small chunks—about 10-12 pulses. If using the bag method, place cookies in a zip-top bag and crush with a rolling pin until you have a mix of textures. Transfer to a bowl and stir in the melted butter and salt until combined. The crumbs should look like damp soil.
- Prepare the Tombstones (10 minutes): While the pudding chills, prepare your tombstones. Using the black decorating gel, write ‘RIP’ on each rectangular cookie. Get creative—some can say ‘BOO’ or have a little skull drawn on them. Let the gel dry for a few minutes while you assemble the cups.
- Layer the Cups (10 minutes): Spoon about 2 tablespoons of the cookie crumbs into the bottom of each cup. This creates the ‘dirt’ base. Gently press down with the back of a spoon to compact it slightly. Next, spoon or pipe the chocolate pudding over the crumbs, filling each cup about halfway. Tap the cups gently on the counter to settle the pudding and remove any air bubbles. Add another layer of cookie crumbs on top of the pudding, leaving about 1/2 inch of space at the top of the cup. This top …
- Decorate the Graveyard (5 minutes): Stick a gummy worm halfway into the pudding at the edge of each cup, so it looks like it’s crawling out of the dirt. Place one or two tombstones in the center of each cup, pressing the bottom gently into the crumbs so they stand upright. Add any extra decorations—candy bones, plastic skeletons, or edible eyeballs—around the tombstones. Scatter a few extra cookie crumbs on top to cover any bare spots.
- Chill Before Serving (30 minutes minimum): Refrigerate the cups for at least 30 minutes before serving. This allows the pudding to fully set and the flavors to meld. The cups can be made up to 24 hours in advance, which is perfect for party prep. Just add the gummy worms and tombstones right before serving to keep them looking fresh.
Notes
Don’t overmix the pudding; whisk just until powder dissolves and mixture thickens (about 2 minutes). Let pudding sit for 5-10 minutes before layering to prevent cookie crumbs from sinking. Use a piping bag for cleaner layers. If tombstones fall over, press them into crumbs at a slight angle or use a dab of frosting as glue. Make extra cookie crumbs for snacking or backup. Store leftovers covered in refrigerator for up to 3 days; cookie crumbs will soften over time. Not recommended for freezing.
Nutrition
- Serving Size: 1 cup
- Calories: 285
- Sugar: 30
- Sodium: 380
- Fat: 12
- Saturated Fat: 5
- Carbohydrates: 42
- Fiber: 2
- Protein: 5
Keywords: Halloween dessert, dirt pudding cups, graveyard pudding, chocolate pudding, easy Halloween treat, spooky dessert, no-bake dessert