Love this? Save it for later!
Share the inspiration with your friends
There used to be this tiny, dimly lit pub in downtown Portland called The Cauldron that made the most incredible Halloween chili. I’m talking about the kind of chili that had people lining up out the door every October, steam fogging up the windows, with these ghoulish breadstick fingers poking out of every bowl. When they closed three years ago — landlord issues, the usual story — I honestly felt a little lost. That first Halloween without their chili felt wrong, like wearing a costume without a party to go to.
After seven tries — seven pots of chili that ranged from “meh” to “my husband politely ate two bowls but said nothing” — I finally cracked it. The secret, let me tell you, isn’t some fancy spice blend you have to order online. It’s about layering flavors in a way that makes the whole thing taste like it simmered all day, even when you’re pulling it together in under an hour. And those breadstick fingers? My first batch looked more like mutant slugs, but I’ve since figured out the trick to making them actually look like something you’d want to eat (and then dip in chili).
This One-Pot Halloween Chili with Breadstick Fingers has become our family’s official Halloween night tradition. My kids fight over who gets the “witch fingernail” breadstick, and I’ve lost count of how many neighbors have texted me for the recipe after our annual block party. Maybe you’ve been there — wanting something festive that actually tastes amazing, not just looks cute for five minutes. This is that recipe. It’s the one that made me stop missing The Cauldron and start looking forward to my own kitchen on Halloween night.
Why You’ll Love This Recipe
Let’s be real for a second. Halloween recipes can be a total letdown. Either they look incredible but taste like cardboard, or they taste great but look like… well, regular food. This One-Pot Halloween Chili with Breadstick Fingers breaks that cycle completely. It’s the dish that gets the double-take at the party and then gets devoured before the punch bowl.
- One-Pot Wonder: Everything comes together in a single pot. Less cleanup means more time for costume contests and carving pumpkins. I mean, who wants to be scrubbing pans when you could be watching Hocus Pocus?
- Spooky Without Being Silly: The breadstick fingers are creepy enough to impress your guests but not so over-the-top that picky eaters refuse to try them. Even my nephew, who once declared all chili “suspicious,” asked for seconds.
- Perfect for a Crowd: This recipe scales beautifully. I’ve made it for our small family dinner and for a party of twenty. Just grab a bigger pot and double everything — the method stays the same.
- Make-Ahead Magic: The chili actually tastes better the next day. Make it a day before your party, store it in the fridge, then reheat and add the breadstick fingers right before serving. Stress-free hosting at its finest.
- Bold, Comforting Flavor: This isn’t watery, disappointing chili. It’s thick, meaty, and packed with smoky, savory depth that makes you close your eyes after the first spoonful. The breadsticks are just the delicious cherry on top.
What makes this recipe different from every other Halloween chili out there? It’s the two-step chili base. Most recipes dump everything in and hope for the best. I’ve learned that browning the meat with the onions until you get those crispy, caramelized bits — that’s where the real flavor lives. Then you deglaze with beer (or broth) and build from there. It’s a small extra step that makes a massive difference.
This is the kind of recipe that makes you look like a Halloween hero without spending all day in the kitchen. Your guests will think you slaved away for hours. You’ll know it only took about an hour. And honestly? That’s a win-win.
Ingredients You Will Need
This recipe uses simple, hearty ingredients that come together to create something truly special. Most of these are probably already in your pantry, which makes this perfect for those last-minute Halloween gatherings.
For the Chili
- 2 pounds ground beef (80/20 blend works best — the fat adds flavor, and you can drain the excess)
- 1 large yellow onion, diced (about 2 cups; sweet or white onion works too)
- 1 red bell pepper, diced (adds color and sweetness; green bell pepper works for a more savory flavor)
- 4 cloves garlic, minced (fresh is non-negotiable here — jarred garlic just doesn’t hit the same)
- 2 tablespoons chili powder (I use McCormick, but any good brand works)
- 1 tablespoon ground cumin (toast it in the pot for 30 seconds before adding liquid — trust me on this)
- 1 teaspoon smoked paprika (this is the secret weapon for that deep, campfire flavor)
- 1/2 teaspoon cayenne pepper (optional, for heat — add more if you like it spicy)
- 1 teaspoon salt (plus more to taste)
- 1/2 teaspoon black pepper
- 1 can (15 ounces) fire-roasted diced tomatoes (fire-roasted makes a difference — regular diced tomatoes work in a pinch)
- 1 can (15 ounces) tomato sauce
- 1 can (15 ounces) kidney beans, drained and rinsed (dark red kidney beans hold their shape best)
- 1 can (15 ounces) black beans, drained and rinsed
- 1 cup beef broth (low-sodium so you control the salt)
- 1/2 cup dark beer (a stout or porter adds incredible depth — use beef broth if you prefer non-alcoholic)
- 1 tablespoon brown sugar (balances the acidity from the tomatoes)
- 1 tablespoon Worcestershire sauce
- 2 tablespoons tomato paste (for thickening and intensifying tomato flavor)
For the Breadstick Fingers
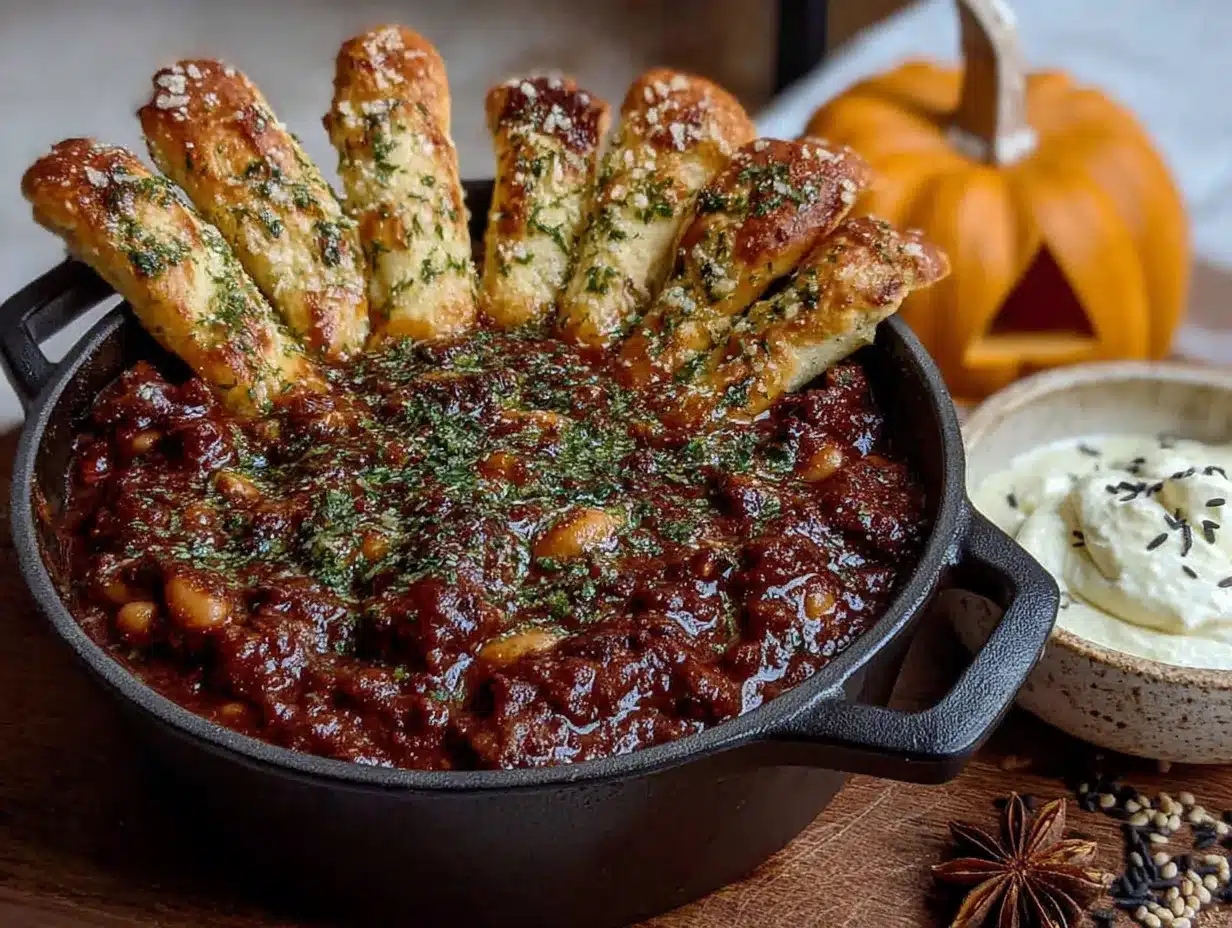
- 1 can (16.3 ounces) refrigerated breadstick dough (Pillsbury Grands! biscuits work too — just roll them into finger shapes)
- 1 egg, beaten (for egg wash — gives them that golden, glossy finish)
- 1 tablespoon sesame seeds (for the “knuckles” — poppy seeds work too)
- 1 tablespoon sliced almonds (for the “fingernails” — you can also use whole almonds cut in half)
- 1/4 cup grated Parmesan cheese (optional, for extra flavor on the breadsticks)
Optional Toppings
- Shredded cheddar cheese
- Sour cream
- Fresh cilantro, chopped
- Diced jalapeños
- Green onions, sliced
Ingredient Substitution Tips: If you’re feeding vegetarians, swap the ground beef for two cans of pinto beans and use vegetable broth instead of beef broth. For a gluten-free version, skip the breadstick fingers and serve with tortilla chips or cornbread. The chili itself is naturally gluten-free as written — just double-check your Worcestershire sauce and broth labels.
Equipment Needed
The beauty of this recipe is that you don’t need any fancy equipment. Here’s what you’ll need:
- Large Dutch oven or heavy-bottomed pot (at least 6 quarts — I use my trusty Lodge enameled cast iron pot, and it’s perfect for this)
- Wooden spoon or spatula (for breaking up the meat and stirring)
- Chef’s knife and cutting board (for dicing onions and peppers)
- Can opener
- Measuring spoons and cups
- Baking sheet (for the breadstick fingers)
- Parchment paper (optional, but makes cleanup much easier)
- Pastry brush (for applying the egg wash — a clean silicone brush works great)
- Small bowl (for beating the egg)
If you don’t have a Dutch oven, any large, heavy pot will work. Just make sure it has a tight-fitting lid. I’ve made this in a stainless steel stockpot before, and it turned out fine — just keep an eye on the bottom to make sure nothing scorches.
Preparation Method
Step 1: Brown the Meat (10 minutes)
Place your Dutch oven over medium-high heat. Add the ground beef and diced onion. Cook, breaking up the meat with your wooden spoon, until the beef is browned and the onions are soft and translucent — about 8 to 10 minutes. Don’t rush this step. Let the meat develop those deep brown bits on the bottom of the pot. That’s where the flavor lives. If there’s excessive fat, drain all but about 2 tablespoons.
Step 2: Build the Flavor Base (5 minutes)
Add the diced red bell pepper and minced garlic to the pot. Cook for 2 minutes, stirring frequently, until the pepper softens and the garlic becomes fragrant. Now add the chili powder, cumin, smoked paprika, cayenne, salt, and black pepper. Stir constantly for about 30 seconds — this toasts the spices and wakes them up. You’ll smell it immediately, that warm, smoky aroma that says “something good is happening.”
Step 3: Deglaze and Simmer (30 minutes)
Pour in the dark beer (or beef broth) and use your wooden spoon to scrape up all those browned bits from the bottom of the pot. This is called deglazing, and it’s the secret to deep, complex flavor. Add the fire-roasted tomatoes, tomato sauce, tomato paste, beef broth, Worcestershire sauce, and brown sugar. Stir everything together until well combined. Bring the chili to a boil, then reduce the heat to low, cover, and let it simmer for 20 minutes. Stir occasionally to prevent sticking.
Step 4: Add the Beans (10 minutes)
After 20 minutes, uncover the pot and stir in the drained kidney beans and black beans. Let everything simmer uncovered for another 10 minutes. This allows the chili to thicken slightly. Taste it and adjust the seasoning — maybe a pinch more salt, maybe a dash more cumin. Trust your taste buds here.
Step 5: Make the Breadstick Fingers (15 minutes)
While the chili simmers, preheat your oven to 375°F (190°C). Line a baking sheet with parchment paper. Open the can of breadstick dough and separate the pieces. Cut each piece in half crosswise — you want pieces about 4 inches long. Roll each piece between your palms to form a finger shape, slightly tapered at one end. Place them on the baking sheet about 2 inches apart. Use a knife to gently score 2 to 3 “knuckle” lines across each finger. Press a sliced almond into the tapered end for the “fingernail.” Brush each finger with the beaten egg and sprinkle with sesame seeds over the knuckle lines. Bake for 10 to 12 minutes, until golden brown and puffed.
Step 6: Serve and Impress (2 minutes)
Ladle the chili into bowls. Gently press 2 to 3 breadstick fingers into each bowl so they’re sticking up like creepy hands reaching out of the chili. Add your favorite toppings — shredded cheese, sour cream, cilantro, whatever makes you happy. Serve immediately while the breadsticks are still warm and crispy.
Cooking Tips & Techniques
I’ve made this One-Pot Halloween Chili more times than I can count, and I’ve learned a few things the hard way. Let me save you some trouble.
Don’t skip the browning step. I know it’s tempting to just dump everything in and save time. I’ve been there. But those browned bits on the bottom of the pot — the fond, if you want to get fancy — are pure flavor. Take the extra 10 minutes. Your chili will thank you.
Toast your spices. This is a game-changer. When you add the chili powder and cumin to the hot pot and stir for 30 seconds, something magical happens. The heat releases the essential oils in the spices, making them exponentially more flavorful. I learned this after making a batch that tasted flat and disappointing. Now I never skip it.
Watch your heat level. The cayenne pepper adds a nice kick, but it can sneak up on you. Start with 1/2 teaspoon and taste before adding more. You can always add heat, but you can’t take it away. Unless you’re feeding spice lovers, in which case go wild.
The breadstick fingers need room to puff. Don’t crowd them on the baking sheet. They expand quite a bit in the oven, and if they’re too close together, they’ll merge into one giant blob. Trust me, I’ve made “breadstick hands” before — not the look you’re going for.
Make the chili ahead of time. This is my number one hosting tip. Make the chili a day or two before your party. Store it in the fridge. The flavors meld and deepen overnight — it truly tastes better the next day. When guests arrive, just reheat the chili and bake the breadsticks. You’ll be relaxed and ready to enjoy the party.
Keep the breadsticks separate until serving. If you stick them in the chili too early, they’ll get soggy. Bake them right before serving, or keep them warm in a low oven until you’re ready to assemble the bowls. Crispy breadsticks are happy breadsticks.
Variations & Adaptations
This recipe is incredibly flexible. Here are some ways to make it your own:
Vegetarian Version
Swap the ground beef for 2 cans of pinto beans (drained and rinsed) and 1 cup of finely chopped mushrooms. The mushrooms add that meaty texture without any actual meat. Use vegetable broth instead of beef broth. Everything else stays the same. My vegetarian sister-in-law requests this every Halloween — she says it’s better than most meat chilis she’s tried.
Extra Spicy Version
For those who like it hot, add 1 diced jalapeño (seeds and all) with the bell pepper. Increase the cayenne to 1 teaspoon. Add 1 tablespoon of hot sauce (I like Cholula) with the tomatoes. Top with fresh jalapeño slices and a drizzle of spicy honey. Warning: this version is not for the faint of heart.
Slow Cooker Version
Brown the meat and onions in a skillet, then transfer everything except the beans to a slow cooker. Cook on low for 6 to 8 hours or on high for 3 to 4 hours. Add the beans in the last 30 minutes. Make the breadstick fingers right before serving. This is perfect for parties — just set out the slow cooker and let guests serve themselves.
White Chicken Chili Twist
Not feeling the traditional red chili? Swap the ground beef for 2 pounds of shredded cooked chicken. Use white beans instead of kidney and black beans. Replace the tomato products with 2 cups of chicken broth and 1 cup of heavy cream. Use white chili seasoning (cumin, oregano, garlic powder). The breadstick fingers work just as well with white chili — they look even creepier against the pale background.
Smoky Chipotle Version
Add 2 chipotle peppers in adobo sauce (minced) along with the tomatoes. This adds a deep, smoky heat that’s absolutely addictive. Reduce the cayenne to 1/4 teaspoon since chipotles bring plenty of heat. This version is my personal favorite — it reminds me of the chili at The Cauldron.
Serving & Storage Suggestions
This One-Pot Halloween Chili is meant to be the star of your Halloween spread. Here’s how to serve it like a pro:
Presentation Tips: Serve the chili in deep, wide bowls so the breadstick fingers have room to stand up. Arrange them so they look like hands reaching up from the depths — the creepier, the better. Set up a topping bar with shredded cheese, sour cream, diced onions, and jalapeños so guests can customize their bowls. For extra spooky vibes, serve the chili in hollowed-out mini pumpkins or black cauldron-shaped bowls.
What to Serve Alongside: This chili is a meal on its own, but it pairs beautifully with a simple green salad dressed with lime vinaigrette. For drinks, serve dark beer (a stout or porter complements the smoky flavors perfectly) or apple cider for the kids. Cornbread muffins are always a hit — they’re perfect for sopping up the last bits of chili from the bowl.
Storage Instructions: The chili keeps beautifully in the refrigerator for up to 5 days. Store it in an airtight container. The flavor actually improves over the first 2 to 3 days as the spices meld together. The breadstick fingers are best eaten the same day — they lose their crispiness overnight. If you have leftover breadsticks, store them in a paper bag at room temperature and reheat in a 350°F oven for 5 minutes.
Freezing Instructions: This chili freezes like a dream. Let it cool completely, then transfer to freezer-safe containers or zip-top bags. It will keep for up to 3 months. Thaw overnight in the refrigerator and reheat on the stovetop or in the microwave. Do not freeze the breadstick fingers — they’ll turn into sad, soggy messes.
Reheating Tips: Reheat the chili on the stovetop over medium-low heat, stirring occasionally. Add a splash of beef broth or water if it’s too thick. You can also microwave individual portions in 30-second bursts, stirring between each. The chili reheats beautifully — it’s one of those rare dishes that tastes even better the next day.
Nutritional Information & Benefits
Here’s the approximate nutritional breakdown for one serving of chili (about 1.5 cups, without toppings or breadsticks):
- Calories: 420
- Protein: 32g
- Fat: 18g
- Carbohydrates: 32g
- Fiber: 10g
- Sugar: 8g
- Sodium: 890mg
This chili is packed with protein from the beef and beans, which keeps you full and satisfied. The beans are an excellent source of fiber — 10 grams per serving is no joke. Fiber helps with digestion and keeps your blood sugar stable. The bell peppers and tomatoes provide a healthy dose of vitamin C and antioxidants. And the cumin and chili powder have anti-inflammatory properties. So yes, this Halloween treat is actually pretty good for you — at least until you add the cheese and sour cream.
Dietary Considerations: This recipe is naturally gluten-free (just double-check your Worcestershire sauce and broth). It’s also dairy-free as written. To make it lower in sodium, use low-sodium broth and canned tomatoes, and skip the added salt until the end. For a lower-carb version, skip the beans and add extra ground beef and bell peppers.
Conclusion
This One-Pot Halloween Chili with Breadstick Fingers has become more than just a recipe in my house — it’s a tradition. Every October 31st, the pot goes on the stove, the breadsticks go in the oven, and my family gathers around the table, laughing at each other’s costumes and dipping those creepy fingers into the best chili we’ve ever had. It’s messy, it’s fun, and it’s absolutely delicious.
I hope this recipe becomes a tradition in your home too. Don’t be afraid to make it your own — add more spice, swap in different beans, or get creative with the breadstick shapes. That’s the beauty of cooking. The recipe is just a starting point. What you do with it is what makes it special.
If you make this One-Pot Halloween Chili with Breadstick Fingers, I’d love to hear about it. Drop a comment below and tell me how it turned out. Did your kids love the breadstick fingers? Did your guests ask for the recipe? Did you add your own twist? Share your Halloween chili stories — I read every single comment, and they honestly make my day.
Now go get that pot on the stove. Halloween is calling, and this chili is ready to steal the show.
Frequently Asked Questions
Can I make this chili in an Instant Pot?
Absolutely! Use the sauté function to brown the meat and onions, then add all the remaining ingredients except the beans. Pressure cook on high for 15 minutes, then quick release. Stir in the beans and let sit for 5 minutes before serving. Make the breadstick fingers in the oven while the chili cooks.
How do I make the breadstick fingers look more realistic?
For extra creepy fingers, add a small slit at the “knuckles” before baking — this creates more defined joints. You can also use a tiny bit of red food coloring mixed with water to paint “blood” around the fingernails after baking. Just don’t go overboard — you want them spooky, not scary.
Can I use ground turkey instead of beef?
Yes, but ground turkey is leaner and can result in drier chili. Add an extra tablespoon of olive oil when browning the meat, and consider using dark meat ground turkey for more flavor. You might also want to add a splash more broth to compensate for the reduced fat.
How can I thicken the chili if it’s too thin?
If your chili is too thin, mash some of the beans against the side of the pot with a fork — this releases their starches and naturally thickens the chili. You can also simmer it uncovered for an extra 10 to 15 minutes. As a last resort, mix 1 tablespoon of cornstarch with 2 tablespoons of cold water and stir it in.
Can I prepare the breadstick dough ahead of time?
You can shape the breadstick fingers up to 2 hours ahead of time and keep them covered on the baking sheet in the refrigerator. Brush with egg wash and bake just before serving. Any longer than that and the dough might become too sticky to work with.
Pin This Recipe!

One-Pot Halloween Chili with Breadstick Fingers

A thick, meaty chili with smoky depth, served with creepy breadstick fingers that look like hands reaching out of the bowl. Perfect for Halloween parties and family dinners.
- Prep Time: 15 minutes
- Cook Time: 45 minutes
- Total Time: 1 hour
- Yield: 8 servings 1x
- Category: Main Course
- Cuisine: American
Ingredients
- 2 pounds ground beef (80/20 blend)
- 1 large yellow onion, diced (about 2 cups)
- 1 red bell pepper, diced
- 4 cloves garlic, minced
- 2 tablespoons chili powder
- 1 tablespoon ground cumin
- 1 teaspoon smoked paprika
- 1/2 teaspoon cayenne pepper (optional)
- 1 teaspoon salt
- 1/2 teaspoon black pepper
- 1 can (15 ounces) fire-roasted diced tomatoes
- 1 can (15 ounces) tomato sauce
- 1 can (15 ounces) kidney beans, drained and rinsed
- 1 can (15 ounces) black beans, drained and rinsed
- 1 cup beef broth (low-sodium)
- 1/2 cup dark beer (stout or porter, or beef broth)
- 1 tablespoon brown sugar
- 1 tablespoon Worcestershire sauce
- 2 tablespoons tomato paste
- 1 can (16.3 ounces) refrigerated breadstick dough
- 1 egg, beaten
- 1 tablespoon sesame seeds
- 1 tablespoon sliced almonds
- 1/4 cup grated Parmesan cheese (optional)
Instructions
- Brown the meat: Place a large Dutch oven over medium-high heat. Add ground beef and diced onion. Cook, breaking up the meat, until browned and onions are soft (8-10 minutes). Drain excess fat, leaving about 2 tablespoons.
- Build the flavor base: Add diced red bell pepper and minced garlic. Cook 2 minutes until pepper softens. Add chili powder, cumin, smoked paprika, cayenne, salt, and black pepper. Stir constantly for 30 seconds to toast spices.
- Deglaze and simmer: Pour in dark beer (or broth) and scrape up browned bits from pot bottom. Add fire-roasted tomatoes, tomato sauce, tomato paste, beef broth, Worcestershire sauce, and brown sugar. Stir well. Bring to a boil, then reduce heat to low, cover, and simmer 20 minutes, stirring occasionally.
- Add the beans: Uncover and stir in drained kidney beans and black beans. Simmer uncovered 10 minutes to thicken. Taste and adjust seasoning.
- Make the breadstick fingers: Preheat oven to 375°F (190°C). Line a baking sheet with parchment paper. Separate breadstick dough pieces and cut each in half crosswise (about 4 inches long). Roll each piece into a finger shape, slightly tapered at one end. Place on baking sheet 2 inches apart. Score 2-3 knuckle lines on each finger. Press a sliced almond into the tapered end for fingernail. Brush with beaten egg and sprinkle sesame seeds over knuckle lines. Bake 10-12 minutes until golden brown an…
- Serve: Ladle chili into bowls. Press 2-3 breadstick fingers into each bowl so they stand up. Add desired toppings (shredded cheddar, sour cream, cilantro, jalapeños, green onions). Serve immediately.
Notes
For best flavor, brown the meat well and toast the spices. The chili tastes even better the next day. Make the breadstick fingers just before serving to keep them crispy. For a vegetarian version, swap ground beef for 2 cans pinto beans and use vegetable broth. For gluten-free, skip breadsticks and serve with tortilla chips or cornbread.
Nutrition
- Serving Size: 1.5 cups chili (with
- Calories: 420
- Sugar: 8
- Sodium: 890
- Fat: 18
- Saturated Fat: 6
- Carbohydrates: 32
- Fiber: 10
- Protein: 32
Keywords: Halloween chili, one-pot chili, breadstick fingers, spooky dinner, easy chili recipe, Halloween party food, ground beef chili, kid-friendly Halloween



