Love this? Save it for later!
Share the inspiration with your friends
The power went out halfway through chopping the onions. Not exactly the start I had planned for Halloween dinner, but honestly, it turned out to be the best thing that could have happened. My neighbor across the hall, a guy named Marco who always has music playing, knocked on my door with a flashlight in one hand and a can of black beans in the other. “Figured you might be cooking,” he said, handing me the can. “I’ve got chili on the brain, but my stove is gas and I’m not touching it in the dark.”
I laughed, because here I was with half-chopped vegetables and a suddenly useless electric stove. So we did what any sensible people would do — we dragged my biggest pot out to the hallway where the emergency lights were flickering, and we made chili by flashlight. Marco’s abuela had taught him this particular style of one-pot chili years ago, and he walked me through it while I stirred. It was messy, it was chaotic, and the chili was absolutely incredible. I mean, there’s something about cooking under pressure — literally, when you’re racing against a dead battery — that forces you to stop overthinking and just cook.
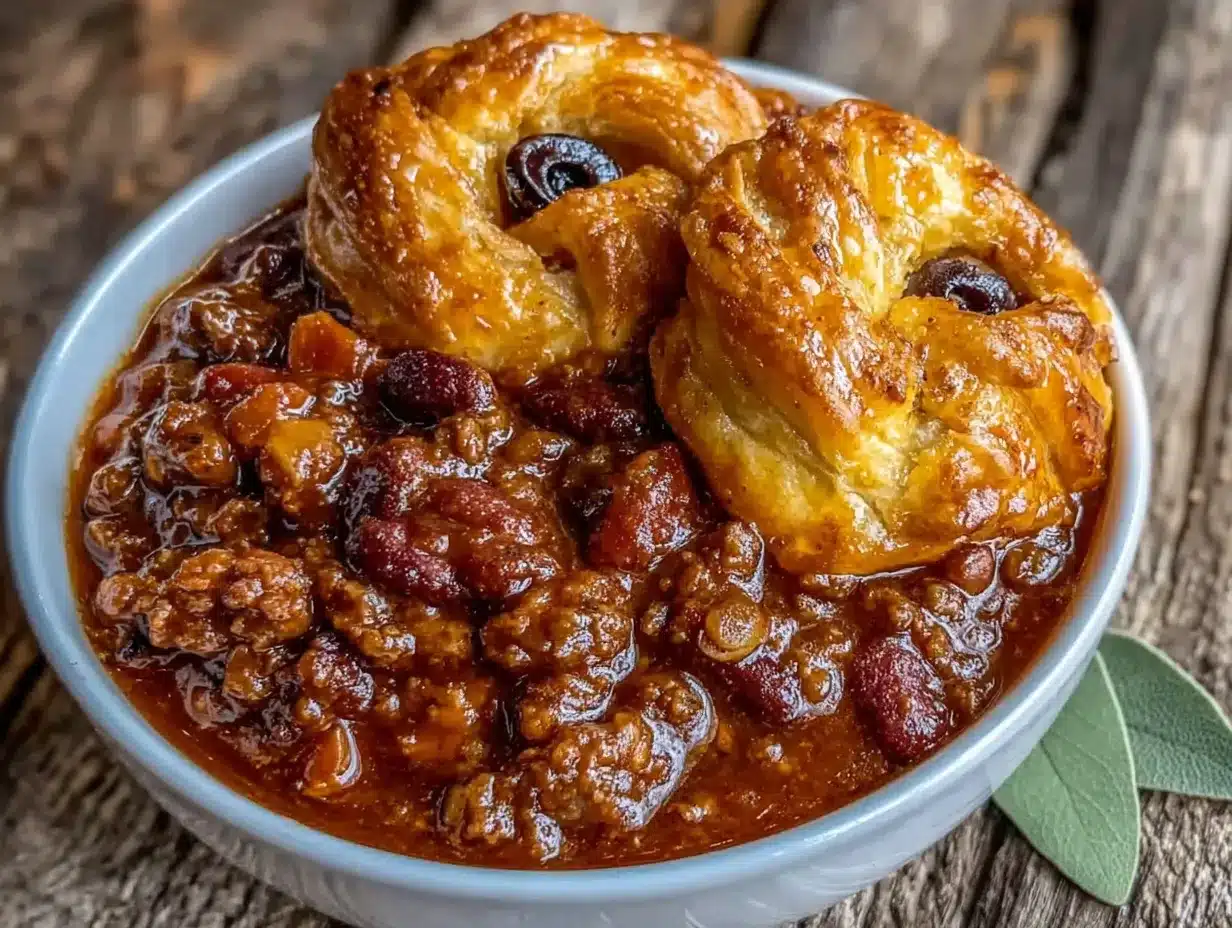
That night birthed what I now call my Spooky One-Pot Mummy Chili. It’s the kind of meal that feels like a Halloween party in a bowl, but comes together in under 30 minutes with zero fuss. You know that feeling when you want something hearty and warming, but you also want to spend your time carving pumpkins or handing out candy instead of scrubbing dishes? This is that recipe. It’s got all the deep, smoky, slightly spicy flavor of a chili that simmered all day, but it’s done before you can say “trick or treat.” And the best part? It’s wrapped up like a mummy — with crescent roll “bandages” draped over the top. I’ve been making this for four Halloweens now, and it never gets old. Every time I pull that pot out of the oven, I think of Marco and his flashlight and the best accidental dinner party I ever had.
Why You’ll Love This Recipe
Let me tell you something — I’ve tested a lot of chili recipes over the years. Some are too watery, some are too spicy, and some just feel like a hassle when you’re trying to enjoy a holiday. This Spooky One-Pot Mummy Chili hits every single note. Here’s why you’re going to want this in your Halloween rotation:
- 30 Minutes Start to Finish: From the moment you start browning the meat to the moment you pull that bubbly, bandage-covered pot out of the oven, it’s half an hour. Perfect for busy Halloween nights when you’re juggling costumes, candy bowls, and excited kids.
- One Pot, Minimal Mess: This is the kind of recipe that makes you feel like a kitchen genius without the cleanup. Everything happens in one oven-safe pot — no extra pans, no multiple bowls, no mountain of dishes.
- Simple Pantry Ingredients: Ground beef, canned tomatoes, beans, chili powder, and a tube of crescent rolls. That’s it. You probably have most of this in your kitchen right now.
- Kid-Approved and Adult-Friendly: The mummy design is pure fun, but the flavor is serious. Smoky, rich, with just enough heat to keep things interesting without sending anyone running for milk.
- Perfect for Halloween Parties: I’ve brought this to potlucks, served it at costume parties, and even made it for a small gathering of friends before heading out for trick-or-treating. It always gets the biggest reaction — and the cleanest pot.
What really sets this apart from other Halloween recipes is the way the crescent roll “bandages” get all golden and flaky on top while the chili underneath stays thick and luscious. It’s not just a gimmick — the bread soaks up just a little bit of that chili goodness, creating these perfect little bites that are part soup, part bread, all delicious. Honestly, I’ve had people tell me they make this in November too, just because it’s that good. The mummy look is just a bonus.
What Ingredients You Will Need
This recipe uses simple, everyday ingredients that come together to create something truly special. No fancy trips to specialty stores, no obscure spices — just good, honest food that works.
- 1 pound ground beef (80/20 works best — the fat adds flavor and keeps the chili moist)
- 1 medium yellow onion, diced (about 1 cup — adds sweetness and depth)
- 3 cloves garlic, minced (fresh is best, but jarred works in a pinch)
- 1 can (15 ounces) black beans, drained and rinsed (I prefer Goya or Bush’s for consistent texture)
- 1 can (15 ounces) kidney beans, drained and rinsed (dark red kidney beans hold their shape better)
- 1 can (15 ounces) diced tomatoes, with juices (fire-roasted if you can find them — adds smoky depth)
- 1 can (8 ounces) tomato sauce (no salt added gives you more control over seasoning)
- 2 tablespoons chili powder (use a good quality one — I like McCormick or Penzeys)
- 1 teaspoon ground cumin (toasty and warm, essential for that chili flavor)
- 1 teaspoon smoked paprika (this is my secret weapon — adds that campfire vibe)
- ½ teaspoon cayenne pepper (optional, for heat — adjust to your tolerance)
- 1 teaspoon salt (plus more to taste)
- ½ teaspoon black pepper
- 1 cup beef broth (low sodium preferred — you can always add more salt later)
- 1 can (8 ounces) refrigerated crescent roll dough (Pillsbury is the classic, but store brands work fine)
- 2 slices provolone or mozzarella cheese (for the mummy eyes — use what you have)
- Olive oil (for sautéing)
Substitution Notes: If you’re looking to switch things up, ground turkey or chicken works beautifully here — just add a tablespoon of oil since they’re leaner. For a vegetarian version, use two cans of black beans and one can of pinto beans, and swap the beef broth for vegetable broth. The crescent roll dough is pretty essential for the mummy look, but if you’re gluten-free, you can skip the bandages and just serve the chili with gluten-free cornbread on the side. I’ve also made this with Beyond Meat crumbles, and honestly, it was fantastic — the spices do all the heavy lifting.
Equipment Needed
You don’t need a fancy kitchen to pull this off, which is part of why I love this recipe so much. Here’s what you’ll need:
- A large oven-safe pot or Dutch oven (I use a 5.5-quart Le Creuset, but any heavy-bottomed pot that can go from stovetop to oven will work — Lodge makes affordable cast iron options)
- A sharp chef’s knife (for dicing the onion and mincing garlic — a dull knife makes everything harder)
- A wooden spoon or spatula (for breaking up the meat and stirring)
- A can opener (obvious, but easy to forget)
- A colander (for rinsing the beans)
- Measuring spoons (for the spices)
- A small bowl (for mixing spices if you want to get organized — optional but helpful)
- A sharp knife or pizza cutter (for cutting the crescent roll dough into strips)
- Oven mitts (the pot gets hot, obviously)
If you don’t have a Dutch oven, you can use a large oven-safe skillet or even a 9×13 baking dish — just cook the chili on the stovetop in a regular pot, then transfer it to the baking dish before adding the crescent roll strips. I’ve done it that way when my Dutch oven was already in use, and it works perfectly. Just make sure whatever you’re using is oven-safe up to 375°F.
Preparation Method
Alright, let’s get cooking. This is straightforward, but I’ll walk you through every step so you feel confident. The whole thing takes about 30 minutes, and most of that is hands-off simmering time.
- Preheat your oven to 375°F (190°C). Get that going first so it’s ready when you need it.
- Heat a drizzle of olive oil in your large oven-safe pot over medium-high heat. You want it shimmering but not smoking — about 2 minutes. Add the diced onion and cook for 3-4 minutes, stirring occasionally, until it’s soft and translucent. It should smell sweet, not burnt. If it starts browning too fast, turn the heat down a notch.
- Add the minced garlic and cook for 30 seconds until fragrant. Garlic burns fast, so keep stirring. You’ll know it’s ready when your kitchen smells like heaven.
- Add the ground beef to the pot. Break it up with your wooden spoon as it cooks. Let it brown for about 5-6 minutes, stirring occasionally. Don’t rush this step — you want real browning, not just gray meat. That browning is where the flavor lives. If there’s excess fat, spoon it out, but leave a little for richness.
- Sprinkle the chili powder, cumin, smoked paprika, cayenne (if using), salt, and pepper over the meat. Stir everything together and let it cook for 1 minute. This toasts the spices and wakes them up — you’ll smell that deep, warm chili aroma immediately.
- Pour in the diced tomatoes (with their juices), tomato sauce, and beef broth. Stir well, scraping up any browned bits from the bottom of the pot. Those bits are pure flavor gold.
- Add the drained black beans and kidney beans. Stir everything together until it’s well combined. Bring the chili to a gentle simmer — you should see small bubbles breaking the surface, not a rolling boil. Reduce the heat to medium-low and let it simmer for 10 minutes, stirring occasionally. The chili will thicken slightly and the flavors will meld together beautifully.
- While the chili simmers, prepare your mummy bandages. Open the tube of crescent roll dough — I know that pop sound is startling, you get used to it. Unroll the dough and separate it along the perforations into 8 triangles. Using a sharp knife or pizza cutter, cut each triangle lengthwise into 3-4 thin strips. You should end up with about 24-32 strips total. They don’t have to be perfect — mummies are supposed to look a little messy.
- After the chili has simmered for 10 minutes, taste it and adjust seasoning. Need more salt? Add it now. Want more heat? A pinch more cayenne. This is your moment to make it yours.
- Remove the pot from the stovetop. Carefully arrange the crescent roll strips over the top of the chili, crisscrossing them to look like mummy bandages. Leave a small gap in the center for the “eyes.” Don’t press the dough into the chili — just lay it gently on top. Some strips will sink a little, that’s fine.
- Cut two small circles from the cheese slices using a bottle cap or small cookie cutter. Place them in the gap you left in the center of the mummy. These are the eyes. For a spookier look, you can add two small olive slices on top of the cheese for pupils, but I usually skip that — the white eyes are creepy enough.
- Place the pot in the preheated oven and bake for 12-15 minutes, until the crescent roll strips are golden brown and puffed, and the chili is bubbling around the edges. Keep an eye on it — ovens vary, and you don’t want the dough to burn.
- Remove from the oven carefully — that pot is hot. Let it rest for 5 minutes before serving. This lets the chili settle and the dough set so it doesn’t slide off when you scoop.
A note on timing: If you’re making this for a Halloween party, you can prepare the chili base up to 2 days ahead. Just cook it through step 7, let it cool, and refrigerate. When you’re ready to serve, reheat it on the stovetop, then add the crescent strips and bake. That way, you’re only doing 15 minutes of work on the day of your party.
Cooking Tips & Techniques
I’ve made this chili more times than I can count, and I’ve learned a few things the hard way. Let me save you some trouble.
Don’t skip browning the meat properly. I know it’s tempting to just cook it until it’s no longer pink, but that deep brown color is where all the flavor comes from. Let it sit in the pan for a minute or two without stirring to get a good sear. The browned bits on the bottom of the pot — called fond — are what make your chili taste like it simmered for hours instead of 30 minutes.
Toast your spices. This is a game-changer. Adding the spices to the hot meat and letting them cook for a minute before adding the liquids wakes up their essential oils. You’ll notice the difference immediately — the chili will smell deeper, warmer, more complex. I learned this trick from a chef friend who said it’s the single most important step in any chili recipe, and she was right.
Watch your dough placement. The first time I made this, I laid the crescent strips on too thick and they didn’t cook through in the center. You want them thin — about half an inch wide — and spaced out so the steam can escape. If they’re too crowded, you’ll end up with a soggy middle. Also, don’t press them into the chili. Just lay them gently on top. They’ll sink a little as they bake, and that’s part of the charm.
One mistake I still make: Forgetting to leave the gap for the eyes. I got so excited about the bandages once that I covered the entire surface, and then I had to poke holes in the dough to add the cheese eyes. It still looked cute, but not as clean. Learn from my forgetfulness.
For the best texture, let the chili simmer uncovered for the full 10 minutes. If you cover it, it stays too watery. You want it thick enough that the crescent strips have something to sit on without sinking completely. If your chili seems too thin after 10 minutes, let it simmer for another 5 — no harm done.
Variations & Adaptations
One of the best things about this recipe is how flexible it is. Here are some ways to make it your own:
- Vegetarian Mummy Chili: Skip the ground beef and use two cans of black beans plus one can of pinto beans. Add an extra tablespoon of chili powder and a teaspoon of smoked paprika to make up for the missing meatiness. I’ve made this version for my vegetarian cousin, and she said it was the best chili she’d ever had — no joke.
- Spicy Mummy Chili: If you like things hot, add a diced jalapeño (seeds and all) when you cook the onion. You can also stir in a tablespoon of chipotle peppers in adobo sauce for that smoky, fiery kick. Just be careful — a little goes a long way.
- White Chicken Mummy Chili: Swap the ground beef for shredded rotisserie chicken, use white beans instead of kidney beans, and replace the tomato sauce with a can of green chiles and a cup of chicken broth. Top with the same crescent bandages — the white-on-white look is actually spookier.
- Slow Cooker Version: Brown the meat and onions on the stovetop, then transfer everything except the crescent dough to a slow cooker. Cook on low for 4-6 hours or high for 2-3 hours. When you’re ready to serve, transfer the chili to an oven-safe dish, add the crescent strips, and bake for 12-15 minutes. This is my go-to for parties when I want the chili ready whenever people show up.
- Gluten-Free Adaptation: Skip the crescent roll bandages entirely and serve the chili with gluten-free cornbread or tortilla chips on the side. You can also make gluten-free dumplings to drop on top — just mix 1 cup gluten-free flour, 1 teaspoon baking powder, ½ teaspoon salt, and enough milk to make a soft dough, then drop spoonfuls onto the simmering chili and cover for 15 minutes.
I personally love the spicy version with an extra kick of chipotle. Something about the smoky heat paired with the sweet, flaky crescent dough is just magical. It’s become my default for Halloween, and my friends now expect it to have a little fire.
Serving & Storage Suggestions
This chili is best served hot, straight from the pot, with the mummy bandages golden and the cheese eyes staring up at you. I like to set the pot right on the table with a big ladle and let everyone serve themselves — it makes for a great centerpiece and keeps the spooky vibe going.
What to serve with it: A simple side salad with a tangy vinaigrette cuts through the richness of the chili beautifully. I also love serving it with tortilla chips for scooping, or a chunk of crusty bread for dipping. For a full Halloween spread, add a platter of caramel apples or pumpkin-shaped sugar cookies for dessert. If you’re serving adults, a dark beer or a smoky mezcal cocktail pairs wonderfully with the chili’s depth.
Storage: Leftover chili (without the crescent bandages) keeps beautifully in an airtight container in the refrigerator for up to 4 days. The flavors actually get better overnight as they meld together. If you have leftovers with the bandages still on, the dough will get soft, but it’s still delicious — just reheat gently.
To reheat: Spoon the chili into a pot and warm it over medium-low heat, stirring occasionally, until bubbling. Add a splash of broth or water if it’s too thick. If you want to keep the bandages intact, reheat individual portions in the microwave for 1-2 minutes — the dough will soften, but it’ll still taste great.
Freezer instructions: This chili freezes like a dream. Let it cool completely, then transfer to freezer-safe containers or bags. It’ll keep for up to 3 months. Thaw overnight in the refrigerator before reheating. For best results, freeze the chili without the crescent bandages and add fresh dough when you’re ready to serve. I always make a double batch and freeze half for a lazy weeknight dinner later.
One note on flavor development: This chili is good the day you make it, but it’s even better the next day. Something about the spices settling and the beans absorbing all that tomato goodness makes it deeper and richer. So if you can, make it a day ahead — your future self will thank you.
Nutritional Information & Benefits
Here’s an approximate nutritional breakdown per serving (based on 6 servings, including the crescent bandages):
| Nutrient | Amount per Serving |
|---|---|
| Calories | 420 |
| Protein | 28g |
| Fat | 18g |
| Saturated Fat | 7g |
| Carbohydrates | 38g |
| Fiber | 10g |
| Sugar | 8g |
| Sodium | 890mg |
This chili is packed with protein and fiber thanks to the beans and beef, making it a satisfying meal that keeps you full for hours. The black beans and kidney beans are excellent sources of plant-based protein and soluble fiber, which supports heart health and stable blood sugar. The tomatoes provide lycopene, a powerful antioxidant linked to reduced inflammation. And the spices — especially cumin and chili powder — have anti-inflammatory properties and aid digestion.
Dietary considerations: This recipe contains gluten (from the crescent rolls) and dairy (from the cheese). For a gluten-free version, skip the crescent dough or use a gluten-free alternative. For a dairy-free version, use dairy-free cheese slices or omit the eyes entirely — the chili itself is naturally dairy-free. If you’re watching your sodium, use no-salt-added canned tomatoes and beans, and go easy on the added salt.
I’m not a nutritionist, but I love that this recipe feels indulgent while still being pretty balanced. It’s the kind of meal that satisfies a craving without leaving you feeling heavy — perfect for a night of running around the neighborhood collecting candy.
Conclusion
This Spooky One-Pot Mummy Chili has become a Halloween tradition in my house, and I hope it becomes one in yours too. It’s got everything you want from a holiday meal — it’s fun, it’s festive, and it’s genuinely delicious. No gimmicks, no complicated techniques, just good food that happens to look like a monster.
The best part? You can customize it however you want. Make it spicy, make it mild, load it up with extra beans, or swap in ground turkey — it’s your mummy, your rules. That’s the beauty of a one-pot recipe like this. It’s forgiving, it’s flexible, and it always delivers.
I’d love to hear how yours turns out. Did your kids love the mummy eyes? Did you add extra spice? Did you forget to leave the gap for the eyes like I did that one time? Drop a comment below and let me know — I read every single one. And if you share a photo on Pinterest or Instagram, tag me so I can see your spooky creation. Nothing makes me happier than seeing this recipe come to life in other kitchens.
Now go make some chili. Halloween won’t wait, and neither should you.
Frequently Asked Questions
Can I make this chili ahead of time?
Absolutely. You can prepare the chili base up to 2 days in advance. Just cook it through step 7, let it cool, and store it in the refrigerator. When you’re ready to serve, reheat it on the stovetop, then add the crescent strips and bake as directed. This is actually my preferred method for parties — it makes the day-of cooking almost effortless.
Can I use ground turkey instead of beef?
Yes, ground turkey works great. Since turkey is leaner, add a tablespoon of olive oil when browning to keep the chili moist. You might also want to add an extra teaspoon of chili powder to boost the flavor, since turkey is milder than beef. I’ve made this swap many times and it’s always delicious.
What if I don’t have an oven-safe pot?
No problem at all. Cook the chili in any large pot on the stovetop. When it’s done, transfer it to a 9×13 baking dish or any oven-safe casserole dish. Then add the crescent strips and bake as directed. The chili might spread out a bit more, but it’ll taste exactly the same.
How do I keep the crescent bandages from getting soggy?
The key is to make sure your chili is thick enough before adding the dough. Let it simmer uncovered for the full 10 minutes so excess liquid evaporates. Also, don’t press the dough into the chili — just lay it gently on top. And make sure your oven is fully preheated to 375°F so the dough cooks quickly and gets golden before it has time to absorb too much moisture.
Can I freeze this chili?
Yes, but freeze the chili without the crescent bandages. The dough doesn’t freeze well and will get mushy when reheated. Let the chili cool completely, then store it in freezer-safe containers for up to 3 months. When you’re ready to serve, thaw overnight in the refrigerator, reheat on the stovetop, and add fresh crescent strips before baking. It’s like having a homemade frozen dinner that’s actually good.
Pin This Recipe!

Spooky One-Pot Mummy Chili: Easy 30-Minute Halloween Dinner

A fun and festive Halloween chili that comes together in under 30 minutes with minimal mess. Ground beef, beans, and smoky spices are simmered together, then topped with crescent roll ‘bandages’ and cheese eyes for a spooky, kid-approved dinner.
- Prep Time: 10 minutes
- Cook Time: 20 minutes
- Total Time: 30 minutes
- Yield: 6 servings 1x
- Category: Main Course
- Cuisine: American
Ingredients
- 1 pound ground beef (80/20)
- 1 medium yellow onion, diced
- 3 cloves garlic, minced
- 1 can (15 ounces) black beans, drained and rinsed
- 1 can (15 ounces) kidney beans, drained and rinsed
- 1 can (15 ounces) diced tomatoes, with juices
- 1 can (8 ounces) tomato sauce
- 2 tablespoons chili powder
- 1 teaspoon ground cumin
- 1 teaspoon smoked paprika
- ½ teaspoon cayenne pepper (optional)
- 1 teaspoon salt
- ½ teaspoon black pepper
- 1 cup beef broth (low sodium)
- 1 can (8 ounces) refrigerated crescent roll dough
- 2 slices provolone or mozzarella cheese
- Olive oil (for sautéing)
Instructions
- Preheat your oven to 375°F (190°C).
- Heat a drizzle of olive oil in a large oven-safe pot over medium-high heat. Add the diced onion and cook for 3-4 minutes until soft and translucent.
- Add the minced garlic and cook for 30 seconds until fragrant.
- Add the ground beef and cook for 5-6 minutes, breaking it up with a spoon, until browned. Spoon off excess fat if desired.
- Sprinkle chili powder, cumin, smoked paprika, cayenne (if using), salt, and pepper over the meat. Stir and cook for 1 minute to toast the spices.
- Pour in the diced tomatoes (with juices), tomato sauce, and beef broth. Stir well, scraping up any browned bits from the bottom.
- Add the drained black beans and kidney beans. Stir to combine. Bring to a gentle simmer, then reduce heat to medium-low and let simmer for 10 minutes, stirring occasionally.
- While chili simmers, open the crescent roll dough and separate into 8 triangles. Cut each triangle lengthwise into 3-4 thin strips to make about 24-32 strips total.
- After 10 minutes, taste the chili and adjust seasoning as needed.
- Remove the pot from the stovetop. Arrange the crescent roll strips over the top of the chili in a crisscross pattern, leaving a small gap in the center for the eyes.
- Cut two small circles from the cheese slices and place them in the gap for the eyes.
- Place the pot in the preheated oven and bake for 12-15 minutes, until the crescent strips are golden brown and the chili is bubbling.
- Remove from the oven and let rest for 5 minutes before serving.
Notes
For best texture, let chili simmer uncovered for full 10 minutes. Don’t press crescent strips into chili; lay them gently on top. Chili base can be made up to 2 days ahead. Freeze chili without crescent bandages for up to 3 months.
Nutrition
- Serving Size: 1 serving (about 1.5
- Calories: 420
- Sugar: 8
- Sodium: 890
- Fat: 18
- Saturated Fat: 7
- Carbohydrates: 38
- Fiber: 10
- Protein: 28
Keywords: Halloween chili, mummy chili, one-pot chili, easy chili, 30-minute chili, spooky dinner, kid-friendly chili



